Looking for the “Designing your vMotion network“? Please follow the link.
Last week VMware vCenter Server™ 5.1.0a was released which contains a bugfix for Essential plus license customers. A few readers provided me feedback about being unable to initiate the new vMotion that migrates both host and datastore state of the virtual machine. Due to the feedback and the filed SRs we got to the bottom of the bug pretty quickly and got the bugfix in this release.
vMotion and Storage vMotion
Unable to access the cross-host Storage vMotion feature from the vSphere Web Client with an Essentials Plus license

If you start the migration wizard for a powered on virtual machine with an Essentials Plus license, the Change both host and datastore option in the migration wizard is disabled, and the following error message is displayed:

Storage vMotion is not licensed on this host.

To perform this migration without a license, power off the virtual machine.

This issue is resolved in this release.
https://www.vmware.com/support/vsphere5/doc/vsphere-vcenter-server-510a-release-notes.html
Thanks for the feedback and above all, thanks for filing the SRs providing us useful data. You can download the update here.
vSphere 5.1 Storage DRS load balancing and SIOC threshold enhancements
Lately I have been receiving questions on best practices and considerations for aligning the Storage DRS latency and Storage IO Control (SIOC) latency, how they are correlated and how to configure them to work optimally together. Let’s start with identifying the purpose of each setting, review the enhancements vSphere 5.1 has introduced and discover the impact when misaligning both thresholds in vSphere 5.0.
Purpose of the SIOC threshold
The main goal of the SIOC latency is to give fair access to the datastores, throttling virtual machine outstanding I/O to the datastores across multiple hosts to keep the measured latency below the threshold.
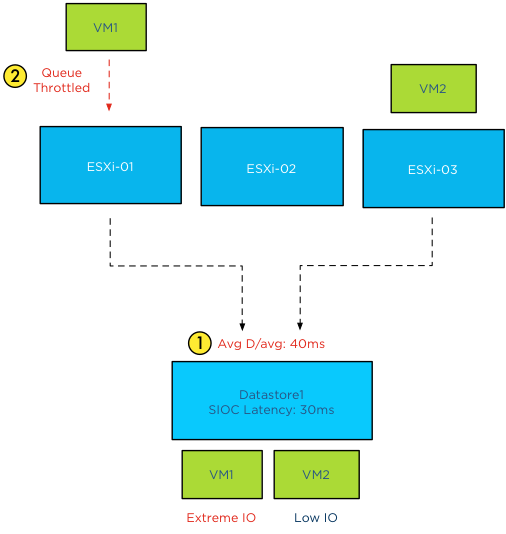
It can have a restrictive effect on the I/O flow of virtual machines.
Purpose of the Storage DRS latency threshold
The Storage DRS latency is a threshold to trigger virtual machine migrations. To be more precise, if the average latency (VMObservedLatency) of the virtual machines on a particular datastore is higher than the Storage DRS threshold, then Storage DRS will mark that datastore as “source” for load balancing migrations. In other words, that datastore provide the candidates (virtual machines) for Storage DRS to move around to solve the imbalance of the datastore cluster.
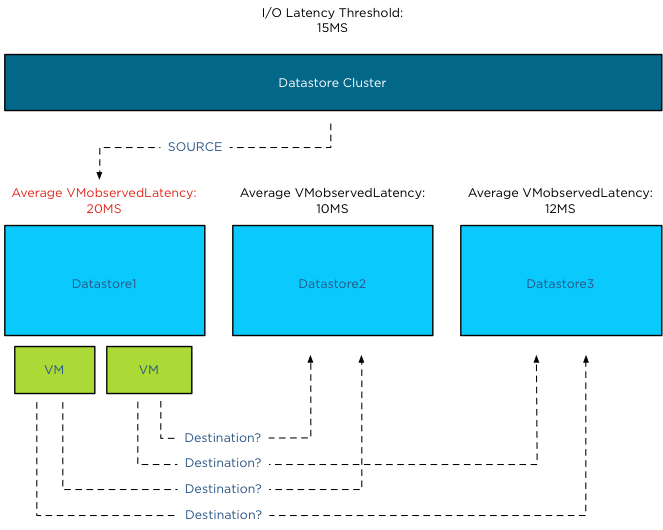
This means that the Storage DRS threshold metric has no “restrictive” access limitations. It does not limit the ability of the virtual machines to send I/O to the datastore. It is just an indicator for Storage DRS which datastore to pick for load balance operations.
SIOC throttling behavior
When the average device latency detected by SIOC is above the threshold, SIOC throttles the outstanding IO of the virtual machines on the hosts connected to that datastore. However due to different number of shares, various IO sizes, random versus sequential workload and the spatial locality of the changed blocks on the array, we are almost certain that no virtual machine will experience the same performance. Some virtual machines will experience a higher latency than other virtual machines running on that datastore. Remember SIOC is driven by shares, not reservations, we cannot guarantee IO slots (reservations). Long story short, when the datastore is experiencing latency, the VMkernel manages the outbound queue, resulting in creating a buildup of I/O somewhere higher up in the stack. As the SIOC latency threshold is the weighted average of D/AVG per host, the weight is the number of IOPS on that host. For more information how SIOC calculates the Device average latency, please read the article: “To which host-level latency statistic is the SIOC congestion threshold related?”
Has SIOC throttling any effect on Storage DRS load balancing?
Depending on which vSphere version you run is the key whether SIOC throttling has impact on Storage DRS load balancing. As stated in the previous paragraph, if SIOC throttles the queues, the virtual machine I/O does not disappear, vSphere always allows the virtual machine to generate I/O to the datastore, it just builds up somewhere higher in the stack between the virtual machine and the HBA queue.
In vSphere 5.0, Storage DRS measures latency by averaging the device latency of the hosts running VMs on that datastore. This is almost the same metric as the SIOC latency. This means that when you set the SIOC latency equal to the Storage DRS latency, the latency will be build up in the stack above the Storage DRS measure point. This means that in worst-case scenario, SIOC throttles the I/O, keeping it above the measure point of Storage DRS, which in turn makes the latency invisible to Storage DRS and therefore does not trigger the load balance operation for that datastore.
Introducing vSphere 5.1 VMObservedLatency
To avoid this scenario Storage DRS in vSphere 5.1 is using the metric VMObservedLatency. This metric measures the round-trip of I/O from the moment the VMkernel receives the I/O (Virtual Machine Monitor) to the datastore and all the way back to the VMM.
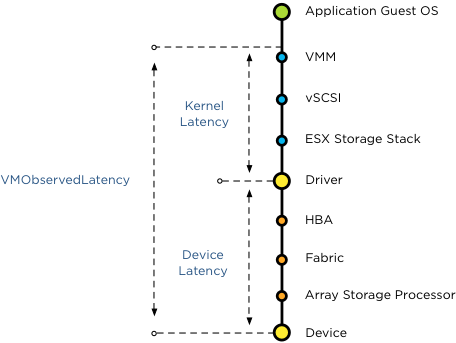
This means that when you set the SIOC latency to a lower threshold than the Storage DRS latency, Storage DRS still observes the latency build up in the kernel layer.
vSphere 5.1 Automatic latency SIOC
To help you avoid building up I/O in the host queue, vSphere 5.1 offers automatic threshold computation for SIOC. SIOC sets the latency to 90% of the throughput level of the device. To determine this, SIOC derives a latency setting after a series of tests, mapping maximum throughput to a latency value. During the tests SIOC detects where the throughput of I/O levels out, while the latency keeps on increasing. To be conservative, SIOC derives a latency value that allows the host to generate up to 90% of the throughput, leaving a burst space of 10%. This provides the best performance of the devices, avoiding unnecessary restrictions by building up latency in the queues. In my opinion, this feature alone warrants the upgrade to vSphere 5.1.
How to set the two thresholds to work optimally together
SIOC in vSphere 5.1 allows the host to go up to 90% of the throughput before adjusting the queue length of each host, and generate queuing in the kernel instead of queuing on the storage array. As Storage DRS uses VMObservedLatency it monitors the complete stack. It observes the overall latency, disregarding the location of the latency in the stack and tries to move VMs to other datastores to level out the overall experienced latency in the datastore cluster. Therefore you do not need to worry about misaligning the SIOC latency and the Storage DRS I/O latency.
If you are running vSphere 5.0 it’s recommended setting the SIOC threshold to a higher value than the Storage DRS I/O latency threshold. Please refer to your storage vendor to receive the accurate SIOC latency threshold.
Get notification of these blogs postings and more DRS and Storage DRS information by following me on Twitter: @frankdenneman
Storage DRS and alternative swap file locations
By default a virtual machine swap file is stored in the working directory of the virtual machine. However, it is possible to configure the hosts in the DRS cluster to place the virtual machine swapfiles on an alternative datastore. A customer asked if he could create a datastore cluster exclusively used for swap files. Although you can use the datastores inside the datastore cluster to store the swap files, Storage DRS does not load balance the swap files inside the datastore cluster in this scenario. Here’s why:
Alternative swap location
This alternative datastore can either be a local datastore or a shared datastore. Please note that placing the swapfile on a non-shared local datastore impacts the vMotion lead-time, as the vMotion process needs to copy the contents of the swap file to the swapfile location of the destination host. However a datastore that is shared by the host inside the DRS cluster can be used, a valid use case is a small pool of SSD drives, providing a platform that reduces the impact of swapping in case of memory contention.
Storage DRS
What about Storage DRS and using alternative swap file locations? By default a swap file is placed in the working directory of a virtual machine. This working directory is “encapsulated” in a DRMdisk. A DRMdisk is the smallest entity Storage DRS can migrate. For example when placing a VM with 3 hard disks in a datastore cluster, Storage DRS creates 4 DRMdisks, one DRMdisk for the working directory and separate DRMdisks for each hard disk.
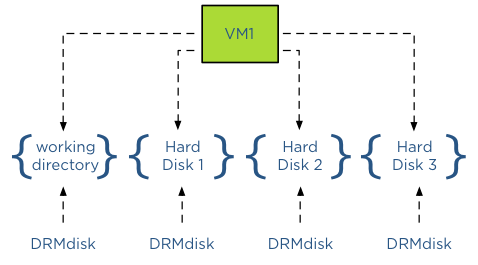
Extracting the swap file out of the working directory DRMdisk
When selecting an alternative location for swap files, vCenter will not place this swap file in the working directory of the virtual machine, in essence extracting it from – or placing it outside – the working directory DRMdisk entity. Therefore Storage DRS will not move the swap file during load balancing operations or maintenance mode operations as it can only move DRMdisks.
Alternative Swap file location a datastore inside a datastore cluster?
Storage DRS does not encapsulate a swap file in its own DRMdisk and therefore it is not recommended to use a datastore that is part of a datastore cluster as a DRS cluster swap file location. As Storage DRS cannot move these files, it can impact load-balancing operations.
The user interface actually reveals the incompatibility of a datastore cluster as a swapfile location because when you configure the alternate swap file location, the user interface only displays datastores and not a datastore cluster entity.
DRS responsibility
Storage DRS can operate with swap files placed on datastores external to the datastore cluster. It will move the DRMdisks of the virtual machines and leave the swap file on its specified location. It is the task of DRS moving the swap file if it’s placed on a non-shared swap file datastore when migrating the compute state between two hosts.
Get notification of these blogs postings and more DRS and Storage DRS information by following me on Twitter: @frankdenneman
Want to have a vSphere 5.1 clustering deepdive book for free?
Want to have a vSphere 5.1 clustering deepdive book for free? CloudPhysics are giving away some vSphere 5.1 clustering deepdive books, do the following if you want to receive a copy:
Action required
- Email info@cloudphysics.com with a subject of “Book”. No message is needed.
- Register at http://www.cloudphysics.com/ by clicking “SIGN UP”.
- Install the CloudPhysics Observer vApp to activate your dashboard.
Eligibility rules
- You are a new CloudPhysics user.
- You fully install the CloudPhysics ‘Observer’ vApp in your vSphere environment.
The first 150 users gets a free book, but what’s even better, the Cloudphysics service gives you great insights on your current environment. For more info read the following blogposts:
CloudPhysics in a nutshell and VM reservations and limits card – a closer look
HA admission control is not a capacity management tool.
I receive a lot of questions on why HA doesn’t work when virtual machines are not configured with VM-level reservations. If no VM-level reservations are used, the cluster will indicate a fail over capacity of 99%, ignoring the CPU and memory configuration of the virtual machines. Usually my reply is that HA admission control is not a capacity management tool and I noticed I have been using this statement more and more lately. As it doesn’t scale well explaining it on a per customer basis, it might be a good idea to write a blog article about it.
The basics
Sometimes it’s better to review the basics again and understand where the perception of HA and the actual intended purpose of the product part ways.
Let’s start of what HA admission control is designed for. In the availability guide the two following statement can be found: Quote 1:
“vCenter Server uses admission control to ensure that sufficient resources are available in a cluster to provide failover protection and to ensure that virtual machine resource reservations are respected.”
Let’s dive in the first quote and especially this statement: “To ensure that sufficient resources are available in a cluster” is the key element, and in particular the word sufficient (resources). What sufficient means for customer A, does not mean sufficient for customer B. As HA does not have an algorithm decoding the meaning of the word sufficient for each customer, HA relies on the customer to set vSphere resource management allocation settings to indicate the importance of resource availability for the virtual machine during resource contention scenarios.
As we are going back to the basics, lets have a quick look at the resource allocation settings that are used in this case, reservations and shares. A reservation indicates the minimum level of resources available to the virtual machine at all times. This reservation guarantees – or protect might be a better word –the availability of physical resources to the virtual machine regardless of the level of contention. No matter how high the contention in the system is, the reservation restricts the VMkernel from reclaiming that particular CPU cycle or memory page.
This means that when a VM is powered on with a reservation, admission control needs to verify if the host can provide these resources at all times. As the VMkernel cannot reclaim those resources, admission control makes sure that when it lets the virtual machine in, it can hold its promise of providing these resources all the time, but also checks if it won’t introduce problems for the VMkernel itself and other virtual machines with a reservation. This is the reason why I like to call admission control the virtual bouncer.
Besides reservation we have shares and shares indicates the relative priority of resource access during contention. A better word to describe this behavior is “opportunistic access”. As the virtual machine is not configured with a reservation, it provides the VMkernel with a more relaxed approach of resource distribution. When resource contention occurs, VMkernel does not need to provide the configured resources all the time, but can distribute the resources based on the activity and the relative priority based on the shares of the virtual machines requesting the resources. Virtual machines configured only with shares will just receive what they can get; there is no restrictive setting for the VMkernel to worry about when running out of resources. Basically the virtual machines will just get what’s left.
In the case of shares, it’s the VMkernel that decides which VM gets how many resources in a relaxed and very social way, where virtual machines configured with a reservation DEMAND to have the reservations available at all times and do not care about the needs of others.
In other words, the VMkernel MUST provide the resources to the virtual machine with reservation first and then divvy up the rest amongst the virtual machines who opted for a opportunistic distribution (shares).
How does this tie in with HA admission control?
The second quote gives us this insight:
“vSphere HA: Ensures that sufficient resources in the cluster are reserved for virtual machine recovery in the event of host failure.”
We know that admission control checks if there is enough resources are available to satisfy the VM-level reservation without interfering with VMkernel operations or VM-level reservations of other virtual machines running on that host. As HA is designed to provide an automated method of host failure recovery, we need to make sure that once a virtual machine is up and running it can continue to run on another host in the cluster if the current hosts fails. Therefor the purpose of HA admission control is to regulate and check if there are enough resources available in the cluster that can satisfy the virtual machine level reservations after a host failure occurs.
Depending on the admission control policy it calculates the capacity required for a failover based on available resources and still comply with the VMkernel resource management rules. Therefor it only needs to look at VM-level reservations, as shares will follow the opportunistic access method.
Semantics of sufficient resources while using shares-only design
In essence, HA will rely on you to determine if the virtual machine will receive the resources you think are sufficient if you use shares. The VMkernel is designed to allow for memory overcommitment while providing performance. HA is just the virtual bouncer that counts the number of heads before it lets the virtual machine in “the club”. If you are on the list for a table, it will get you that table, if you don’t have a reservation HA does not care if you decide to need to sit at a 4-person table with 10 other people fighting for your drinks and food. HA relies on the waiters (resource management) to get you (enough) food as quickly as possible. If you wanted to have a good service and some room at your table, it’s up to you to reserve.
Get notification of these blogs postings and more DRS and Storage DRS information by following me on Twitter: @frankdenneman