Home labs are interesting beasts, at one hand you would love to have all the compute, storage and network power available, on the other hand you do not want to have a power bill similar to a Google data center.
I have a decent setup, with 4 Xeon servers, two cisco 1GB switches, a 10Gb switch and 3 Synology’s, but I don’t keep everything on all the time. One server acts as the management server, running a Windows DC, vCenter appliance, the PernixMS server and some other stuff. These machines are always on, not only to save time when I want to use my lab but increased stability as well. Due to this, my network gear and storage systems are also on. Which made me wonder how much the need for availability and stability will cost me on a yearly basis. The big Xeon rigs equipped with multiple PCIe devices are usually shut down after tests because I expect them to consume lots of power. Time to stop guessing and start monitoring. As always Home Lab Sensei Erik Bussink pointed me out to a simple solution the Smart Plug Edimax SP-2101W Smart Plug Switch. Please leave a comment if you are using a different solution that is a better alternative to this device.
The device
Nothing much to add about the device itself, it is sleek enough so it will not eat up multiple power outlets.
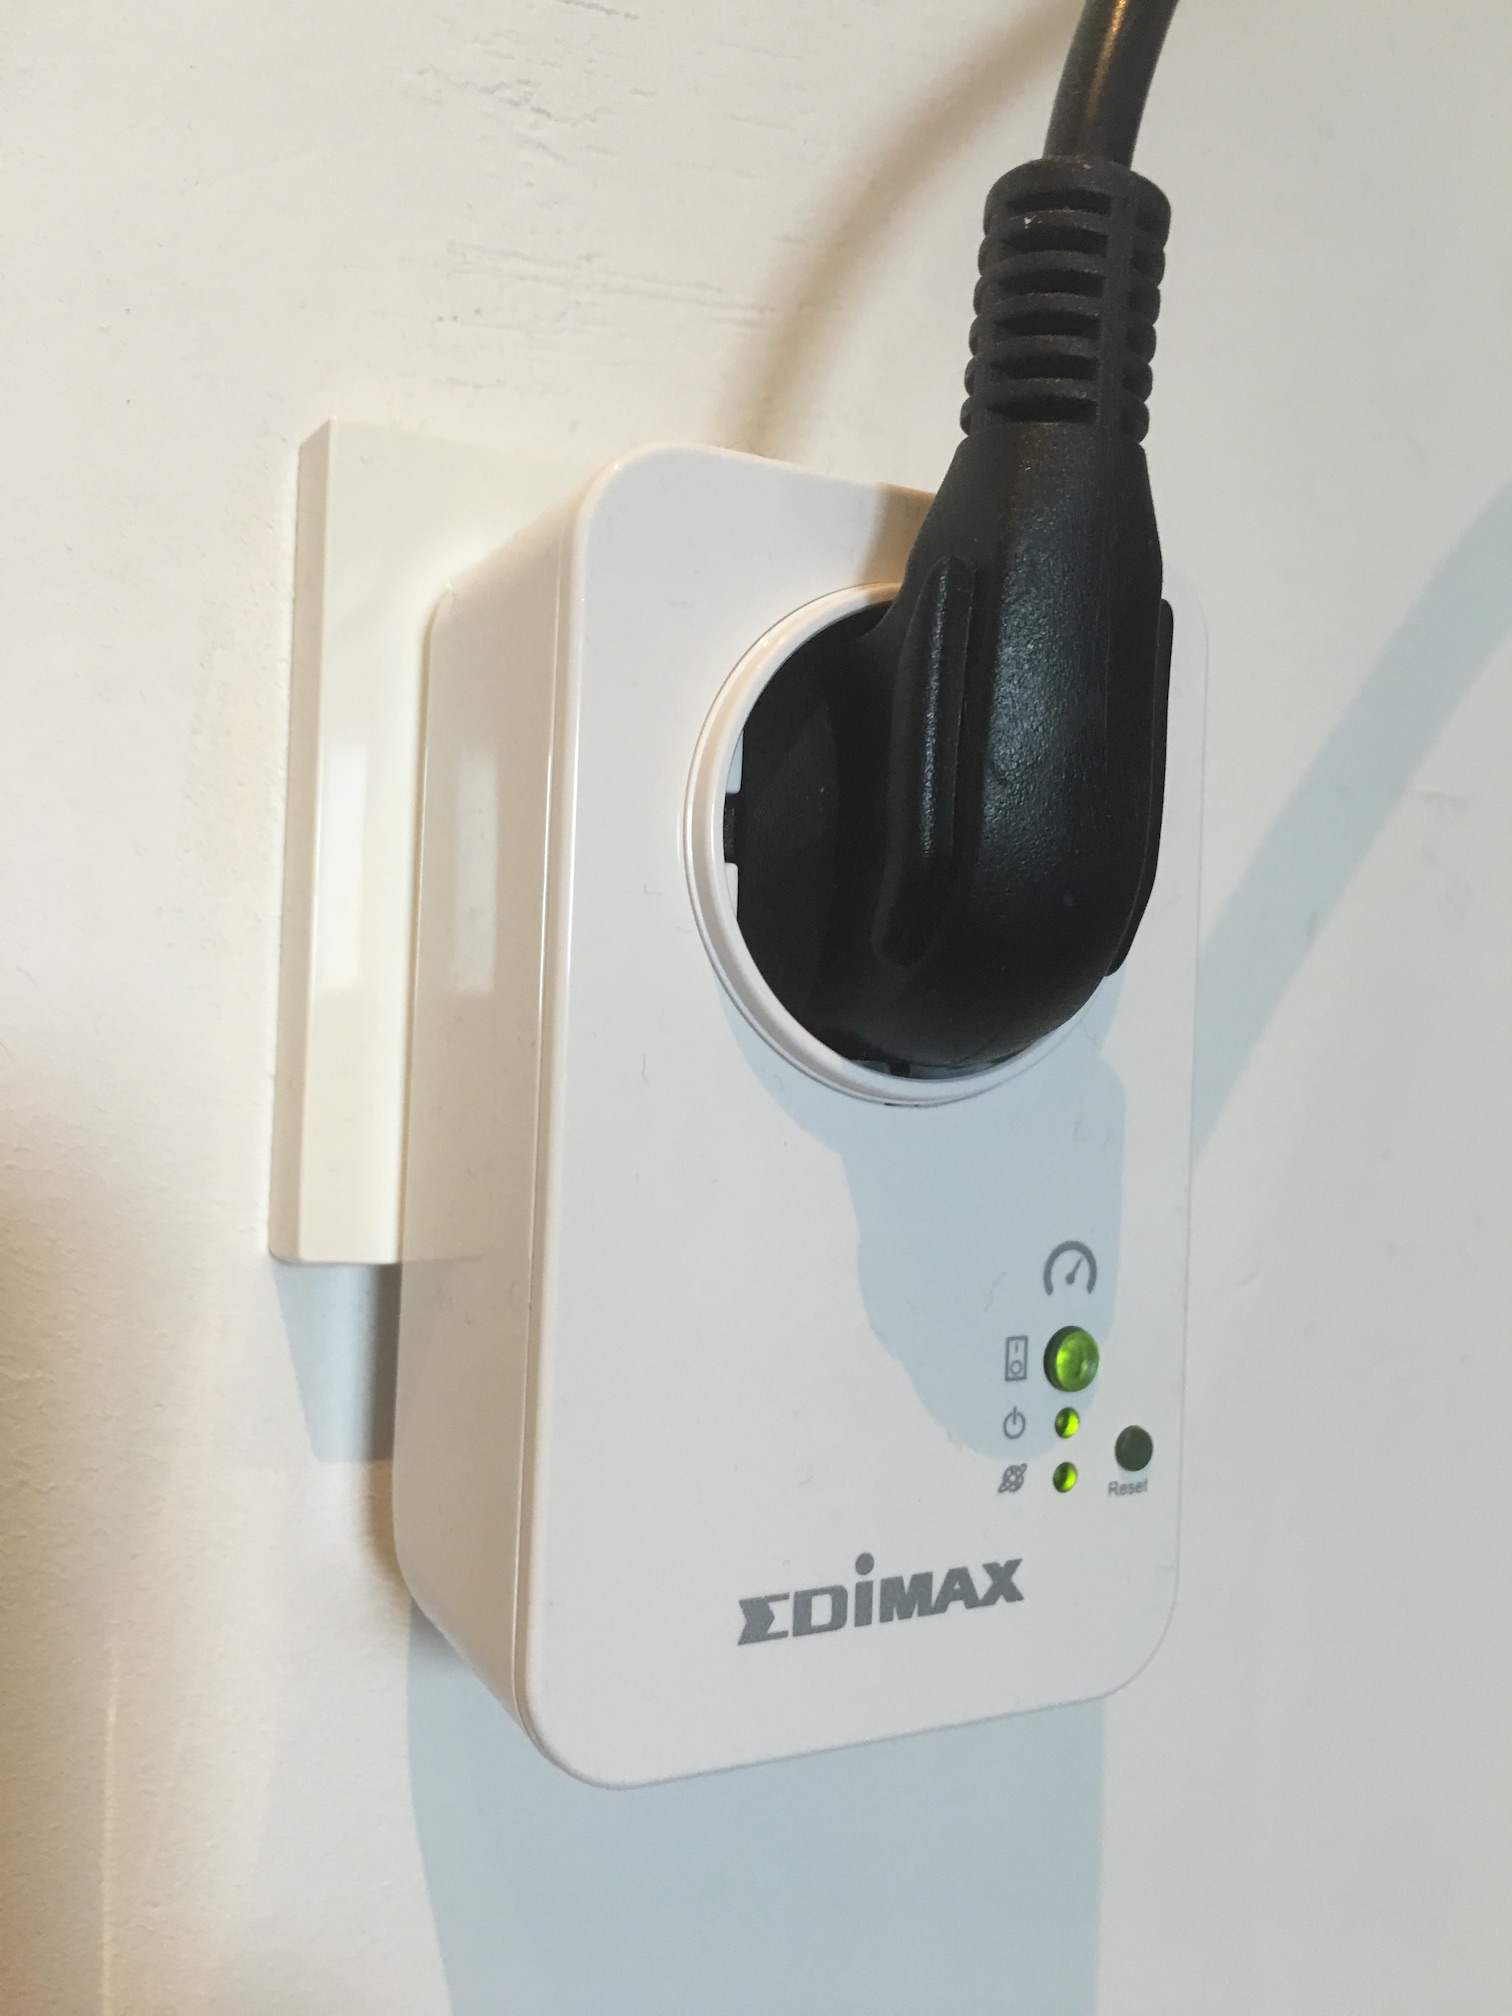
The device is managed via an apple or android app, the following screenshots are taken from an Apple device, you can monitor it with both your iPhone or iPad. You can manage multiple smart plugs from one device. As I’ve spread my lab over two power-groups I’ve installed two power-plugs to monitor my home lab.

Unfortunately, the app doesn’t allow displaying two smart plugs simultaneously, you have to open each individually. The monitor page shows the real time power consumption registered by the plug. It displays Amps and Watts. Quite cool to see what happens when you power-on devices or even a virtual machine, this monitored server generates a spike of 30 watts when powering on a VM, it quickly returns to a steady state though. Fun to see that ESXi hosts do not consume a steady high state of power.
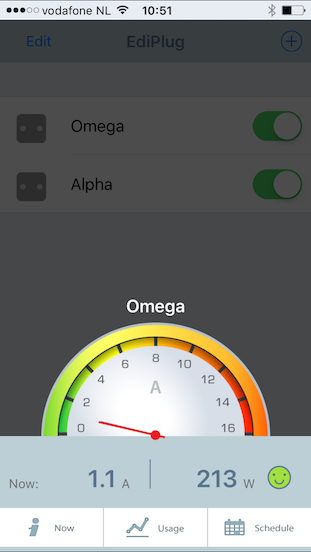
The Now button shows the real-time power consumption and the total power consumption registered of today, this week and this month. By providing the price of energy, it calculates the total cost additionally. Unfortunately I haven’t found the option to change the currency sign, so you are stuck with the dollar sign.

By selecting the Usage button provides you a chart to view the power consumption of that day.
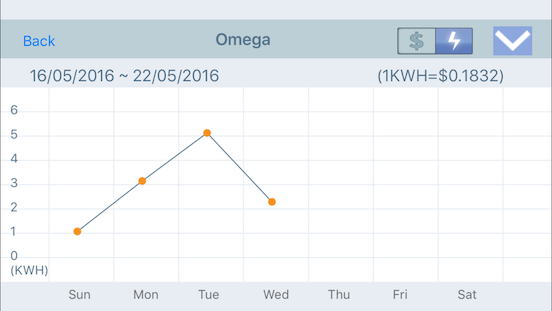
The app allows you to analyze power consumption trends of your home lab by provides an overview based on 24 hours of data, a week, a month and a full year.

Conclusion
The smart plugs are a great addition to my home lab, it provides me insights in the consumption and it for me personally have removed the reluctancy of leaving my full lab on. The answer to the question whether you need a smart plug if you run a home lab is in my opinion a straight and simple no. You can estimate cost or you can just ignore it and pay the bill when it arrives. I’m just curious about these things and it helps to clear my conscious.
Managing your virtual datacenter and home lab with a MAC
The majority of virtual datacenters are managed from Windows systems. When I started with virtualization I also used a windows system, however when I joined VMware I received a MacBook and this was the beginning of the end. Soon ever window device was replaced with an Apple device in my home. The problem was that I still needed to manage by home lab. To circumvent this, I created a Windows admin VM and installed all my trusted Windows apps, such as Putty, vSphere client and WinSCP. Works great! Until you want to rebuild your lab or restructure the environment. It always felt as a burden and on top of that I didn’t want to spend CPU cycles and waste memory of my home lab on admin VM. Throughout the years I discovered tools for Mac OS that replaced their trusted Windows equivalent and with the new release of the HMTL 5 Web client fling it removed dependency on the Client Integration Plugin (CIP). Here is the list of program and tips and tricks I use on my Mac to manage my Home lab.
Putty > iTerm2
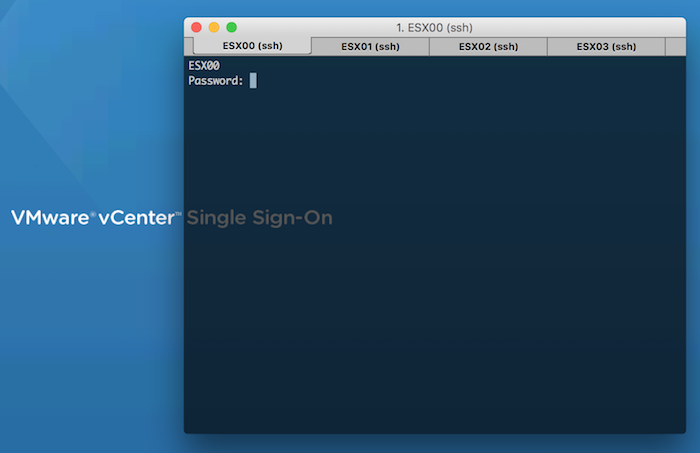
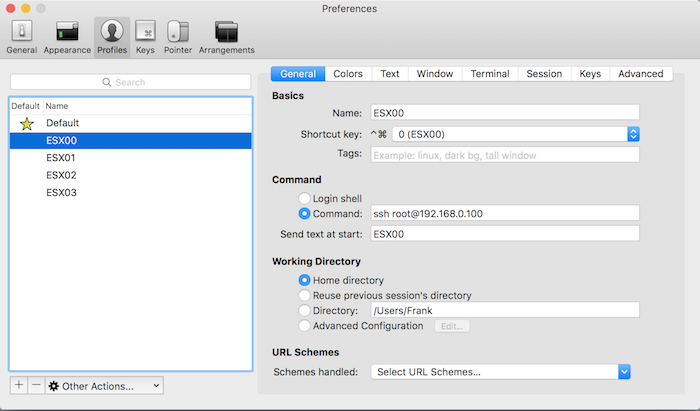
PuTTY is an SSH and telnet client for the Windows Platform allowing you to have access to the command line of the ESXi server. For the Mac platform I recommend iTerm2. Although Mac OS has a native terminal application, iTerm2 has a couple of cool features that I absolutely love. It can run multiple sessions, each in its own tab.
With profiles you can configure the connection settings to your ESX host and with a simple shortcut key combination (for example, Control-command-1, you open a tab to the ESXi host.
Download iTerm2 here.
Remote Desktop > Royal TSX
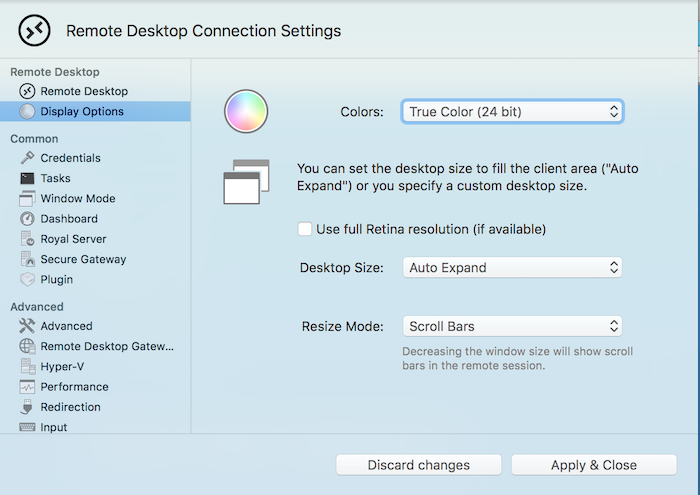
MS Remote Desktop is available for Mac OS, but the one remote desktop application you want to get is Royal TSX. The free version allows up for ten remote desktop connections, typically more than enough for the majority of home labs. I bought a licensed version as I’m using more than ten profiles and like to separate the workload part of the lab in a separate configuration document from the management part of the lab. One of the cool features is the tabbed layout, allowing you to switch between remote desktops quite easily.
The screens at home have a minimum resolution 2560 x 1440 resolution, Royal TSX allows for any resolution, even native Retina resolution. I like to use the smart zoom and the resolution set by the virtual machine allowing you to have a proper environment to work in without hitting the time-consuming scroll bars.
If security isn’t a big concern for you, you can specify the user and password for the connection at multiple levels. Either on the remote desktop connection profile itself or specify it on the ‘connection document’ for the entire environment. A nice time saver!
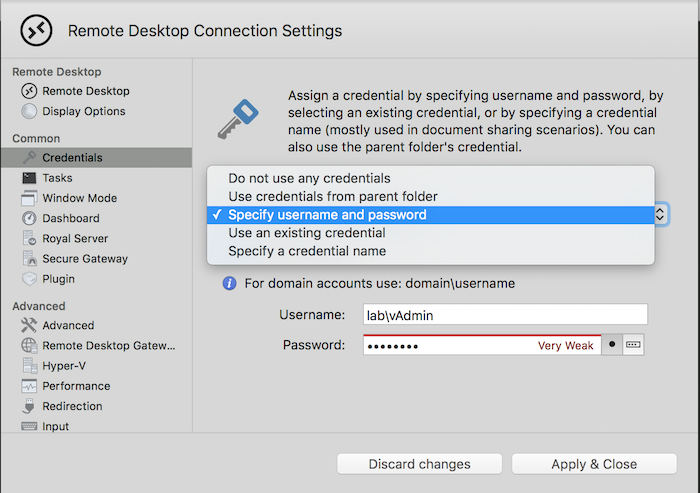
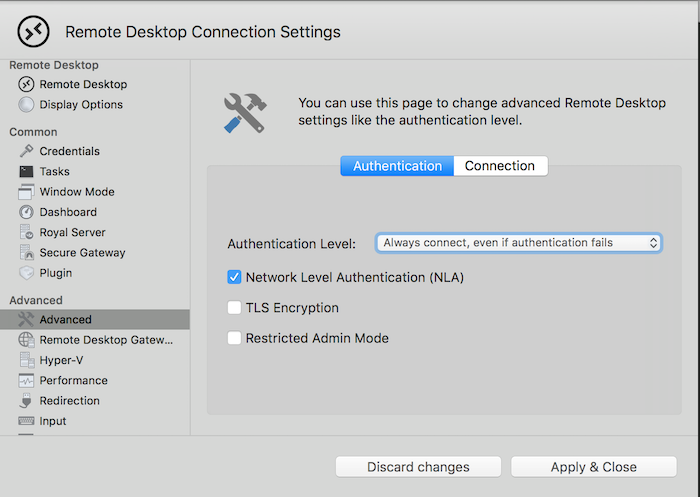
If you are the complete opposite and you need higher levels of security, such as Network Level Authentication (NLA) Royal TSX is the application to get. NLA is enabled by default and you can configure to use Transport Layer Security (TLS) as well.
Download Royal TSX here.
WinSCP > CyberDuck
WinSCP and Veeam Backup Free Edition (previously Veeam FastSCP) are the most popular Secure FTP applications that allows you to copy files directly onto the ESXi host. Unfortunately the once announced port to MacOS of WinSCP never came into fruition and therefor I looked for alternatives. There are plenty SFTP clients, the one I use and like is Cyberduck
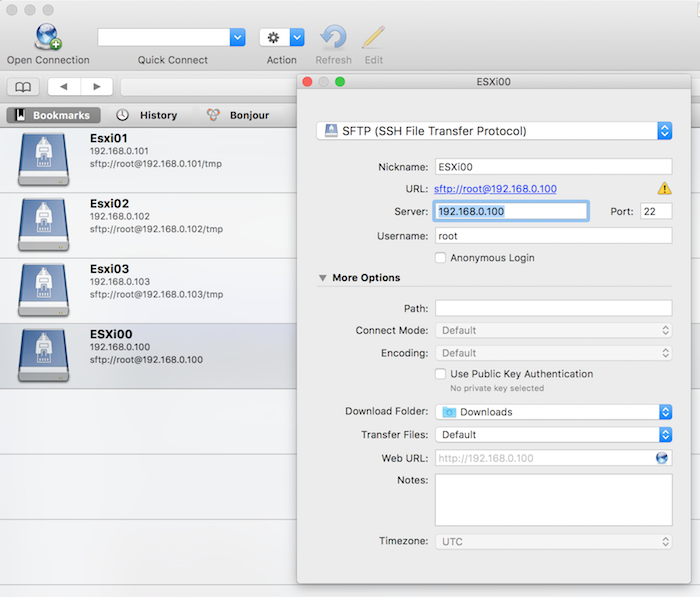
It allows for creating connection profiles called bookmarks, allowing you to connect to the correct folder directly. It also supports various encryption ciphers and authentication algorithms if you operate in a secure environment. Cyberduck is like all the other listed tools free but the occasionally ask for a donation.
Download Cyberduck here.
VMware ESXi Embedded Host Client fling
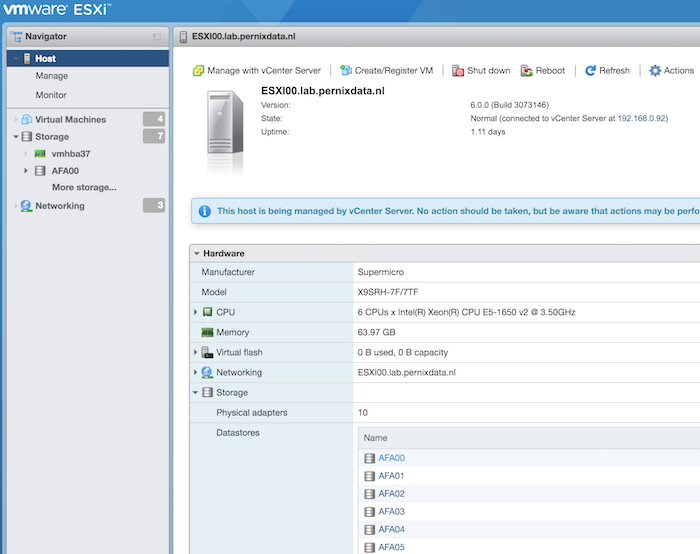
The ESXi embedded host client fling allows you to manage the ESXi host directly through a web client. Its fast, it’s easy to install and it provides most of the functionality you need when you are building your lab before deploying the vCenter Appliance. One of the great assets to this tool is the integrated VM console. It’s directly accessible within the browser and does not require any addiotnal plugins or installers. Solving the annoying Client Integration Plugin problem most Mac users faced when connecting to the vCenter via the web client.
The Fling currently only supports ESXi 6.0, however William published a workaround for ESXi 5.x. found here: http://www.virtuallyghetto.com/2015/08/new-html5-embedded-host-client-for-esxi.html
Download the VMware ESXi Embedded Host Client fling here.
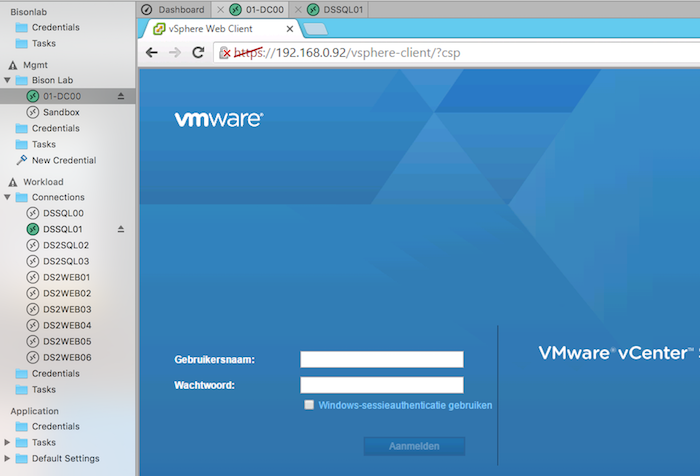
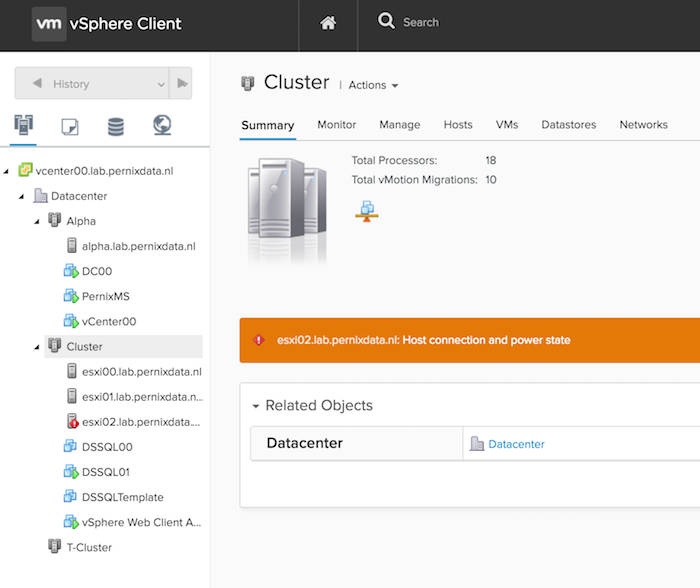
vSphere HTML5 Web Client Fling v1.2 (h5client)
This fling got released this week and it allows you to connect with an HTML5 based web client to the vCenter server. Be aware that this client is designed for managing vCenter only! This release focuses on removing the dependency of the client integration plugin allowing administrators to connect with the VM console via the web client and do the basic stuff. Combine that with the normal web client and you execute the majority of operations to setup and deploy your home lab / virtual datacenter.
The client is deployed as a vib on one of the ESXi host. For detailed install instructions visit the VMware vSphere blog.
Download the HTML5 Web Client Fling v1.2 here.
Function keys
Not a tool, but sometimes you are required to press a function key, such as F11 when installing ESXi. No problem when installing physical boxes, a challenge when installing a nested ESXi system using a remote (VM) console. In order to send the correct key, press FN-CMD-F11. This works on most function keys and other non-alphanumeric keys
Please leave a comment if you want to share your favorite tool or handy tips and tricks to save time.
DVD Store, the perfect homelab workload tool
DVD Store 2.1, a magnificent tool for all aspiring VCP/VCAP candidates. A great tool for home lab enthousiasts to understand performance metrics, a fantastic tool to understand the behavior of an application stack in a virtual datacenter.
WHAT IS DVD STORE?
According to the official site the DVD Store Version 2.1 (DS2) is a complete open source online e-commerce test application, with a backend database component, a web application layer, and driver programs. The goal in designing the database component as well as the midtier application was to utilize many advanced database features (transactions, stored procedures, triggers, referential integrity) while keeping the database easy to install and understand. The DS2 workload may be used to test databases or as a stress tool for any purpose.
Thanks Todd Muirhead and Dave Jaffe for creating this! However there is a slight challenge in installing it properly. You can install it on windows or on Linux and use many different database programs. I like to use windows for this. Unfortunately I tried to follow the instruction video on youtube and it was lacking some crucial details to get it deployed successfully. Therefor I started to document the steps involved to get it deployed on a Windows 2012 system using SQL 2014 SP1. Please note that you can run DVD store on Linux as well, and it might be even better (more lean and mean than a windows install) for homelabs. If you have a detailed write-up (100% reproducible) of a working deployment DVD store on Linux, please share the link to your article in the comments.
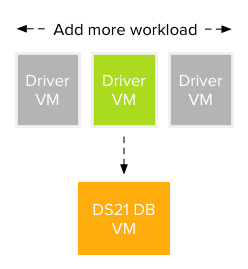
DVDSTORE ARCHITECTURE
As described above the DVD Store is an application stack that can run on a single or multiple virtual machines. By using multiple virtual machines, you can test various components and layers in your virtual datacenter. As this is my goal I’m creating a VM that will run the database and another VM that generates the workload.
Requirements
I’m listing the software I’ve used in order to create a working environment. Many variations are possible. If you can create a lightweight version of this build, or a complete community edition (license free) please share URL of your article in the comments.
- Two virtual machines
- Windows 2008 R2 and Windows 2012
- Windows 2008 R2 SP1
- DVD Store 2.1 ds21.tar.gz
- DVD Store 2.1 ds21_sqlserver.tar.gz
- Winzip
- SQL 2014 SP1*
- ActiveState ActivePerl Community Edition
DATABASE VM
In this exercise I’m going to install and configure a 20GB database on a Windows 2012 VM. If you are using templates, check if you have enough space for the DVD store on your C-drive. During the first stage the temporary files will be stored on the C: drive, provide enough space which is at least equal to the DB size. The database hard disk needs to be twice the size of the DB in order to successfully import the data. Post configuration optimizations can reduce the consumed space of the database, but don’t be too frugal when configuring the hard disks. Play around with the compute settings depending on your lab equipment. I noticed that Windows 2012 uses 5.4 GB of memory to run its OS and SQL Express when idling, but during installation it consumed close to 11GB.
Windows 2012 configuration
Update Windows 2012 with all the latest patches and update VMtools, enable remote desktop if you don’t want to use the VM console. Disable the firewall, as this I run an air-gapped lab I don’t want to spend too much time on firewall rules. SQL requires to Enable Microsoft .Net Framework 3.5 SP1. and Download and install Microsoft .Net Framework 4.0. .Net Framework 4.0 is already a part of the Windows 2012 OS, therefore you only have to enable 3.5. by executing the following steps:
- Go to Server Manager
- Add roles and features
- Next
- Role-based or feature-based installation
- Click Next until you reach Features
- Select .Net Framework 3.5 Features
- Click Install
Extracting DVD Store
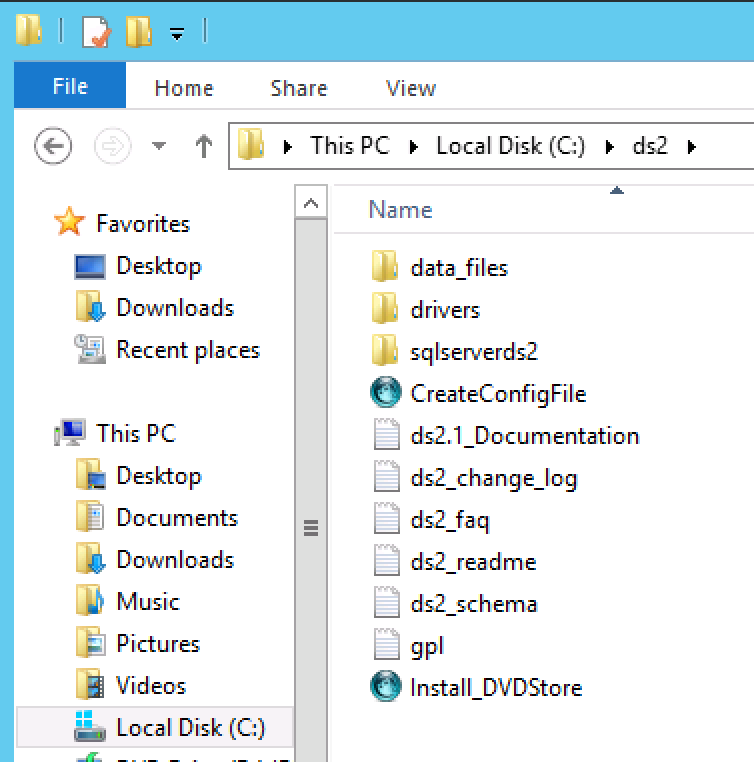
The DVD Store kit is available at linux.dell.com/dvdstore. Download the file ds21.tar.gz and ds21_sqlserver.tar.gz. Both include scripts that are made on a unix based machine, missing the proper CR/LF format for a windows system. Winzip converts files to proper windows format while extracting, therefor I recommend using Winzip. Alternatively you can use a tool such as Unix2Dos to convert the files if you don’t want to use Winzip. Extract both files to the C:\ Drive creating a directory structure as follows:
Install ActivePerl
The installation of DVD Store is done via a Perl script, Windows 2012 doesn’t contain a Perl utility. One of the recommended Perl Utility is ActiveState ActivePerl Community Edition. You can download it here. As I’m using Windows 2012, I need to download the x64 MSI version. The install is straightforward, no specific options need to be selected, basically a next next finish install.
SQL 2014
DVD store can leverage both the full version or the Express version of SQL. Microsoft allows you to evaluate their products 180 days. If you do maintain a VM configuration for more than 180 days you can use the free version of SQL 2014 express. Please be aware that you need SQL Server Express with Advanced Services as it includes the full version of SQL Server 2014 Management Studio and Full Text Search and Reporting Service. Both features are required to run DVD Store. For more info on SQL 2014 versions go here: https://www.microsoft.com/en-us/download/details.aspx?id=42299. Download SQL 2014 Express ADV SP1 here: https://www.microsoft.com/en-us/download/details.aspx?id=46697
If you are going to use the express version, adjust your VM configuration. Unfortunately SQL Express has some CPU limitations for the database engine (Limited to lesser of 1 Socket or 4 cores) and a 10 GB DB limitation. Therefore a 4 vCPU configuration would be 1 virtual sockets: 1 and 4 cores per socket. For more info about virtual sockets and cores please read this article: http://frankdenneman.nl/2013/09/18/vcpu-configuration-performance-impact-between-virtual-sockets-and-virtual-cores/
Install SQL 2014 Express ADV SP1
Run Install and select the following options:
- New SQL Server stand-alone instalation
- Accept the license terms
- Check “Use MS Update to check for updates”
- Database Engine Configuration: Mixed Mode (SQL Server Authentication and Windows Authentication) (provide password)
- Reporting Services Native Mode: Install and Configure
Install SQL 2014 SP1
Download the eval version of SQL 2014 SP1 here: http://technet.microsoft.com/evalcenter/dn205290.aspx
Run Install and select the following options:
- New SQL Server stand-alone instalation
- Select Evaluation
- Accept the license terms
- Setup Role: Select All Features using default values for service accounts*
- Database Engine Configuration: Mixed Mode (SQL Server Authentication and Windows Authentication) (provide password)
- Analysis Services Configuration: Add current User
- Reporting Services Configuration: Install and Configure
- Distributed Replay Controller: Add Current User
- Install
During the install it can happen that the install process freezes when on a step called “Install_WatsonX86_Cpu32_Action”. To solve this state, open up task manager and end all “extra” processes called “Windows Installer (32 bit) ” leaving only a single Windows Installer process.
I’m sure you can improve and optimise the SQL installation, but I haven’t really looked into this. For more information I recommend David Klee’s blog (http://www.davidklee.net/) and the book of Michael Webster “Virtualising SQL Server with VMware” (http://longwhiteclouds.com/)
INSTALLING DVD STORE
Once SQL is installed you can begin installing DVD Store.The process of installing DVD store consists of executing two scripts, the Install_DVDStore.pl script and the SQL script.
Install_DVDStore.pl script
The Install_DVDStore.pl script generates the database content (such as users and products) by creating CSV files and it generates a SQL script that allows MSSQL to create the DB2user, the databases and importing the CSV content files. In order to correctly generate these files, you must create the directories where the MSSQL Database files will be stored. I’m using a single drive for all databases, therefore I create a directory SQL\DBfiles on the E: drive (E:\SQL\DBfiles).
Please note that the workload CSV files are generated in the C:\DS2 folder! That means that if you are going to generate a 20GB database, you need at least 20GB of free space on your C:\ drive as well to temporarily store the CSV files.
Once installed SQL you can run the Install_DVDStore script in the C:\DS2 folder. I prefer to open up a command prompt to run the script. The window remains open after the script has completed successfully, allowing me to do other stuff in the mean time. If you have more trust in scripts than me, go right ahead and click on the perl script from the windows explorer.
C:\ds2\Install_DVDStore.pl. In order to create a 20GB DB in the directory E:\SQL\DBfiles, I’m going to answer the questions as follows:
- Database size: 20
- Database size is in MB or GB: GB
- Database type: MSSQL
- System type: WIN
- Path where Database files will be stored: E:\SQL\DBFiles\ *
* Please note the trailing \ in E:\SQL\DBFiles\, this is required otherwise the script will fail.
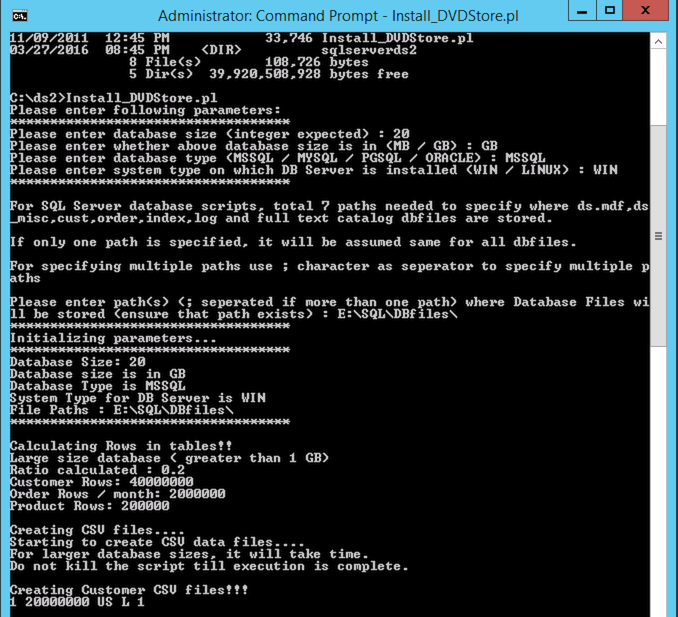
Creating the custom CSV and the sql script files took my system roughly 20 minutes. The CSV files are stored in the directory structure of the C:\DS2\Data_files. The SQL script is stored in the directory C:\DS2\sqlserverds2\. The Install_DVDStore script generated the following script: sqlserverds2_create_all_20GB. Thats the script we want to run in order to get the DB loaded with the records.
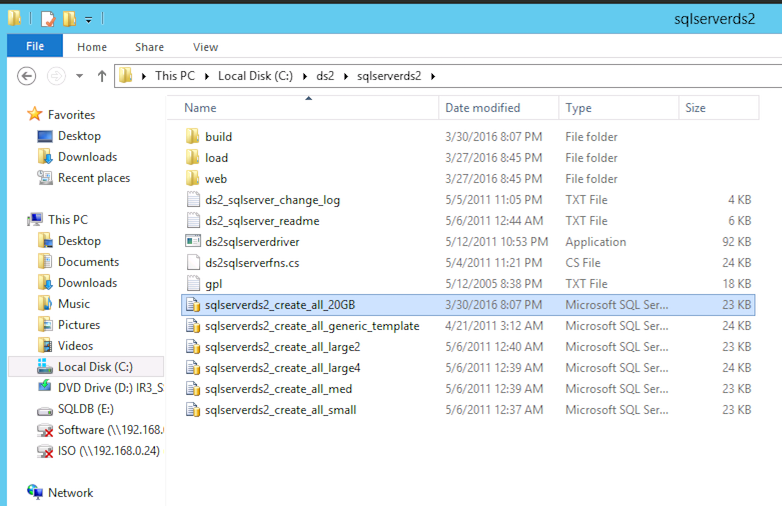
Edit the SQL script
David Klee (@kleegeek), the SQL MVP, discovered there was a slight error in the script. In order to fix this, edit the script in notepad or SQL management studio. Go to line 91 (or use find) and change (1) of GENDER VARCHAR(1) into (2) resulting in GENDER VARCHAR(2). Save and exit.

It seems the DS2 scripts use the SA account with an blank password. You can do two thing, go through all the scripts or change the SA password on your SQL server. If someone knows the location of the SA user in the scripts, please leave a comment. In order to change the SA password, open up the SQL 2014 management studio. (Go to start, apps, SQL Server 2014 Management Studio). Select “SQL Server Authentication” and use the SA user with the password you entered during the installation process of SQL. Go to Security \ Logins and select the SA account, go to properties and deselect the option “Enforce password policy”. Now remove the password and click on OK. Yes you are sure you want to continue so click on Yes 😉 Exit the management studio.
Execute the SQL script
Go to the C:\DS2\sqlserverds2 directory and click on the sqlserverds2_create_all_20GB script. This opens SQL2014 management Studio and you need to authenticate again. A good time to check to see if the SA account is using a blank password, use the SA user account and click on connect.
Management Studio shows the script, press F5 to execute or go to the Query menu and click on Execute. In the bottom left corner, it will show executing query. Select the Message tab to monitor the progress of the script. It took my system 1 hour and 5 minutes to complete the script, it might be a good time to start working on the “workload” VM that’s going to generate the queries in the mean time. After the script finishes, it’s time to run a SQL maintenance task. Although the script creates a 20GB database, 37GBs of space is consumed on the hard disk.

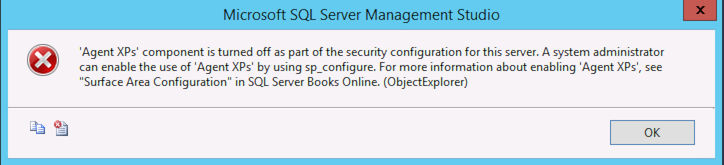
SQL2014 Maintenance Plan
In the DVD Store documentation it’s recommended to run the maintenance plan to optimize performance. The SQL Agent service is turned off by default in SQL 2014. Start this service by opening a command prompt and type in the command: net start sqlserveragent otherwise the follow error will be presented when attempting to create a maintenance plan in SQL Management Studio:
Open the SQL Server 2014 Management Studio(GUI), follow following steps:
- Go to Object Explorer and click and expand database server tree.
- Under server tree, expand management and right click on maintenance plans.
- Left Click on “Maintenance Plan Wizard Option”.
- In the wizard opened, click next and enter name of plan as “ds2”.
- Click next and check “Update Statistics” checkbox and again click next.
- Click next and then choose database as DS2 and click OK.
- Ensure “All existing statistics” and “Sample By” checkbox are set along with value “18” “percent”.
- Once above step is done click next twice to create a task under “Maintenance Plans” under “Management” object under SQL Server tree.
- Now right click on this task “ds2” created from above steps and it will show a menu option for right click.
- Click execute to update statistics on all tables in DS2 database using task created due to above steps.
Visit the sites of the SQL experts to learn more about optimizing SQL DB’s if you want to get more performance out of this database. At this point, the Database VM configuration is complete and we can start generating some workload by running the ds2sqlserverdriver program on the worload VMs.
DS2 WORKLOAD VM
Unfortunately the DS2webdriver kept on crashing on a Windows 2012 system, complaining about invalid registry settings. Therefor I’m using a Windows 2008 system. The configuration of the VM is straightforward. Ensure that the workload VM can connect to the database VM across the network and run the ds2sqlserverdriver program.
Database VM configuration
- OS: Windows 2008
- CPU config:
- Number of virtual sockets: 2
- Number of cores per socket: 1
- Memory 12GB
- Harddisk 1: 40 GB
- SCSI controller 0: LSI Logic SAS
- Network Adapter: VMXNET 3
Windows 2008 configuration
- Update Windows 2008 with all the latest patches, service packs and update VMtools.
- Download SP1 here: https://www.microsoft.com/en-us/download/details.aspx?id=5842
- Disable the firewall. *
- Enable remote desktop if you don’t want to use the VM console
- Enable .Net 3.5 if you want to install SQL management studio
* As this I run an air gapped lab I don’t want to spend too much time on firewall rules)
DS2SQLSERVERDRIVER
Extract the ds2.tar.gz and ds2_sqlserver.tar.gz on the C:\.
Open command prompt and go to c:\ds2\sqlserverds2\ and run ds2sqlserverdriver.exe. This will show the options:
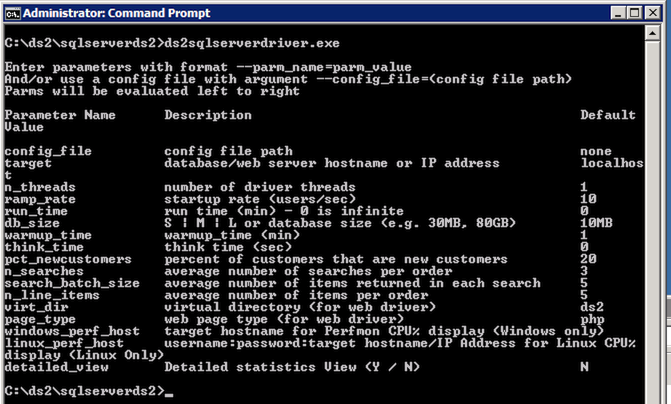
An example script (by David Klee):
c:\ds2\sqlserverds2\ds2sqlserverdriver.exe --target=192.168.0.132 --run_time=60 --db_size=20GB --n_threads=4 --ramp_rate=10 --pct_newcustomers=0 --warmup_time=0 --think_time=0.085
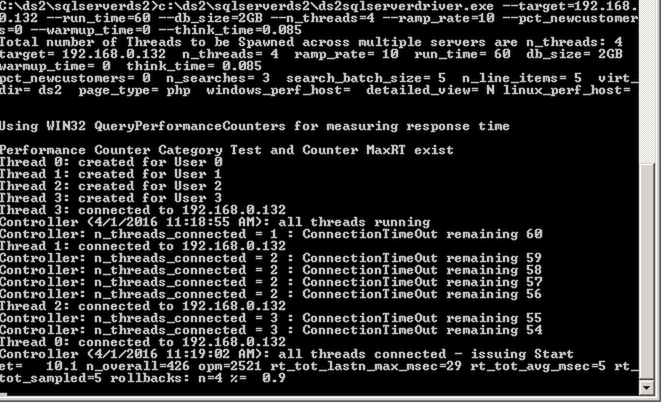
This program allows you to customize every workload possible. The command that I like the most is the think time. This is the amount of time that a simulated user would ‘think’ before clicking again. This command allows you to create a more realistic workload that differs from any synthetic benchmark tool out there. You can run spawn multiple virtual machines running different configured workloads against a single database. Adjust the think time, adjust the average number of search order per customer. The application stack allows you to investigate the complete stack. You can run multiple workload VMs and the DB VM on a single host, allowing to understand CPU or memory contention. It allows to distribute the workload across multiple hosts, allowing you do dive into the impact of networking and possibly DRS. Moving VMs onto a single datastore and monitor the storage path and the impact of SIOC. The possibilities are endless. Genuinely a tool that can help anyone at any level understand virtualization and IT infrastructures better.
When your Home Lab turns into a Home DC
A little bit over a year ago I decide to update my lab and build two servers. My old lab had plenty of compute power, however they were lacking bandwidth, 3 Gbit/s SATA and 1 Gb network bandwidth. I turned to one of the masters of building a home lab, Erik Bussink, and we thought that the following configuration was sufficient to handle my needs.
Overview
| Component | Type | Cost |
| CPU | Intel Xeon E5 1650 v2 | 540 EUR |
| CPU Cooler | Noctua NH-U9DX i4 | 67 EUR |
| Motherboard | SuperMicro X9SRH-7TF | 482 EUR |
| Memory | Kingston ValueRAM KVR16R11D4/16HA | 569 EUR |
| SSD | Intel DC 3700 100GB | 203 EUR |
| Power Supply | Corsair RM550 | 90 EUR |
| Case | Fractal Design Define R4 | 95 EUR |
| Price per Server | (without disks) | 1843 EUR |
The systems are great, but really quickly I started to hit some limitations. Limitations that I have addressed in the last year, and that are interesting enough to share.
Adding a third host
As FVP is a scale out clustered platform, having two hosts to test with simply just don’t cut it. For big scale out testing I use nested ESXi but to do simple tests I just needed one more host. The challenged I faced was the dilemma of investing in “old” tech or going with new hardware. Intel updated their Xeon line to version 3, the Intel Xeon v3 has more cache (from 12MB to 15MB) more memory bandwidth, increased max memory support up to 768GB and uses DDR4 memory. (Intel ark comparison)
New shiny hardware might be better, but the main goal is to expand my cluster and one of the things I believe in is a uniform host configuration within a cluster. Time is a precious resource and the last thing I want to spend time on is to troubleshoot behavior that is caused by using non-uniform hardware. You might win some time by having a little bit more cache, more memory bandwidth but once you need to troubleshoot weird behavior you lose a lot more.
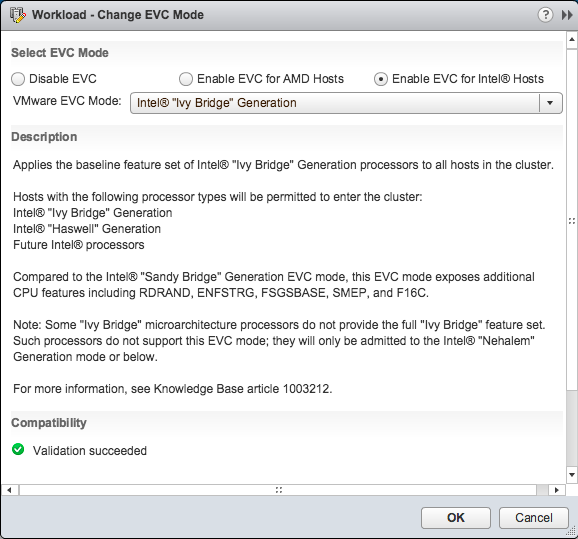
A dilemma is not a dilemma if you go back and forth between the options, thus I researched if it was possible. The most predominant one is the change in CPU microarchitecture. The v3 is part of the new Intel Haswell microarchitecture. The Xeon v2 is build upon the Ivy Bridge. That means that the cluster has to run in EVC mode Ivy Bridge. The EVC dialog box of the cluster indicates that Haswell chips are supported in this EVC mode, thus DRS functionality remains available if I go for the Haswell chip
The Haswell chip uses DDR4 memory and that means different memory timings and different memory bandwidth. FVP can use memory as a storage I/O acceleration resource and a lot of testing will be done with memory. That means that applications can behave differently when FVP decides to replicate fault tolerant writes to the DDR4 host or vice versa. In itself it’s a very interesting test, thus again another dilemma is faced. However, these tests are quite unique and I rather have uniform performance across the cluster and avoid any troubleshooting behavior due to hardware disparity.
Due to the difference in memory type, a new Motherboard is required too. That meant that I have to find a motherboard that contains the same chipsets and network configuration. The SuperMicro X9SRH-7TF rocks. Onboard 10 GbE is excellent. Some other users in the community have reported overheating problems, Erik Bussink was hit hard by the overheat problem and bought another board just to get rid of weird errors caused by the overheating. That by itself made me wonder if I would buy another X9SRH-7TF or go for a new Supermicro board and buy a separate Intel X540-T2 dual port 10GbE NIC to get the same connectivity levels.
After weighing the pros and cons I decided to go for the uniform cluster configuration. Primarily because testing and understanding software behavior is hard enough. Second-guessing whether behavior is caused by the hardware disparity is a time sucking beast and even worse, it typically kills a lot of joy in your work. Contrary to popular belief, prices of older hardware does not decline forever, due to availability of newer hardware and remaining stock, prices go up. The third host was almost 500 Euro’s, more expensive than the previous price I had to pay.
Networking
Networking is interesting as I changed a lot during the last year. The hosts are now equipped with an Intel PRO 1000 PT dual ports with the 82571 chip. Contrary to my initial post these are supported by vSphere 5.5.
However network behavior is a large part of understanding scale out architectures, thus more NIC ports are needed. An additional HP NC365T Quad-port Ethernet Server Adapter was placed in each server. The HP NIC is based on the Intel 82580 chipset but is a lot cheaper than buying Intel branded cards. Each host has one NIC dedicated to IPMI, 2 10GbE ports and 6 1GbE. In hindsight, I would rather go for two Quad NIC cards as it allows me to setup different network configurations without having to tear them down each time.
With the introduction of the third host I had to buy a 10GbE switch. The two host were directly connected to each other, however this configuration is not possible with three hosts. Thus I had to look for a nice cheap 10GbE switch that doesn’t break the bank and is quiet. Most 10GbE switches are made for the data center where noise isn’t really a big issue. My home lab is located in my home office, spending most of my day with something that sounds like a jet plane is not my idea of fun. The NETGEAR ProSafe Plus XS708E 8-port 10-Gigabit fit most of my needs. 8 ports for less than 900 euro’s, it’s kind of a steal compared to the alternatives. However I wasn’t really impressed by the noise levels (and spending 900 euro’s but that’s a different story). Again my main go-to-guy for all hardware related questions Erik Bussink provided the solution, the Noctua NF-A4-x10 FLX coolers. Designed to fit into 1U boxes they were perfect.
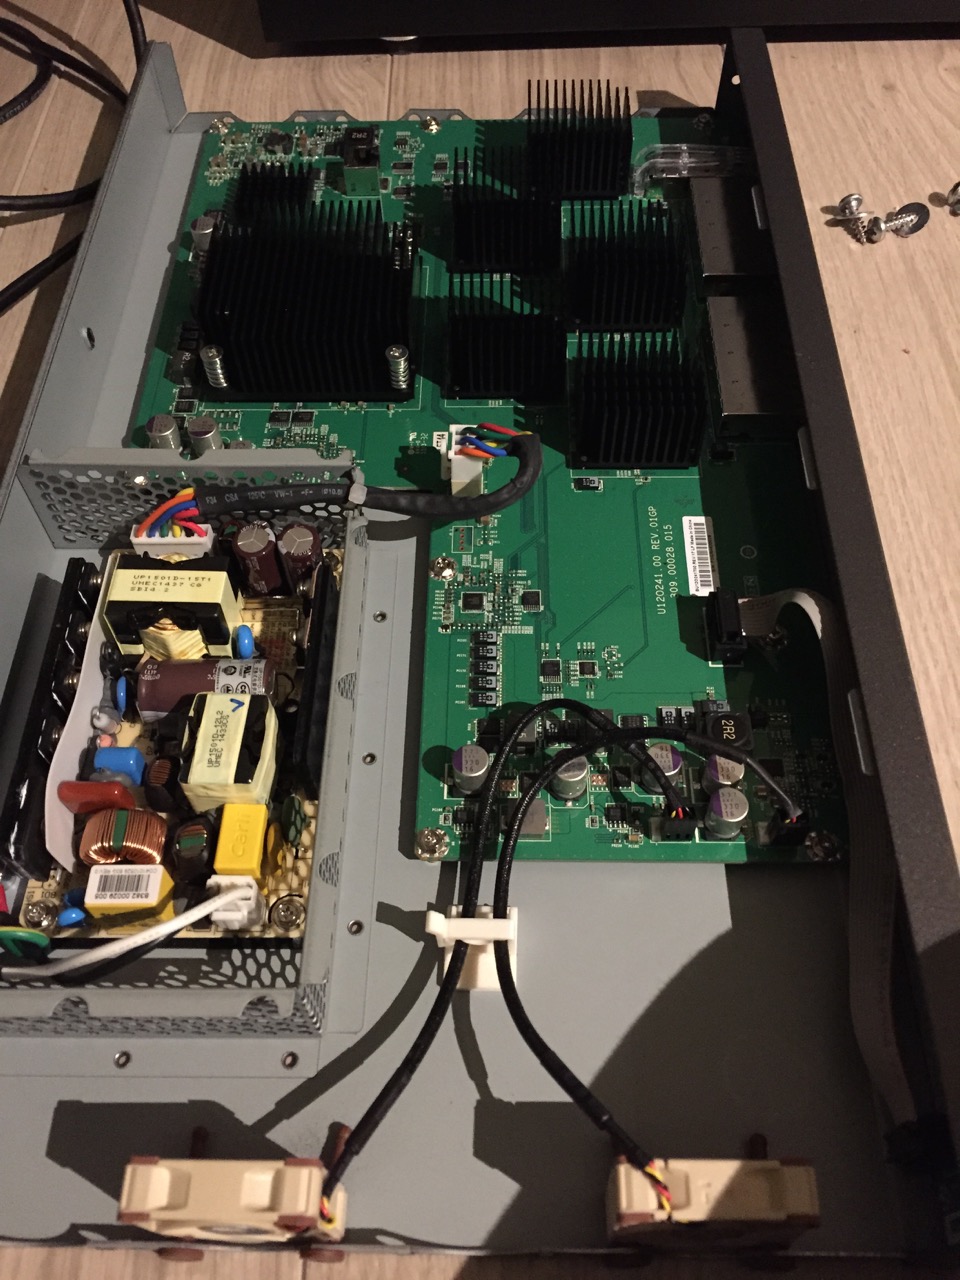
But as you can see the design of the Netgear is a bit weird. The coolers are positioned at the far end of the PCB with all the heatsinks. When the switch is properly loaded, the thing emits a lot of heat. Regardless of what type of internal fan is used. To avoid heat buildup in the switch I used simple physics, but I will come to that later.
Now having three hosts with seven 1 GbE connections, two storage systems eating up 3 ports and an uplink to the rest of the network I needed a proper switch. Lessons learned in that area, research thoroughly before pressing the buy button. I started of with buying an HP 1810-24G v2 switch. Silent, 24 ports, VLAN support. Awesome! No not awesome because it couldn’t route VLANs. And to the observant reader, 25 ports required, 24 ports offered. A VCDX’esque-like constraint. To work around the 24 ports limitation I changed my network design and wrote some scripts to build and tear down different network configurations. Not optimal, but dealing with home labs is almost like the real world.
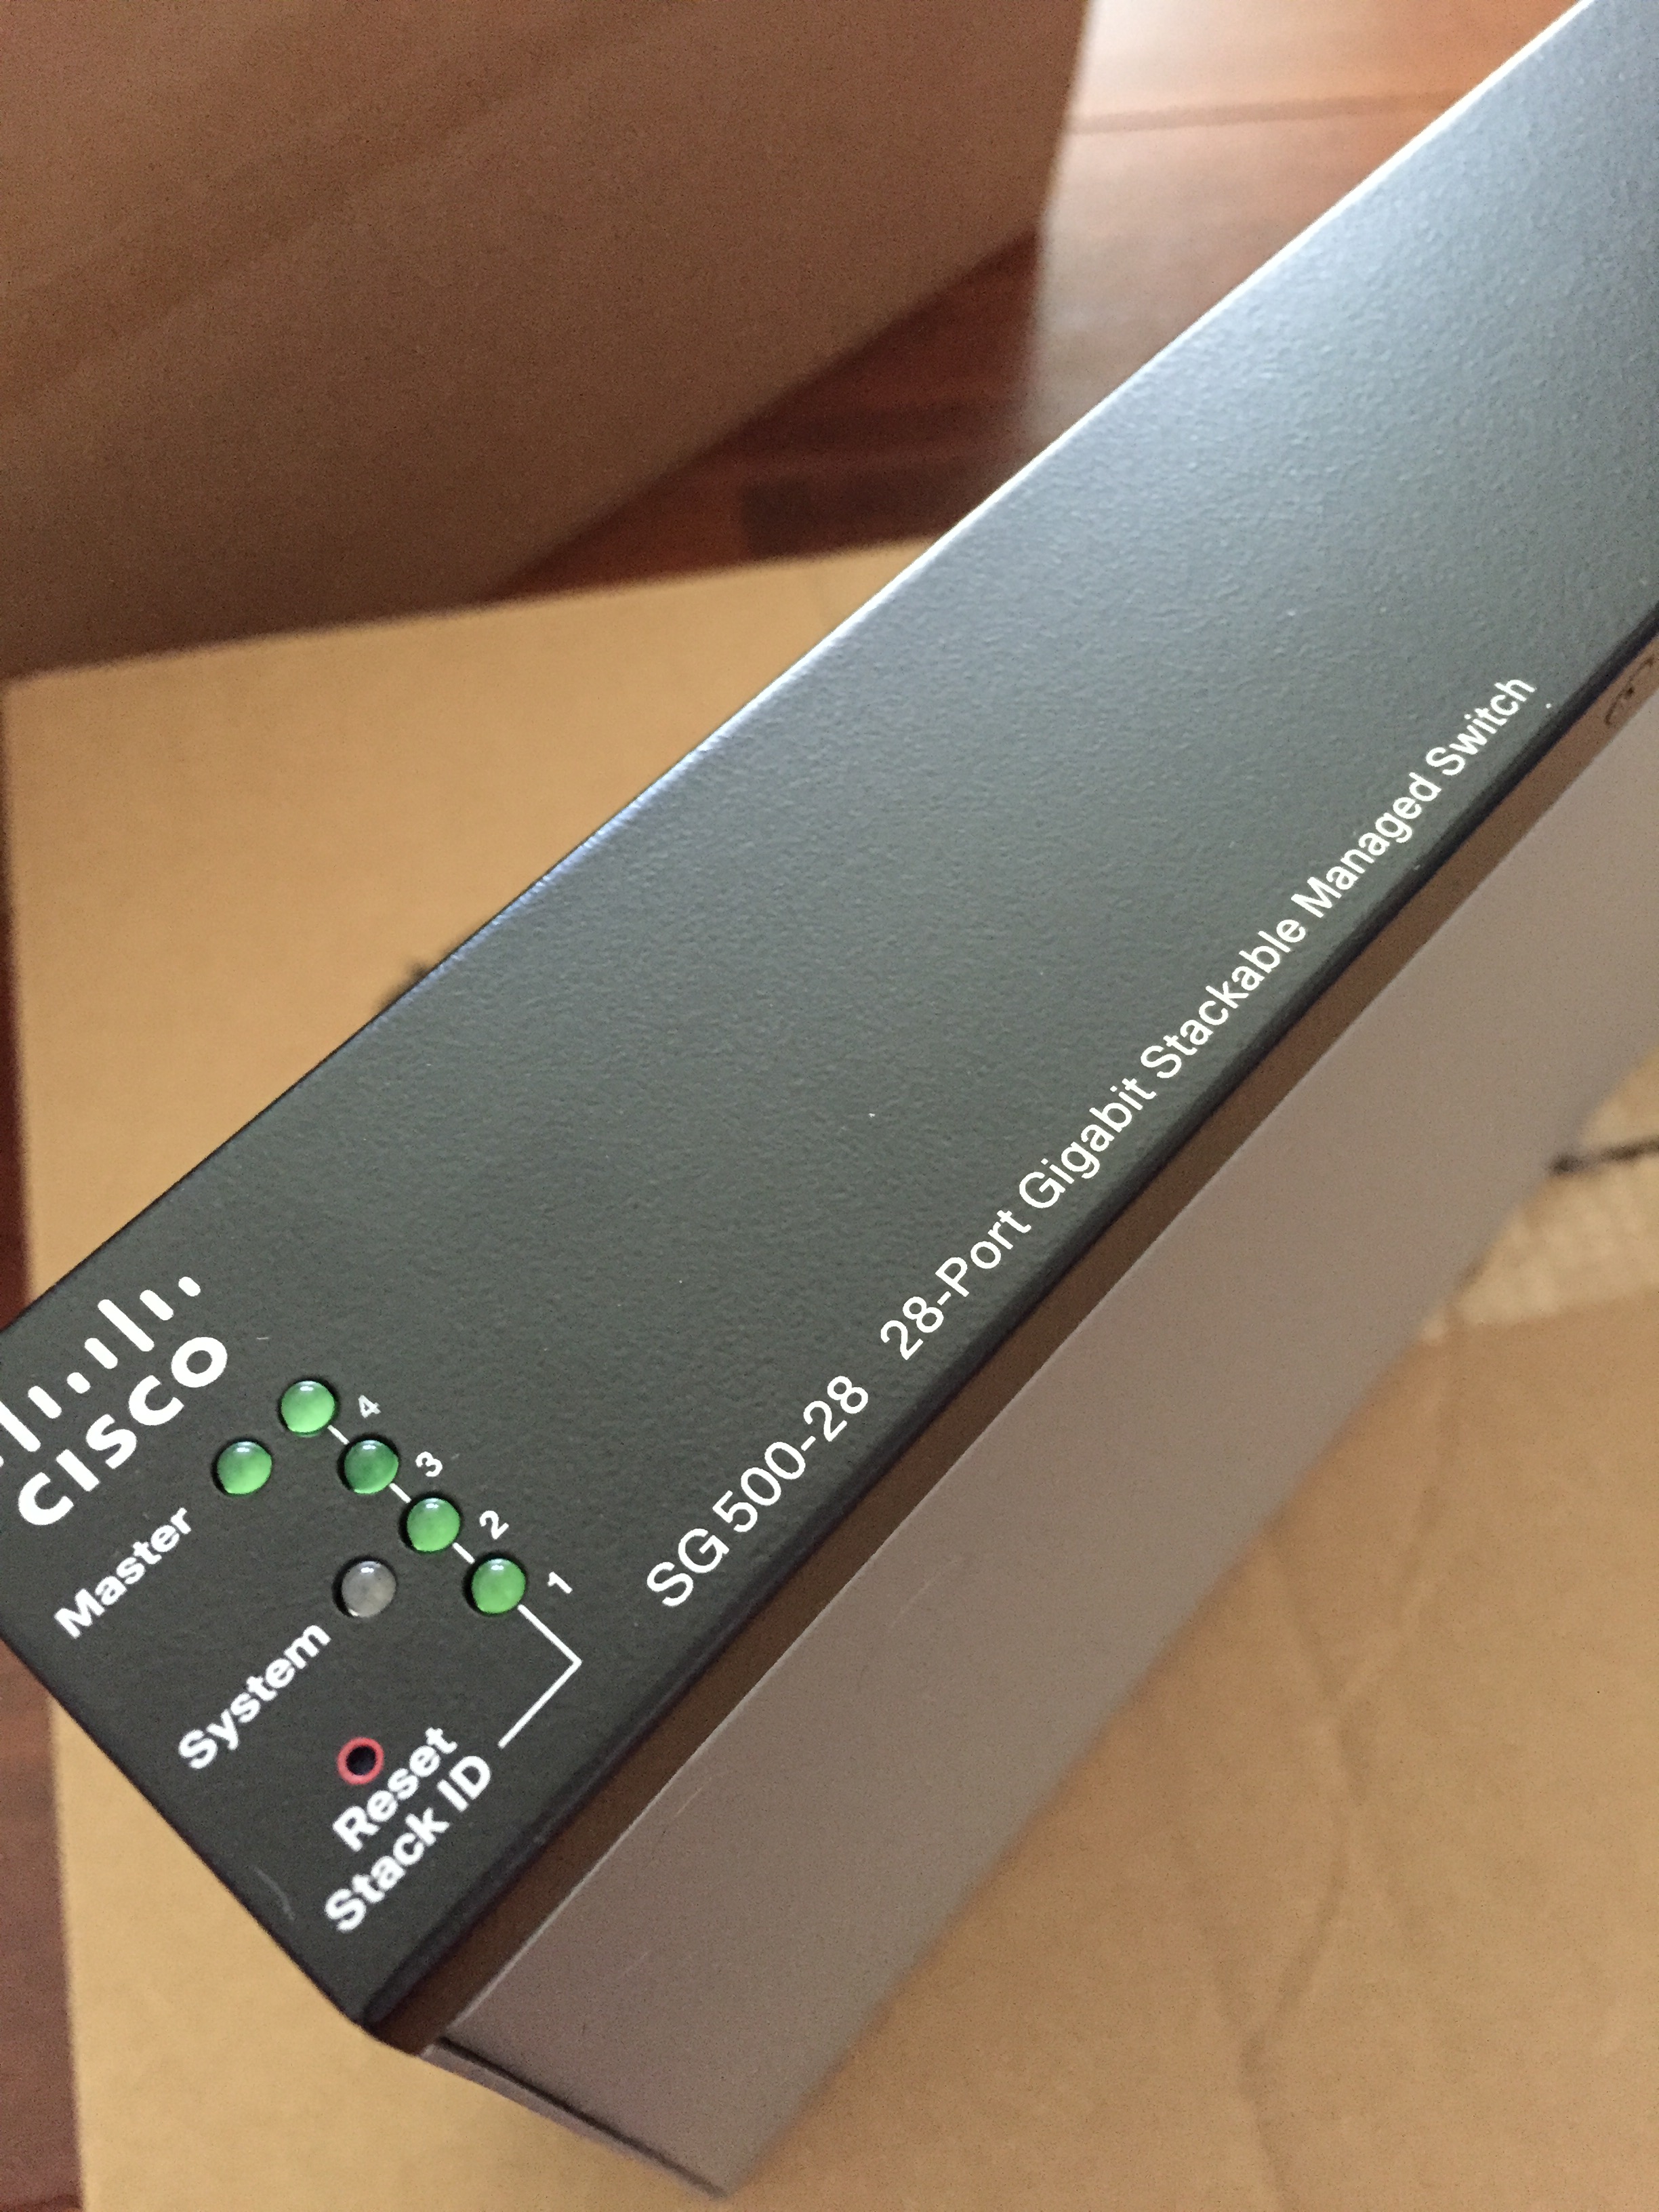
While testing network behavior and hitting the VMkernel network stack routing problem I decided it was time to upgrade my network with some proper equipment. I asked around in the community and a lot where using the Cisco SG300 series switch. Craig Kilborn on twitter blogged about his HP v1910 24G and told me that it was quite noisy. A Noctua hack might do the trick, but I actually wanted some more ports than 24. Erik pointed out the Cisco SG500-28-K9-G5 switches that are stackable and fanless. Perfect! I could finally use all the NICs in my servers and have room for some expansion.
Time for a new rack
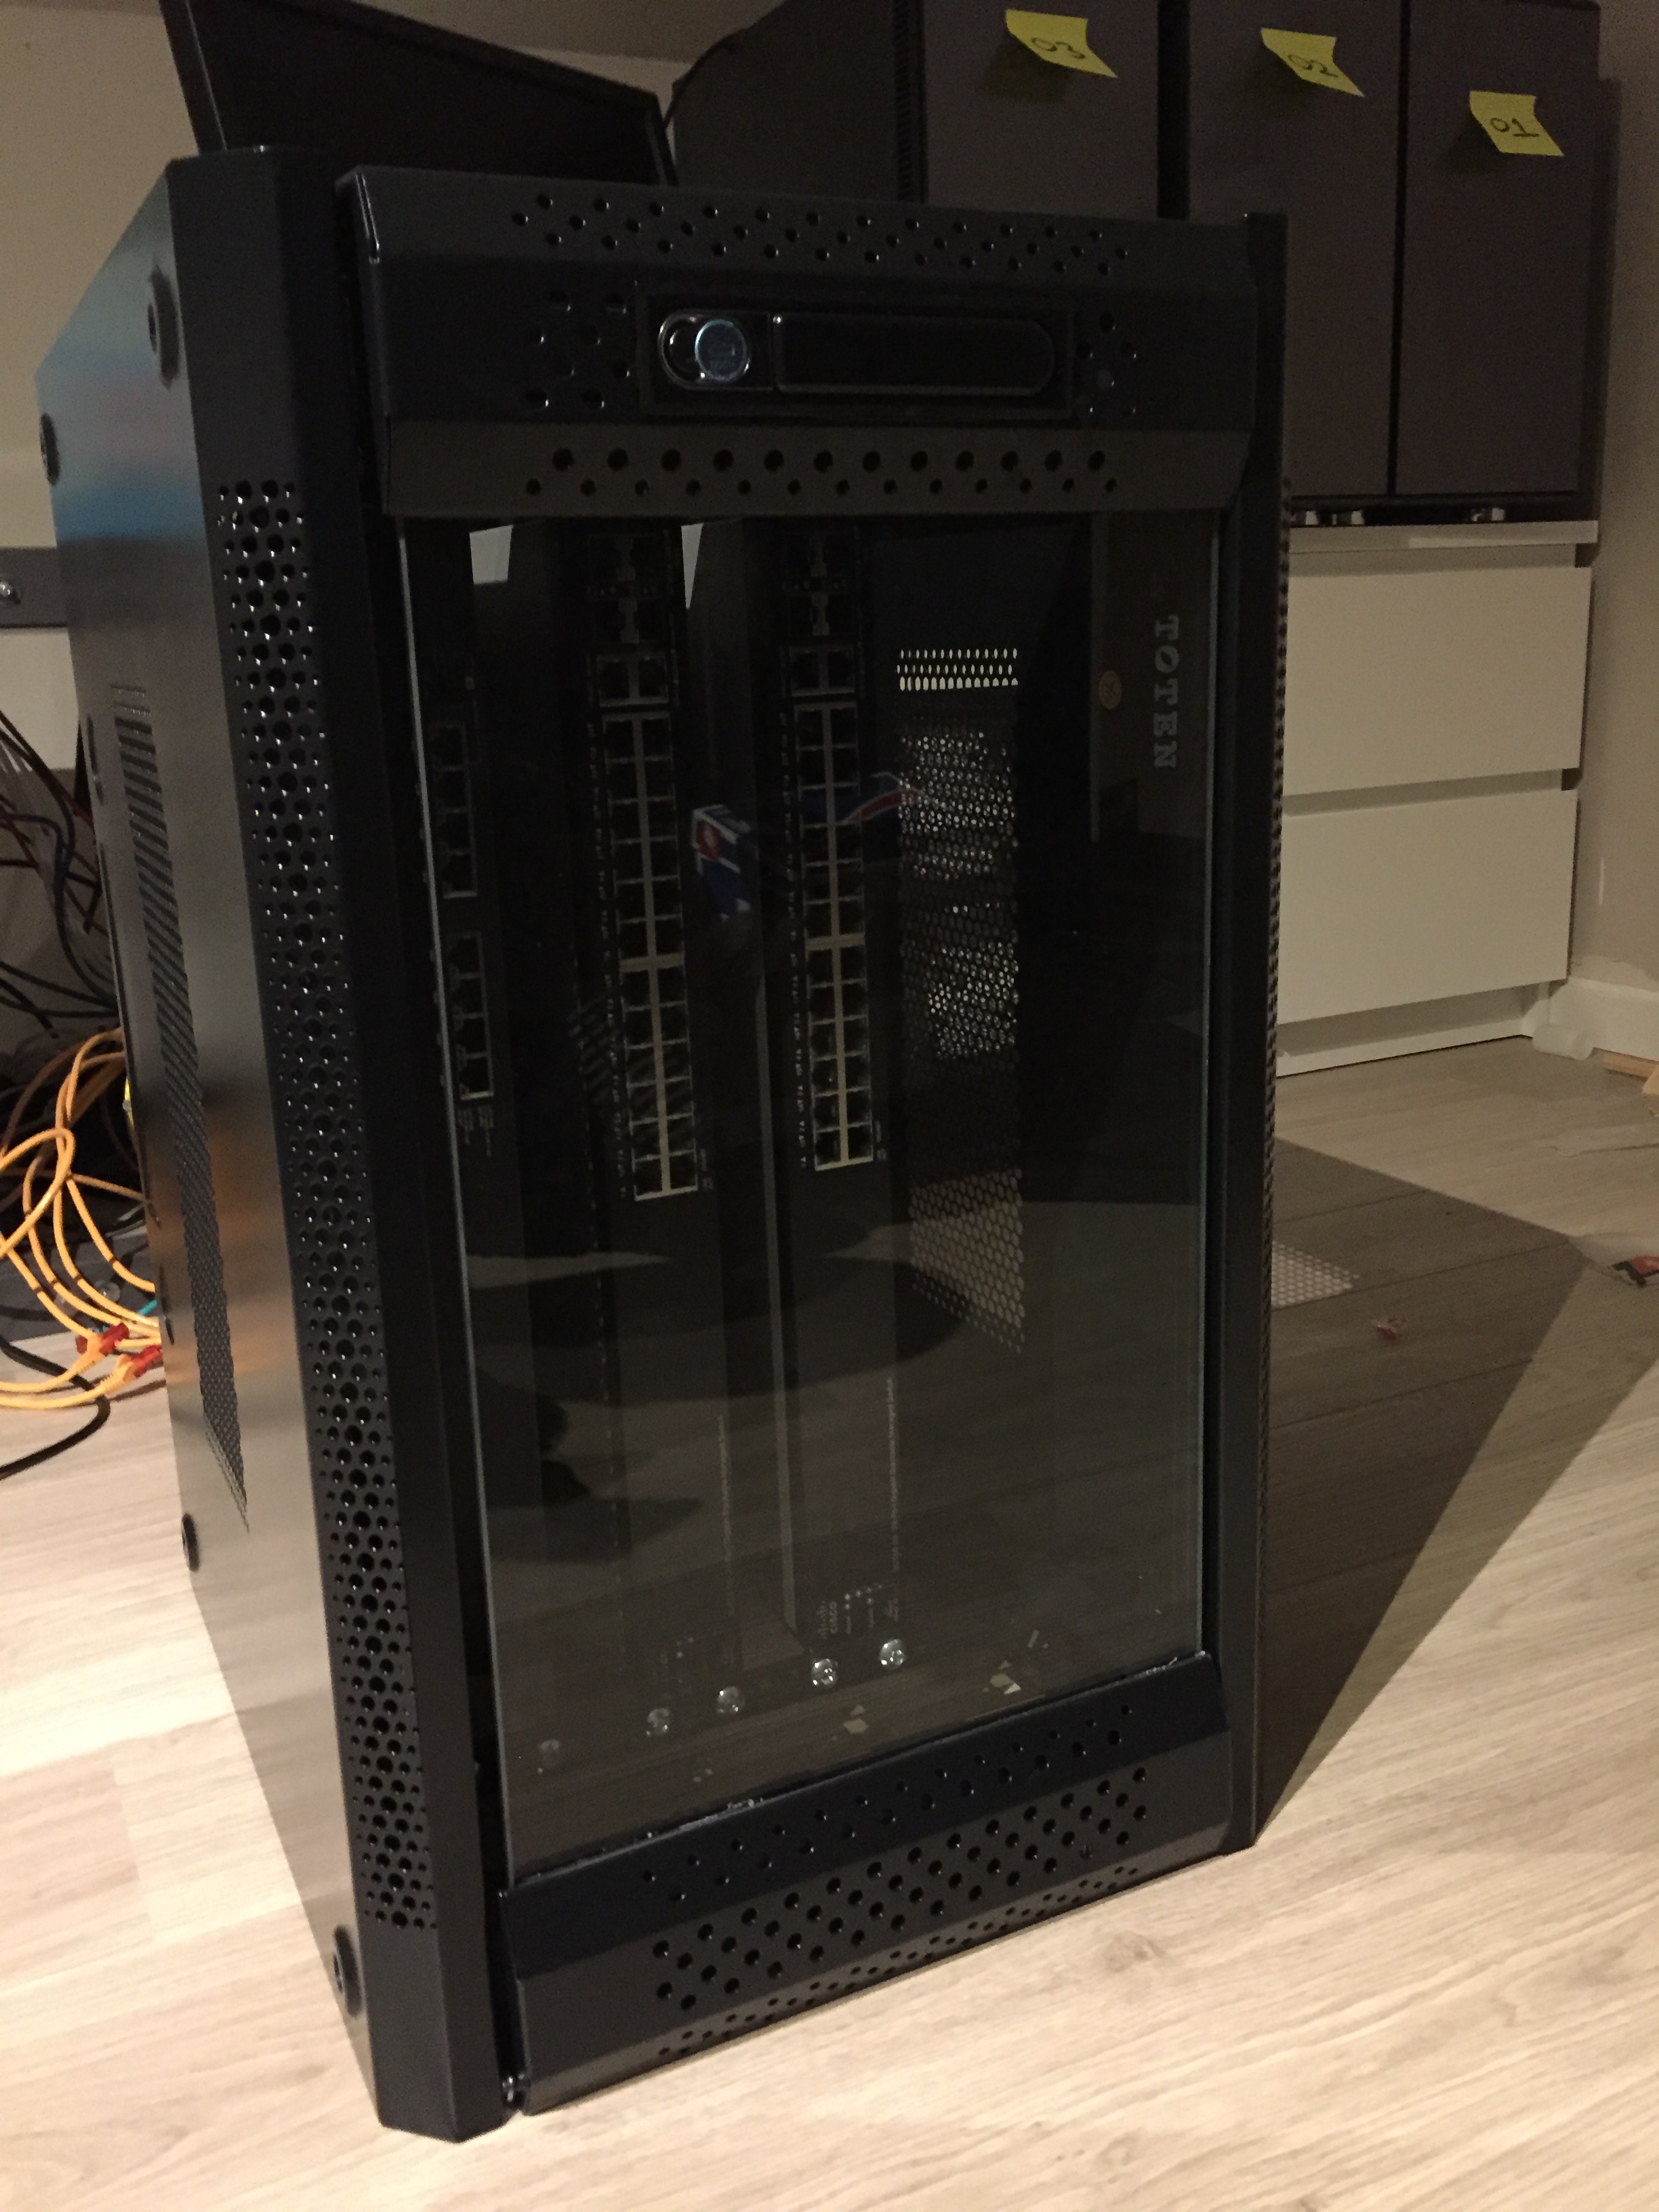
So from this point on I have three 19” sized switches, the IKEA lack hack table was nice, but these babies deserved better. The third host didn’t fit the table therefor new furniture had to be bought anyways. After spending countless of hours looking at 19” racks I came across a 6U Patch case.

This case had a lockable glass door (kids) and removable side panels, perfect for my little physics experiment. Just place the case in an upright position, remove the side panels and let the heat escape from the top. The fans will suck in “cold” air from the bottom. The dimensions of the patch case were perfect as it fitted exactly in my setup. The case is an Alfaco 19-6406. But with this networking equipment I’m feeling that my home lab is slowly turning into a #HomeDC.
With all this compute and network power I wanted to see what you can do when you have enterprise grade flash devices. I’m already using the Intel DC S3700 SSD’s and I’m very impressed by their consistent high performance. However Intel has released the Intel SSD DC p3700 PCIe card that use NVMe. I turned to Intel and they were so generous of loaning me three of these beasts for a couple of months. The results are extremely impressive, soon I will post some cool test results, but imagine seeing more than 500.000 IOPS in your homeDC on a daily basis.
Management server
To keep the power bill as low as possible, all three hosts are shutdown after testing, but I would like to have the basic management VMs running. In order to do this, I used a Mac Mini. William wrote extensively about how to install ESXi on a Mac, if you are interested I would recommend to check out his work: http://www.virtuallyghetto.com/apple. Unfortunately 16Gb is quite limited when you are running three windows VMs with SQL DB’s, therefor I might expand my management cluster by adding another Mac Mini. Time to find me some additional sponsors. 🙂