To get a datastore cluster to surface a (user-defined) storage capability, all datastores inside the datastore cluster must be configured with the same storage capability.
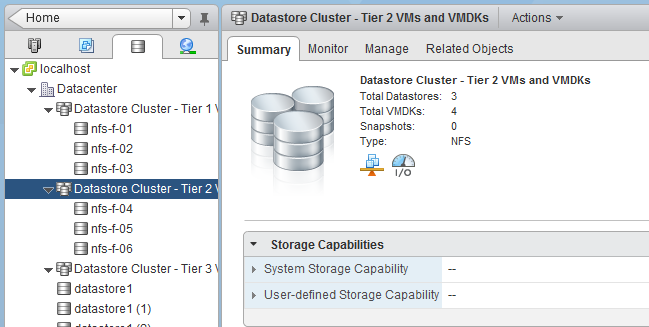
When creating Storage Capabilities, the UI does not contain a view where to associate a storage capability with multiple datastores. However that does not mean the web client does not provide you with the ability to do so. Just use the multi-select function of the webclient.
Go to Storage, select the datastore cluster, select Related Objects and go to Datastores view. To select all datastores, click the first datastore, hold shift and select the last datastore. Right click and select assign storage capabilities.

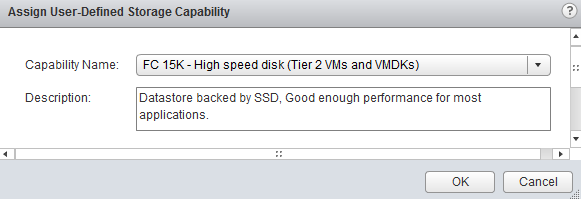
Select the appropriate Storage capability and click on OK.
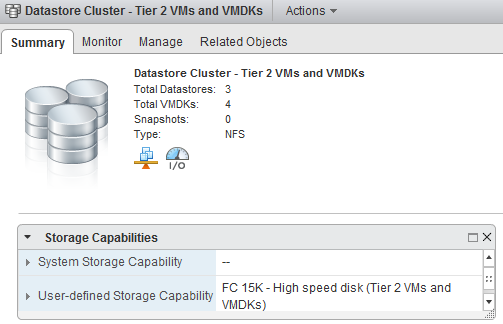
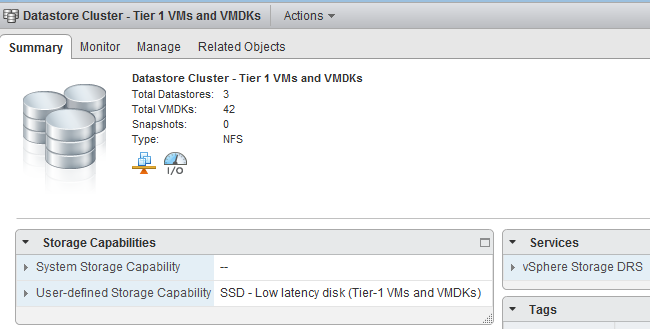
The Datastore Cluster summary tab now shows the user-defined Storage Capability.
Get notification of these blogs postings and more DRS and Storage DRS information by following me on Twitter: @frankdenneman
Storage DRS demo available on VMware TV
If you haven’t seen Storage DRS in action, check out the Storage DRS demo I’ve created for VMwareTV.
Get notification of these blogs postings and more DRS and Storage DRS information by following me on Twitter: @frankdenneman
VM Storage Profiles and Storage DRS – Part 2 – Distributed VMs
Mentioned in part-1 of the Storage DRS and VM Storage Profiles series, Storage DRS expects “storage characteristics –alike” datastores inside a single datastore cluster. But what if you have multiple tiers of storage and you want to span the virtual machine across them? Storage profiles can assist in deploying the VMs across multiple datastore clusters safely and inline with your SLAs.
Storage DRS Datastore architecture
When you have multiple tiers of storage, its recommended to create multiple datastore clusters and each datastore cluster contains disks from a single tier. Let’s assume you have three different kinds of disks in your array: SSD, FC 15K and SATA.

Datastores backed by disk out a single pool are aggregated into a single datastore, resulting in three datastore clusters. Having multiple datastore clusters can increase the complexity of the provisioning process, using VM storage profiles ensures you that virtual machines or disk files are placed in the correct datastore cluster.
Assign storage capabilities to datastores
All datastores within a single datastore cluster are associated with the same storage capability.
| Storage Capability | Associated with datastores in Datastore cluster: |
| SSD – Low latency disks (Tier 1 VMs and VMDKs) | Datastore Cluster Tier 1 VMs and VMDKs |
| FC 15K – Fast disks (Tier 2 VMs and VMDKs) | Datastore Cluster Tier 2 VMs and VMDKs |
| SATA – High Capacity Disks (Tier 3 VMs and VMDKs) | Datastore Cluster Tier 3 VMs and VMDKs |
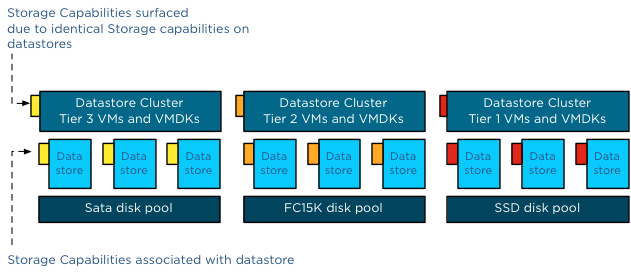
Please note that all datastores must be configured with the same storage capability. If one datastore is not associated with a storage capability or has a different storage capability than its sibling datastores, the datastore cluster will not surface a storage capability.
One virtual machine – different levels of service required
Generally faster disk have higher cost per gigabyte and have a lower maximum capacity per drive, this usually drives various design decisions and operational procedures. Typically Tier 1 applications and data caching mechanisms end up in on the fastest storage disk pools.
Most virtual machines are configured with multiple hard disks. A system disk containing the Operating System and one or more disks containing log files and data. The footprint of the virtual machine is made up out of a working directory and its VMDK files. When reviewing the requirements of the virtual machine, it is common that only the VMDKs containing the log files and the databases require low latency disks while the system disk can be placed in a lower tier storage pool. And this is the reason why you can assign multiple different VM storage profiles to a virtual machine.
Multiple VM storage Profiles
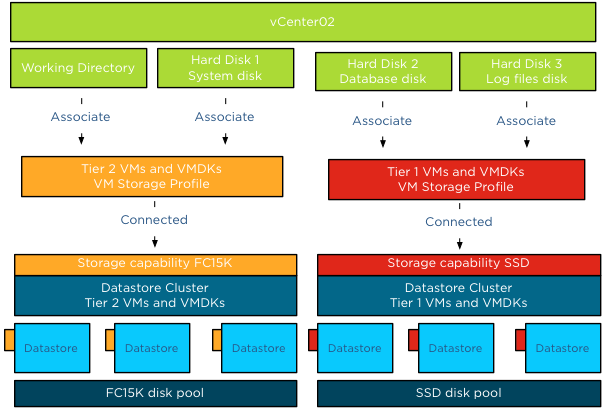
Let’s use an example; in this scenario we are going to deploy the virtual machine vCenter02. The virtual machine is configured with three disks, Hard disk 1 contains the OS, Hard disk 2 contains the database and Hard disk 3 contains the log files.
We associated the VM with two VM Storage Profiles. To avoid wasting precious low latency disk space in the Tier 1 datastore cluster, we are going to associate the VMs working directory (containing the VM swap file) and the 60GB system disk are to the Tier 2VM storage profile, which is connected to Tier 2 Storage capability.
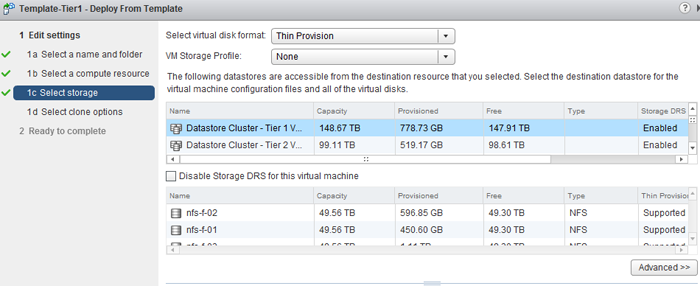
When selecting storage during the deployment process, click on the button advanced.
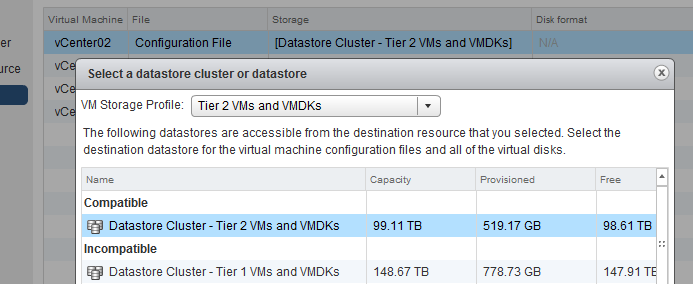
To associate a VM storage profile to a Hard disk or the working directory, called Configuration file in this screen, double click the item in the storage column and select browse.

The VM storage Profile screen appears and you can select the appropriate VM storage profile. The VM storage profile “Tier 2 VMs and VMDKs” is selected and will be associated with the Configuration file once we click ok. As Tier 2 storage profile is associated with Storage Capability “FC 15K – Fast disks (Tier 2 VMs and VMDKs)”, the UI list “Datastore Cluster – Tier 2 VMs and VMDKs” as the only compatible datastore cluster.
These steps have to be repeated for every hard disk of the virtual machine. At this point the working directory (configuration file) and the System disk will be placed on Datastore Cluster Tier 2 and the Database disk and Log file disk will be placed on Datastore Cluster Tier 1 once the deployment process has completed.

The ready to complete screen displays the associated VM storage profiles and the destinations of the working directory and Hard disks.
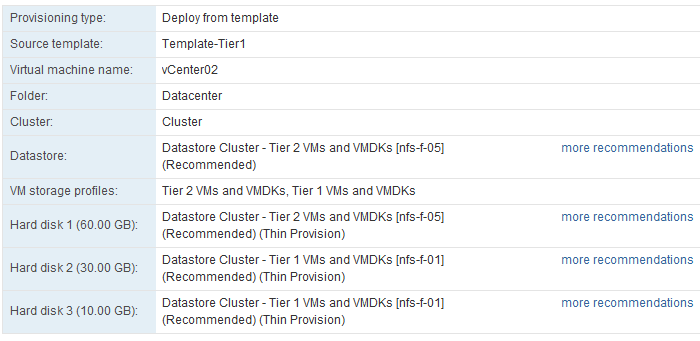
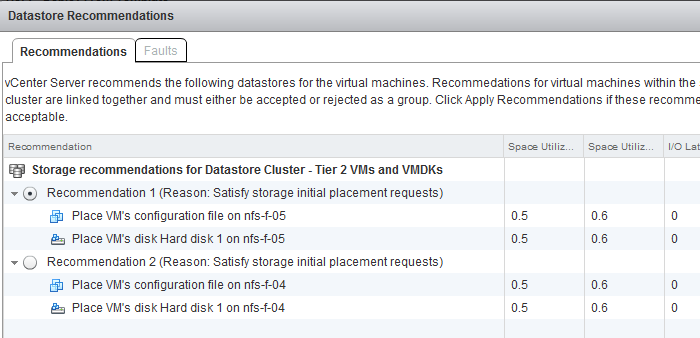
Storage DRS generates placement recommendations and these can be changed if you want to select a different datastore. By selecting the option “more recommendations” a window is displayed and will show you alternative destination datastores.
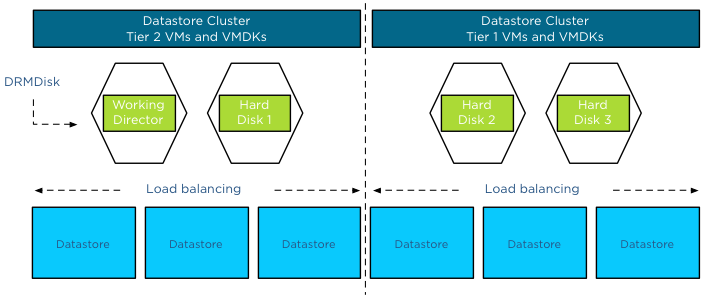
DRMDisks
Storage DRS is able to generate these stand-alone recommendations due to the construct called DRMDisks. Storage DRS generates a construct called DRMDisk for each VM working directory and each VMDK. The DRMDisk is the smallest element Storage DRS can load balance (atomic level). Therefore Storage DRS can move a system disk VMDK to a different datastore in the datastore cluster without having to move the working directory or another disk. Depending on the default Affinity rule of the cluster, DRMdisks within the datastore cluster will be placed on the same datastore (affinity) or separated on different datastores (anti-affinity).
For more information about load balancing based on DRMdisk instead of a complete VM, please read the article: Impact of Intra VM affinity rules on Storage DRS.
Part 3 will cover applying Storage Profiles to virtual machine templates
Get notification of these blogs postings and more DRS and Storage DRS information by following me on Twitter: @frankdenneman
VM Storage Profiles and Storage DRS – Part 1
In my previous article about how to configure storage profiles using the web client I stated that different storage profiles could be assigned to a single virtual machine. Storage profiles can be used together with Storage DRS. Let’s take a closer look on how to use storage profiles with Storage DRS.
Architectural view
VM storage profiles need to be connected to a storage capability to function. The storage capability itself needs to be associated to one or more datastores. A virtual machine in its whole can be associated with a storage profile, or you can use a more granular configuration and associate different storage profiles to the VM working directory and / or VMDK files.
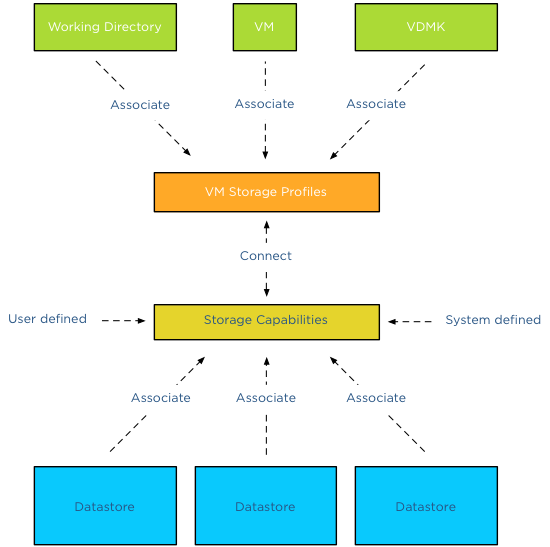
Datastore cluster storage capabilities
You might have noticed that there isn’t a datastore cluster element depicted in the diagram. The storage capabilities of a datastore cluster are extracted from the associated storage capabilities of each datastore member. If all datastores are configured with the same storage capability, the datastore cluster surfaces this storage capability and becomes compliant with the connected VM storage profiles.
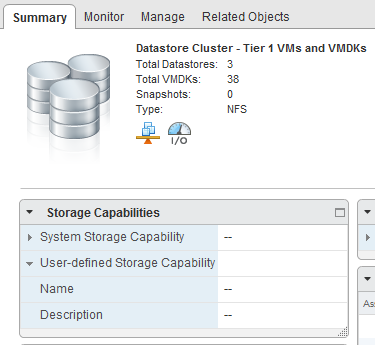
For example, “Datastore cluster – Tier 1 VMs and VMDKs” contains 4 datastores. NFS-F-01, NFS-F-02, NFS-F-03 are associated with the storage capability “SSD low latency disk (Tier-1 VMs and VMDKs)” while datastore NFS-F-04 is associated with storage capability “FC 15K – High Speed disk (Tier 2 VMs and VMDKs)”.
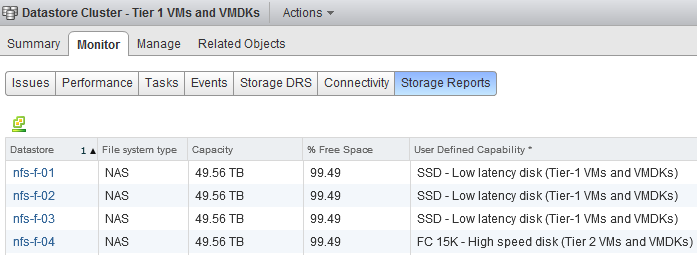
When reviewing the Storage Capabilities of the datastore cluster, no Storage Capability is displayed:
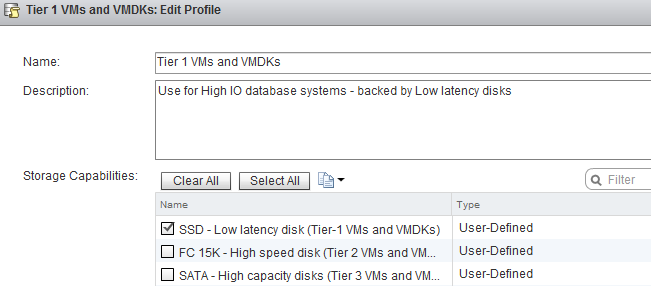
The VM Storage Profile “Tier 1 VMs and VMDK” is connected to the Storage Capability “SSD low latency disk (Tier-1 VMs and VMDKs)”.
When selecting storage during the deployment of a virtual machine, the datastore cluster is considered incompatible with the selected VM Storage Profile.
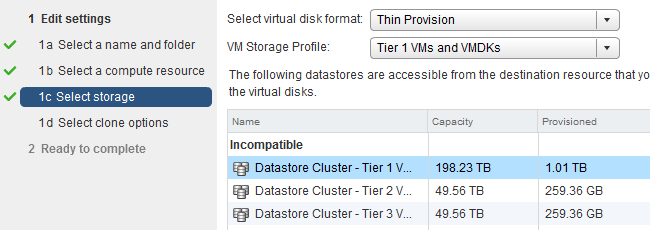
Incompatible, but there are three datastores available with the correct Storage capabilities?
Although this is true, Storage DRS does not incorporate storage profiles compliancy in its balancing algorithms. Storage DRS is designed with the assumption that all disks backing the datastores are “storage characteristics-alike”.
Manually selecting a datastore in the datastore cluster is only possible if the option “Disable Storage DRS for this virtual machine” is selected. Placing the VM on the specific datastore and then enabling Storage DRS later on that VM is futile. Storage DRS will load balance the VM if necessary, but it doesn’t take the VM storage profile compatibility into account when load balancing. So if you have, please remove this “workaround” in your operation manuals 🙂
After removing the datastore with the dissimilar storage capability (NFS-F-04), the Datastore cluster surfaces “SSD – Low Latency disk (Tier-1 VMs and VMDKs)” and becomes compatible with virtual machines associated with the Tier-1 VM storage Profile.
Part 2 will cover distributing virtual machine across multiple datastores using Storage Profiles.
Get notification of these blogs postings and more DRS and Storage DRS information by following me on Twitter: @frankdenneman
How to create a datastore cluster using the new web client.
vSphere 5.1 main user interface is provided by the web client, during beta testing I spend some time to get accustomed to the new user interface. In order to save you some time, I created this write-up on how to create a datastore cluster using the web client. I assume you already installed the new vCenter 5.1. If not, check out’s Duncan post on how to install the new vCenter Server Appliance.
Before showing the eight easy steps that need to be taken when creating a datastore cluster, I want to list some constraints and the recommendations for creating datastore clusters.
Constraints:
• VMFS and NFS cannot be part of the same datastore cluster.
• Similar disk types should be used inside a datastore cluster.
• Maximum of 64 datastores per datastore cluster.
• Maximum of 256 datastore clusters per vCenter Server.
• Maximum of 9000 VMDKs per datastore cluster
Recommendations:
• Group disks with similar characteristics (RAID-1 with RAID-1, Replicated with Replicated, etc.)
• Leverage information provided by vSphere Storage APIs – Storage Awareness
The Steps
1. Go to the Home screen and select Storage

2. Select the Datastore Clusters icon in Related Objects view.

3. Name and Location
The first steps are to enable Storage DRS, specify the datastore cluster name and check if the “Turn on Storage DRS” option is enabled.

When “Turn on Storage DRS” is activated, the following functions are enabled:
• Initial placement for virtual disks based on space and I/O workload
• Space load balancing among datastores within a datastore cluster
• IO load balancing among datastores within a datastore cluster
The “Turn on Storage DRS” check box enables or disables all of these components at once. If necessary, I/O balancing functions can be disabled independently.If Storage DRS is not enabled, a datastore cluster will be created which lists the datastores underneath, but Storage DRS won’t recommend any placement action for provisioning or migration operations on the datastore cluster.
When you want to disable Storage DRS on an active datastore cluster, please note that all the Storage DRS settings, e.g. automation level, aggressiveness controls, thresholds, rules and Storage DRS schedules are saved so they may be restored to the same state at the moment Storage DRS was disabled.
4. Storage DRS Automation
Storage DRS offers two automation levels:

No Automation (Manual Mode)
Manual mode is the default mode of operation. When the datastore cluster is operating in manual mode, placement and migration recommendations are presented to the user, but are not executed until they are manually approved.
Fully Automated
Fully automated allows Storage DRS to apply space and I/O load-balance migration recommendations automatically. No user intervention is required. However, initial placement recommendations still require user approval.
Storage DRS allows virtual machines to have individual automation level settings that override datastore cluster-level automation level settings.
Similar to when DRS was introduced, I recommend to start using manual mode first and review the generated recommendations. If you are comfortable with the decision matrix of Storage DRS you can switch to fully automated. Please note that you can switch between modes on the fly and without incurring downtime.
5. Storage DRS Runtime Settings
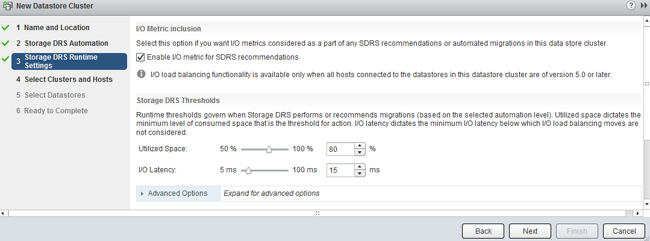
Keep the defaults for now. Future articles expand upon the Storage DRS thresholds and advanced options.
6. Select Clusters and Hosts
The “Select Hosts and Clusters” view allows the user to select one or more (DRS) clusters to work with. Only clusters within the same vCenter datacenter can be selected, as the vCenter datacenter is the boundary for Storage DRS to operate in.

7. Select Datastores
By default, only datastores connected to all hosts in the selected (DRS) cluster(s) are shown. The Show datastore dropdown menu provides the options to show partially connected datastores. The article partially connected datastore cluster gives you insight of the impact of this design decision.

8. Ready to Complete
The “Ready to Complete” screen provides an overview of all the settings configured by the user.
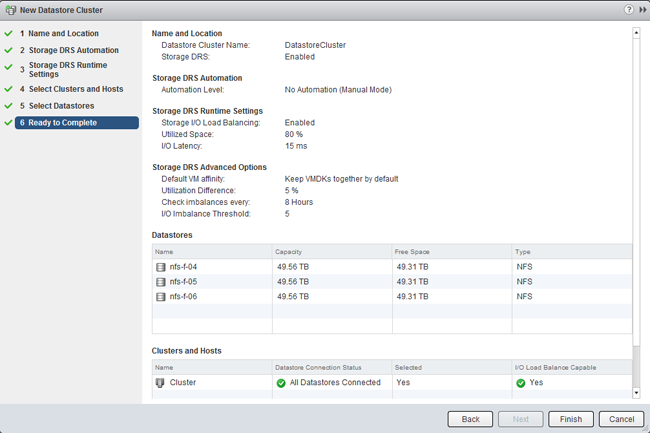
Review the configuration of your new datastore cluster and click on finish.