• Skip to primary navigation
  • Skip to main content

frankdenneman.nl

  • AI/ML
  • NUMA
  • About Me
  • Privacy Policy

Multi-NIC vMotion – failover order configuration

December 20, 2012 by frankdenneman

After posting the article “designing your vMotion network” I quickly received the question which failover order configuration is better. Is it better to configure the redundant NIC(s) as standby or as unused? The short answer: always use standby and never unused!
Tomas Fojta posted the comment that it does not make sense to place the NICs into standby mode:

In the scenario as depicted in the diagram I prefer to use active/unused. If you think about it the standby option does not give you anything as when one of the NICs fails both vmknics will be on the same NIC which does not give you anything.

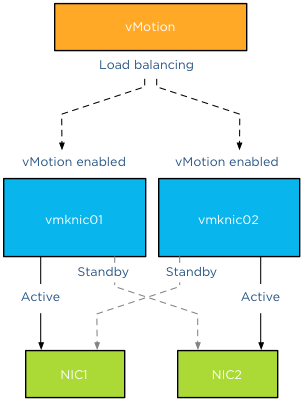
Although it does not provide any performance benefits having vMotion routing the traffic across the same physical NIC during a NIC failure, there are two important reasons for providing redundant connection to each vmknic:

  1. Abstraction layer
  2. Using a default interface for management traffic

Abstraction layer
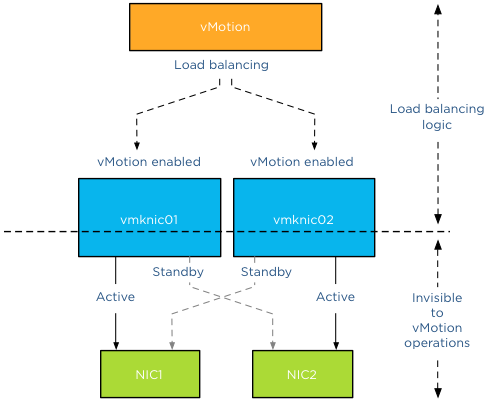
As mentioned in the previous article, vMotion operations are done at the vmknic level. Due to vMotion focussing on the vmknic layer instead of the physical layer, some details are abstracted from vMotion load balancing logic such as the physical NIC’s link state or health. Due to this abstraction vMotion just selects the appopriate vmknics for load balancing network packets and trusts that there is connectivity between the vmknics of the source and destination host.
Default interface
Although vMotion is able to use multiple vmknics to load balance traffic, vMotion assigns one vmknic as its default interface and prefers to use this for connection management and some trivial management transmissions. *
As such, if you’ve got multiple physical NICs on a host that you plan to use for vMotion traffic, it makes sense to mark them as standby NICs for the other vMotion vmknics on the host. That way, even if you lose a physical NIC, you won’t see vMotion network connectivity issues.
This means that if you have designated three physical NICs for vMotion your vmknic configuration should look as follows:

VMknic Active NIC Standby NIC
vmknic0 NIC1 NIC2, NIC3
vmknic1 NIC2 NIC1, NIC3
vmknic2 NIC3 NIC1, NIC2

By placing the redundant NICs into standby instead of unused you avoid the risk of having an unstable vMotion network. If a NIC fails, you might experience some vMotion performance degradation as the traffic gets routed through the same NIC, but you can trust your vMotion network to correclty migrate all virtual machines off the host in order for to replace the faulty NIC.
* Word to the wise
By writing about the fact that vMotion designates a vmknic to be the default interface I’m aware that this triggers and sparks the interest of some of the creative minds in our community. Please do not attempt to figure out which vmknic is designated as default interface and make that specific vmknic redundant and different from the rest. To paraphrase Albert Einstein: “Simplicity is the root of all genius”. Keep your Multi-NIC consistent and identical within the host and throughout all hosts. This saves you a lot of frustration during troubleshooting. Being able to depend on your vMotion network to migrate the virtual machines safely and correctly is worth its weight in gold.
Part 1 – Designing your vMotion network
Part 3 – Multi-NIC vMotion and NetIOC
Part 4 – Choose link aggregation over Multi-NIC vMotion?
Part 5 – 3 reasons why I use a distributed switch for vMotion networks
Filed Under: vMotion

vMotion Futures Survey

December 19, 2012 by frankdenneman

If you have a few spare minutes, please fill out the survey about vMotion futures. We are very interested in how you use vMotion and especially your opinion about use cases for Long-distance vMotion operations. It takes about 10 minutes to get through.
http://tinyurl.com/VMwareVMotion2012

Filed Under: vMotion

Storage vMotion and the vSphere web-client

December 18, 2012 by frankdenneman

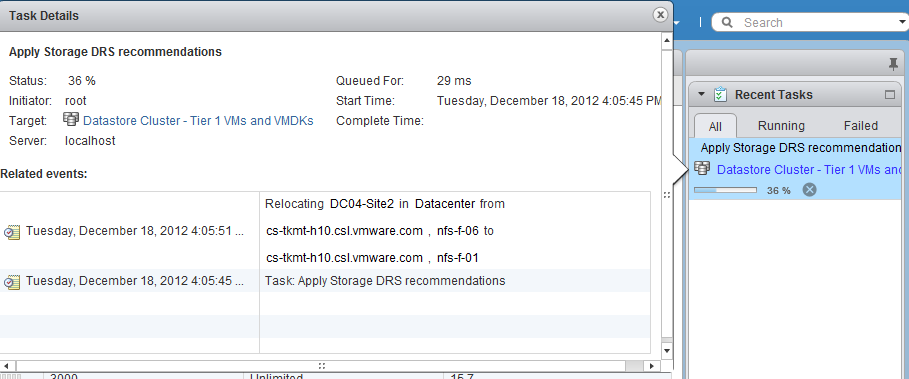
The new web client of vSphere 5.1 is my weapon of choice when working in my lab. It contains a lot of “hidden” gems, the UI team spends a lot of time crafting and aligning the user-interface to the administrator needs. One thing that drove me nuts was the lack of information when running a Storage vMotion operation. The Recent task doesn’t show anything, other than Storage vMotion operation itself and the target. When using Storage DRS, it only shows the name of the target Datastore cluster. Sometimes you just want to know which datastore the virtual machine migrated to.
The new recent task window
For example, take a look at the Recent Tasks window in the right size of the corner of the web client. When running a storage vMotion operation, it displays the Storage vMotion task similar to the vSphere client. However, when clicking on the task itself it shows the event info and task in one view. Helping you identify the source and destination datastore of the Storage vMotion process.

Compare that to the workflow of the old vSphere client
Select the task in the Recent task bar and double click it.

This brings you in the Task and Events view of the target datastore cluster. By default the view is displaying events. Therefore you need to select Tasks, then select the task itself and then click on the related events in the bottom view.

It may look trivial, but these things do speed up your work. Eradicating unnecessary clicks and wait time before a screen refreshes sure makes your job a little easier.

Filed Under: Storage DRS, vMotion

Designing your vMotion network

December 18, 2012 by frankdenneman

A well designed vMotion network will benefit the environment in many ways. Before vSphere 5, designing a vMotion network was relative easy, select the fastest NIC and assign it to a vMotion vmknic. vSphere 4.x supports both 1GB and 10GB networks and since vSphere 5.0 vMotion is able to leverage multiple NICs. Multi-NIC in vSphere 5.x makes it a bit more challenging. The combination of NICs, the failover mode and which load balancing policy need to be taken into consideration when configuring your vMotion network.
The benefit of multi-NIC vMotion network
In vSphere 5.x vMotion balances the vMotion operations across all available NICs. Both for a single vMotion operation and for multiple concurrent vMotions operations. By using multiple NICs it reduces the duration of a vMotion operation. This benefits:

  • Manual vMotion processes: Allocating more bandwidth to the vMotion process will result in faster migration times. The less time spend on monitoring a manual process means more time you can spend on other – more important – operations.
  • DRS load balancing: Based on the average time per migration and the number of concurrent vMotion process, DRS restrict the number of load balancing operations it can process between two load balancing runs. By providing more bandwidth to the vMotion network, DRS is able to run more load balancing operations in between load balancing runs, which in turn benefits the load balance of the cluster. Better load balance means better resource availability for the virtual machines, which in turn means better performance for your applications.
  • Maintenance mode: Faster migration times, means reducing the time a host enters maintenance mode. With the increase of consolidation ratio, the time it takes to migrate all the virtual machines off the host is increased as well. This can have impact on your SLA and the ability to service the host within the allowed time.

Multi-NIC setup
The vMotion process leverages the vmknic instead of sending packets directly to a physical NIC.In order to use multiple NICs for vMotion, multiple vmknics are required. Duncan wrote an excellent article how to setup multi-NIC vMotion network.
Failover order and Load balancing policy
Each vmknic should only use one active NIC, this result in only one valid load balancing policy and that is “Route based on originating virtual port”. This setup inhibits physical NIC load balancing such as IP-hash or the load balancing policy “based on physical load (LBT)”. The reason why the active/standby failover order is the only valid and supported configuration is because of the way vMotion load balancing works. The vMotion process itself handles load balancing, based on its own algorithm, vMotion picks a vmknic for a specific network packet. As vMotion expects the vmknic to be backed by a single physical NIC, sending out data through a given vmknic ensures vMotion that the data traverses that dedicated physical NIC. If the physical NICs were configured in a load-balancing mode, this could interfere with the vMotion level load balancing logic. vMotion would not be able to predict which physical NIC is used by the vmknic and possible sending all vMotion traffic over the same NIC, even if Motion sends the data to different vmknics.

Consistent configuration
Ensure that each physical NIC is configured in a consistent and correct way across the vMotion network on the host and across the hosts inside the cluster. vCenter is very conservative and if it detects a mismatch it drops the number of concurrent vMotion operations on that host back to 2 regardless of the available bandwidth. Therefore always check on each level if the link speed, MTU and duplex settings are identical, both on the NIC side as well as the switch side. Please keep in mind that the all the vMotion vmknics should exist in the same subnet. Although its possible to set static routes, “routable vMotion” configurations are not supported by VMware.
Link speed
By default vCenter allows 4 concurrent vMotion operations on a host with a 1 GB vMotion network and 8 concurrent vMotion operations on a host with a 10 GB vMotion network. Be aware that this is based on the detected link-speed. In other words, if the physical NIC reports at least 10GbE, link speed, vCenter allows 8 vMotions, but if the physical NIC reports less than 10GBe, vCenter allows a maximum of 4 concurrent vMotions on that host. To stress it again, the number of concurrent vMotions is based on the detected link speed. For example, take the HP Flex technology. This sets a hard limit on the flexnics, resulting in the reported link speed equal or less to the configured bandwidth on Flex virtual connect level. I’ve come across many Flex environments configured with more than 1GB bandwidth, ranging between 2GB to 8GB. Although they will offer more bandwidth per vMotion process, it will not offer an increase in the number of concurrent vMotions, limiting the number of concurrent vMotion operations to 4.
As mentioned before, vCenter is very conservative; multi-NIC vMotion limits are currently determined by the slowest available vMotion NIC. This means that if you include a 1GB NIC in your 10GB vMotion network configuration, that host is restricted to maximum of 4 concurrent vMotion operations per host. I’ve seen a few vMotion network designs where a 1GB link was added to the 10GB vMotion network configuration, primarily used as a safety net. Just in case the 10GB network drops, well that safety net just restricted that host to 4 concurrent vMotion operations.
Increase in NICS does not impact number of concurrent vMotions
Using multiple NICs increases the bandwidth available for the vMotion process; it does not increase the number of concurrent vMotions. When 10Gb uplinks are used for the vMotion, the maximum concurrent vMotions allowed is eight, even with multiple NICs are assigned, the limit remains at eight. However the increase in bandwidth will decrease the duration of each vMotion process.
A Multi-NIC vMotion configuration is slightly more complex that single NIC vMotion networks, but this setup will benefit you in many ways. Reducing vMotion operation times allows DRS to schedule more load balancing operations per invocation and the increased bandwidth allows the host to complete the transition to maintenance mode faster. Multi-VM is very helpful when leveraging the new vMotion possibility by migrating the virtual machine between hosts and datastores simultaneously.
Part 2 – Multi-NIC vMotion failover order configuration
Part 3 – Multi-NIC vMotion and NetIOC
Part 4 – Choose link aggregation over Multi-NIC vMotion?
Part 5 – 3 reasons why I use a distributed switch for vMotion networks

Filed Under: vMotion

Calculating the bandwidth usage and duration of a vMotion process?

December 4, 2012 by frankdenneman

Every once in a while I get the question if I have a calculator that can determine the lead-time and the bandwidth consumption of a vMotion process. Unfortunately I haven’t got such a calculator, as there isn’t an easy way to calculate the consumed bandwidth and the duration of a vMotion process.
CPU
vMotion tries to move the used memory blocks as fast as possible. vMotion uses all the available bandwidth depending on the available CPU speed and bandwidth. Depending on the detected line speed, vMotion reserves an X amount of CPU speed at the start of a vMotion process. vMotion computes its desired host vMotion CPU reservation. For every 1GBe vMotion link speed it detects vMotion in vSphere 5.1 reserved 10% of a CPU core with a minimum desired CPU reservation of 30%. This means that if you use a single 1GBe, vMotion reserves 30% of a core, if you use 4 x 1GBe connections, that means vMotion reserves 40% of a core. A 10GBe link is special as vMotion reserves 100% of a single core.
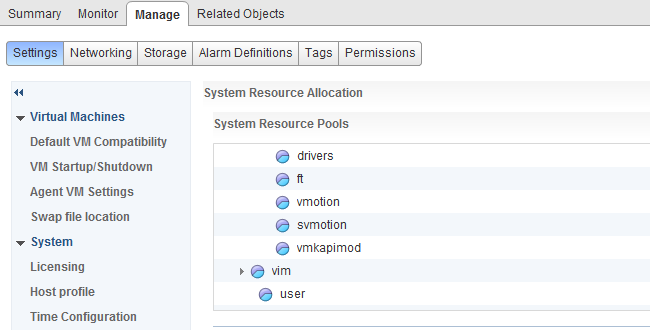
vMotion creates a (system) resource pool and sets the appropriate CPU reservation on the resource pool. It’s important to note that this is being done to the vMotion resource pool, which means that the reservation is shared across all vMotions happening on the host.
vMotion system Resource Pool
Warning: DO NOT CHANGE the default settings of the system vMotion resource pool. This is set dynamically by the kernel depending on its memory state, manually adjusting this setting will likely hurt performance. Please do not attempt to be smarter then the kernel, many have tried, very few have succeeded.
DRS
When DRS is enabled, it can decide to migrate virtual machines as well. It might happen that this occurs at the same time your vMotion process is running. All vMotions will be placed into the vMotion resource pool contesting for the resources acquired by the resource pool of vMotion. If high priority for the manual vMotion is selected (User interface uses the term: Reserve CPU for optimal vMotion performance) then the vMotion process receives a higher priority within the vMotion resource pool. In which case the high priority vMotion will have double the relative CPU shares, and as a result probably complete more quickly than their lower priority counterparts. However it still need to share the resources claimed by the vMotion resource pool. Although it has a higher priority over DRS vMotions, sharing resources still may have an effect on the duration of the vMotion process.
Memory
vMotion copies only the used memory blocks, a virtual machine doesn’t always have to use all of its memory. Therefor its not easy to determine the required bandwidth. To make it more complex, as we are migrating a live virtual machine, the virtual machine can dirty (re-use) memory blocks that are already copied over, those blocks have to be sent again. Prolonging the duration of the process and the used bandwidth.
Swap file
If the swap file is located on a non-shared datastore and pages has been stored in the swap file, those pages are copied over to the new swap file on a location accessible by the destination host. This will increase the demand for bandwidth and increases the duration of the vMotion process. For more information about the impact of non-shared swap files, please read the following articles: (Alternative) VM swap file locations Q&A and (Alternative) VM swap file locations Q&A – part 2.
Conclusion
As you can see, it’s very difficult to determine the duration of a vMotion process and the actual bandwidth it consumes.

Filed Under: vMotion

  • « Go to Previous Page
  • Page 1
  • Page 2
  • Page 3
  • Page 4
  • Page 5
  • Page 6
  • Go to Next Page »

Copyright © 2025 · SquareOne Theme on Genesis Framework · WordPress · Log in