This article provides you an overview of the steps required to setup a Multi-NIC vMotion configuration on an existing distributed Switch with the vSphere 5.1 web client. This article is created to act as reference material for the designing your vMotion network series.
Configuring Multi-NIC vMotion is done at two layers, first the distributed switch layer where we are going to create two distributed port groups and the second layer is the host layer. At the host layer we are going to configure two VMkernel NICs and connect them to the appropriate distributed port group.
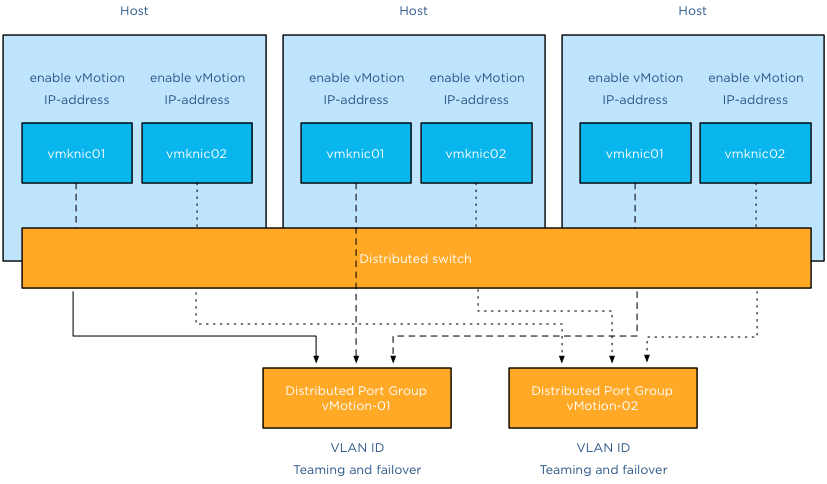
Before you start you need to have ready two ip-addresses for the VMkernel NICs, their respective subnet and their VLAN ID.
Distributed switch level
The first two steps are done at the distributed switch level, click on the networking icon in the home screen and select the distributed switch.
Step 1: Create the vMotion distributed port groups on the distributed switch
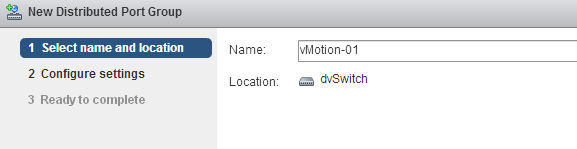
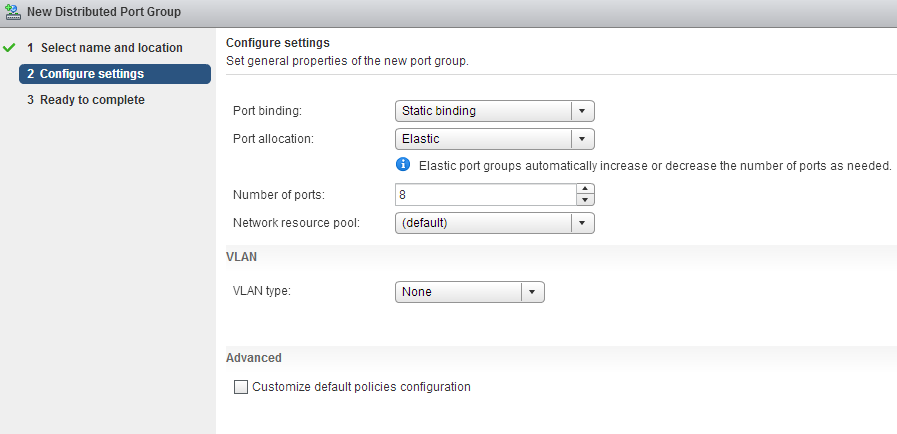
The initial configuration is pretty much basic, just provide a name and use the defaults:
1: Select the distributed switch, right click and select “New Distributed Port Group”.
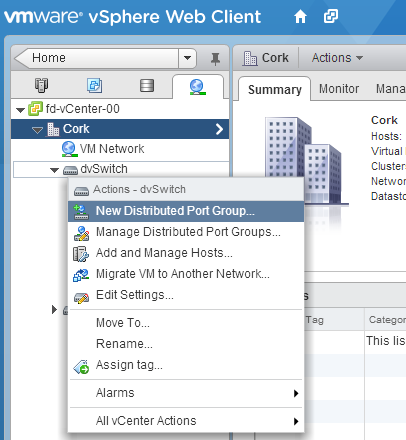
2: Provide a name, call it “vMotion-01” and confirm it’s the correct distributed switch.
3: Keep the defaults at Configure settings and click next.
4: Review the settings and click finish.
Do the same for the second distributed port group, name that vMotion-02
Step 2: Configuring the vMotion distributed port groups
Configuring the vMotion distributed port groups consist of two changes. Enter the VLAN ID and set the correct failover order.
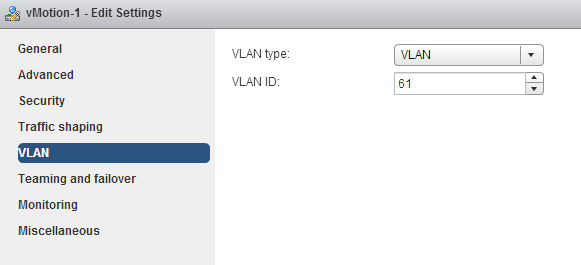
1: Select distributed Port Group vMotion-01 in the left side of your screen and right click and select edit settings.
2: Go to VLAN, select VLAN as VLAN type and enter the first VLAN used by the first VMkernel NIC.
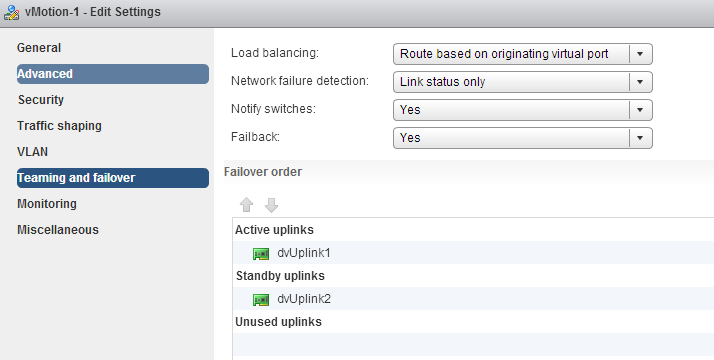
3: Select “Teaming and failover” , move the second dvUplink down to mark it as a “Standby uplink”. Verify that load balancing is set to “Route based on originating virtual port”.
4: Click OK
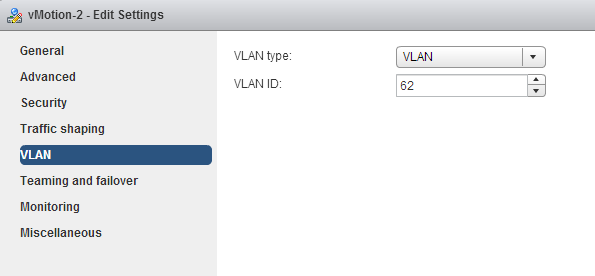
Repeat the instructions of step 2 for distributed Portgroup vMotion-02, but use the VLAN ID used by the IP-address of the second VMkernel NIC.
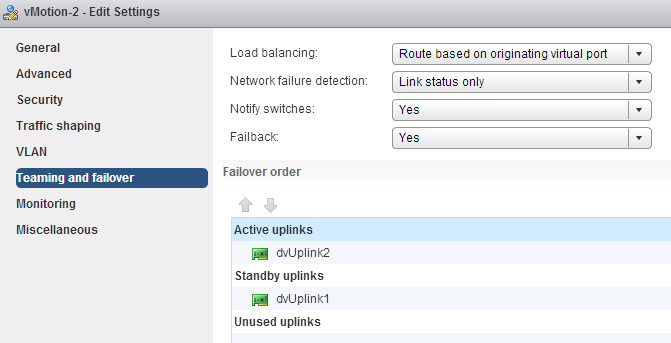
Go to teaming and failover and configure the uplinks in an alternate order, ensuring that the second vMotion VMkernel NIC is using dvUplink2.
Host level
We are done at the distributed switch level, the distributed switch now updates all connected hosts and each host has access to the distributed port groups. Two vMotion enabled VMkernel NICs are configured at host level. Go to Hosts and Clusters view.
Step 3: Create vMotion enabled VMkernel NICs
1: Select the first host in the cluster, go to manage, networking and “add host networking”.

2: Select VMkernel Network Adapter.

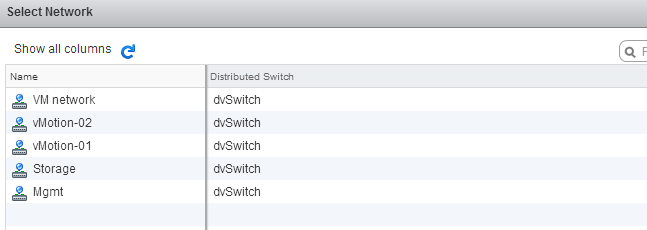
3: Select an existing distributed portgroup, click on Browse and select distributed Port Group “vMotion-01” Click on OK and click on Next.

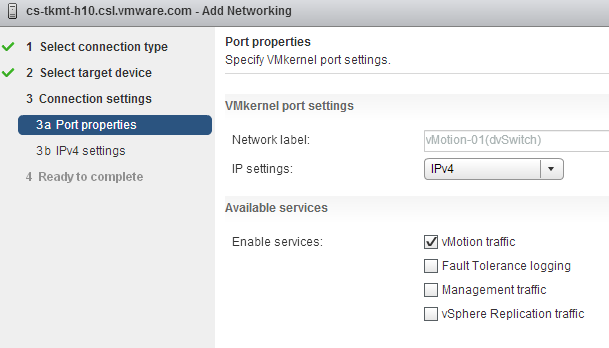
4: Select vMotion traffic and click on Next.
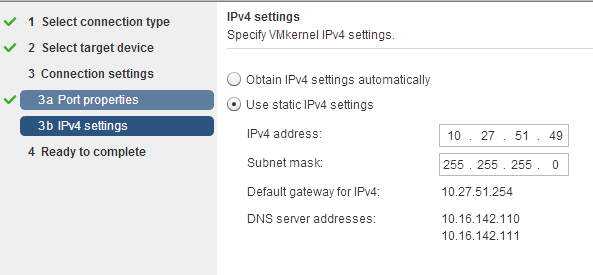
5: Select static IPv4 settings, Enter the IP-address of the first VMkernel NIC corresponding with the VLAN ID set on distributed Port Group vMotion-01.
6: Click on next and review the settings.
Create the second vMotion enabled VMkernel NIC. Configure identically except:
1: Select vMotion-02 portgroup
2: Enter IP-address corresponding with the VLAN ID on distributed Port Group vMotion-02.
The setup of a Multi-NiC vMotion configuration on a single host is complete. Repeat Step 3 on each host in the cluster.
How to setup Multi-NIC vMotion on a distributed vSwitch
1 min read
Hi Frank,
First of all thanks for the great blog post.
I am currently researching vSphere HA, and Multi-NIC vMotion sounds great.
But during my research I’ve come across a lot of situations in which vMotion was enabled on the same VMkernel NICs used for iSCSI traffic. Those VMkernel NICs where placed in a port group that had a one-to-one relation with a physical NIC. The VMkernel NICs where then bound to the software iSCSI storage adapter. And thus no NIC Teaming between VMkernel NICs was setup. Because the iSCSI storage adapter would list those VMkernel NICs as non-compliant.
With the above in mind, it would be seen ill-advised to enable Multi-NIC vMotion on those port groups. Would the creation of separate VMkernel NICs in separate port groups using the same physical NICs as the VMkernel NICs and port groups enabled for iSCSI allow the use of Multi-NIC vMotion?
Hi Frank,
I was wondering if you have tested this configuration and if you can confirm it working. As most others I have reached to including the documentations(http://kb.vmware.com/selfservice/microsites/search.do?language=en_US&cmd=displayKC&externalId=2007467) seems to state that “the kernel ports used for multi-nic vmotion should all be in the same subnet.”
I like the kind of configuration you are doing, but I did not get to test if it actually work and was wondering if you got to test it by any chance & if it is actually supported.
Thanks,
Eiad