• Skip to primary navigation
  • Skip to main content

frankdenneman.nl

  • AI/ML
  • NUMA
  • About Me
  • Privacy Policy

vSphere ML Accelerator Spectrum Deep Dive – Installing the NVAIE vGPU Driver

July 6, 2023 by frankdenneman

After setting up the Cloud License Service Instance, the NVIDIA AI Enterprise vGPU driver must be installed on the ESXi host. A single version driver amongst all the ESXi hosts in the cluster containing NVIDIA GPU devices is recommended. The most common error during the GPU install process is using the wrong driver. And it’s an easy mistake to make. In vGPU version 13 (the current NVAIE version is 15.2), NVIDIA split its ESXi host vGPU driver into two kinds. A standard vGPU driver component supports graphics, and an AI Enterprise (AIE) vGPU component supports compute. The Ampere generation devices, such as the A30 and A100 device, support compute only, so it requires an AIE vGPU component. There are AIE components available for all NVIDIA drivers since vGPU 13.

This article series focuses on building a vSphere infrastructure for ML platforms, and thus this article lists the steps to install the NVD-AIE driver. To download the NVD-AIE driver, ensure you have a user id that has access to the NVIDIA License Portal. The next step is to ensure the platform meets the requirements before installing the driver component. The installation process can be done using vSphere Lifecycle Manager or manually installing the driver component on each ESXi host in the cluster. Both methods are covered in this article.

Requirements

Make sure to configure the ESXi Host settings as follows before installing the NVIDIA vGPU Driver:

ComponentRequirementsNotes
Physical ESXi hostMust have Intel VT-d or AMD I/O VT enabled in the BIOS
Must have SR-IOV enabled in the BIOSEnable on Ampere & Hopper GPUs
Must have Memory Mapping Above 4G enabled in the BIOSNot applicable for NVIDIA T4 (32-bit BAR1)
vCenterMust be configured with Advanced Setting vgpu.hotmigrate.enabledIf you want to live-migrate VMs
vSphere GPU Device SettingsGraphics Type: Basic
Graphics Device Settings: Shared Direct

The article vSphere ML Accelerator Spectrum Deep Dive – ESXi Host BIOS, VM, and vCenter Settings provides detailed information about every setting listed.

Preparing the GPU Device for the vGPU Driver

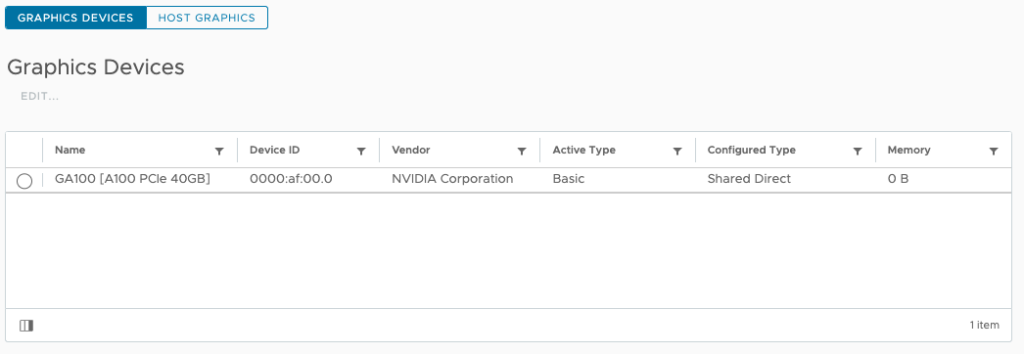
The GPU device must be in “Basic Graphics Type” mode to successfully install the vGPU driver. It is the default setting for the device. That means that the GPU should not be configured as a Passthrough device. In vCenter, go to the Inventory view, select the ESXi host containing the GPU device, go to the Configure menu option, Hardware, PCI Devices. The GUI should present the following settings:

Go to the Graphics menu options

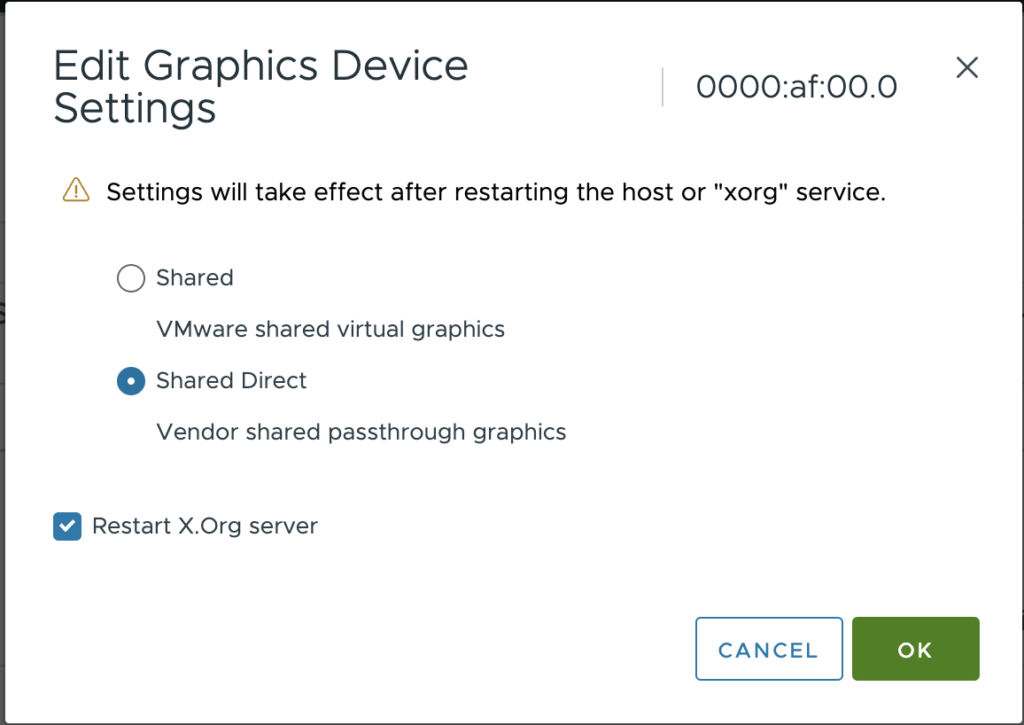
Select the GPU and choose EDIT... The default graphics type is Shared, which provides vSGA functionality. To enable vGPU support for VMs, you must change the default graphics type to Shared Direct.

You can verify these settings via the CLI using the following command:

% esxcli graphics device list
0000:af:00.0
   Vendor Name: NVIDIA Corporation
   Device Name: GA100 [A100 PCIe 40GB]
   Module Name: None
   Graphics Type: Basic
   Memory Size in KB: 0
   Number of VMs: 0

Verify if the default graphics settings is set to Shared Direct using the command:

% esxcli graphics host get
   Default Graphics Type: SharedPassthru
   Shared Passthru Assignment Policy: Performance

If the UI is having an off-day and won’t want to listen to your soothing mouse clicks, use the following commands to place GPU in the correct mode, and restart the X.Org server.

% esxcli graphics host set --default-type SharedPassthru
% /etc/init.d/xorg restart
Getting Exclusive access, please wait…
Exclusive access granted.
% esxcli graphics host get
   Default Graphics Type: SharedPassthru
 Shared Passthru Assignment Policy: Performance

NVAIE Driver Download

Selecting the correct vGPU version

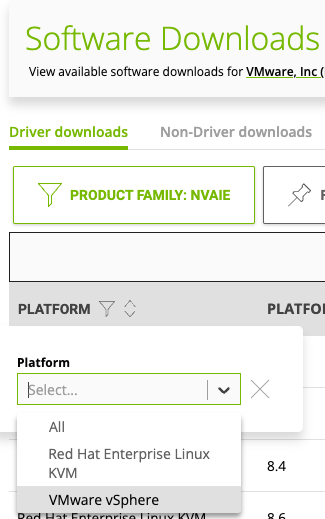
The vGPU driver is available at the NVIDIA Licensing Portal, part of the NVIDIA APPLICATION HUB. Go to the SOFTWARE DOWNLOADS option in the left menu, or go directly to https://ui.licensing.nvidia.com/software if logged in.

Two options look applicable: the vGPU product family and the NVAIE product family. For ML workloads, choose the NVAIE product family. The NVAIE product family provides vGPU capability for compute (ML/AI) workload. The vGPU family is for vGPU functionality for the VDI workload. You can recognize the correct vGPU Driver components with the NVD-AIE (NVIDIA AI Enterprise) prefix. To reduce the results shown on the screen, click PLATFORM and select VMware vSphere.

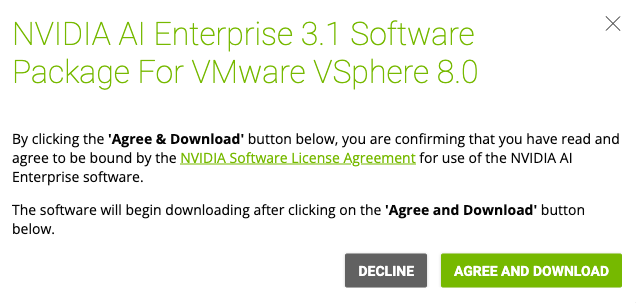
Select the latest release. At the time of writing this article, the latest NVAIE version was 3.1 for both vSphere 7 and vSphere 8. 

Since I’m running vSphere 8.0 update 1, I’m selecting NVAIE 3.1 for vSphere 8.

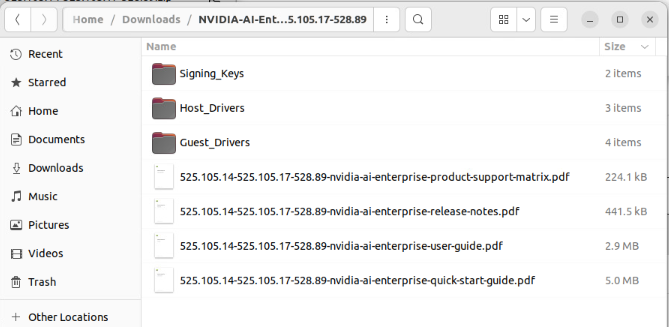
The file is downloaded in a zip-file format. Extract the file to review the contents.

As described in the articles “vSphere ML Accelerator Deep Dive – Fractional and Full GPUs” and “vSphere ML Accelerator Spectrum Deep Dive – ESXi Host BIOS, VM, and vCenter Settings“, two components drive the GPU. The guest OS driver controls the MMIO space and the communication of the device, and the GPU manager (the NVIDIA name for the ESXi Driver) controls the time-sharing mechanism to multiplex control across multiple workloads.

The zip file contains the ESXi Host Drivers and the Guest Drivers. It does not contain the GPU operator for TKGs, which installs and manages the LCM of the TKGs worker node driver. The GPU operator is installed via a helm chart. Before being able to install the GPU operator, the ESXi host driver must be installed to allow the VM Class to present a vGPU device to the TKGs worker node.

Installing the Driver

vSphere offers two possibilities to install the NVAIE vGPU driver onto all the cluster hosts, and which method is best for you depends on the cluster configuration. If every ESXi host in the cluster is equipped with at least one GPU device. Installing and managing the NVAIE vGPU driver across all hosts in the cluster using a vSphere Lifecycle Manager (vLCM) desired state image is recommended. The desired state functionality of Lifecycle Manager ensures the standardization of drivers across every ESXi host in the cluster. Visual confirmation in vCenter allows VI-admins to verify driver consistency across ESXi hosts. If an ESXi host configuration is not compliant with the base image vCenter lifecycle manager reports this violation. If a few ESXi hosts in the cluster contain a GPU card, installing the driver using the manual process might be better. You can always opt for using a desired state image in a heterogeneous cluster, but some ESXi hosts will have a driver installed without use. In general, using the desired state image throughout the cluster, even in heterogeneous clusters, is recommended to manage a consistent version of the NVAIE vGPU Driver at scale.

vSphere Lifecycle Manager

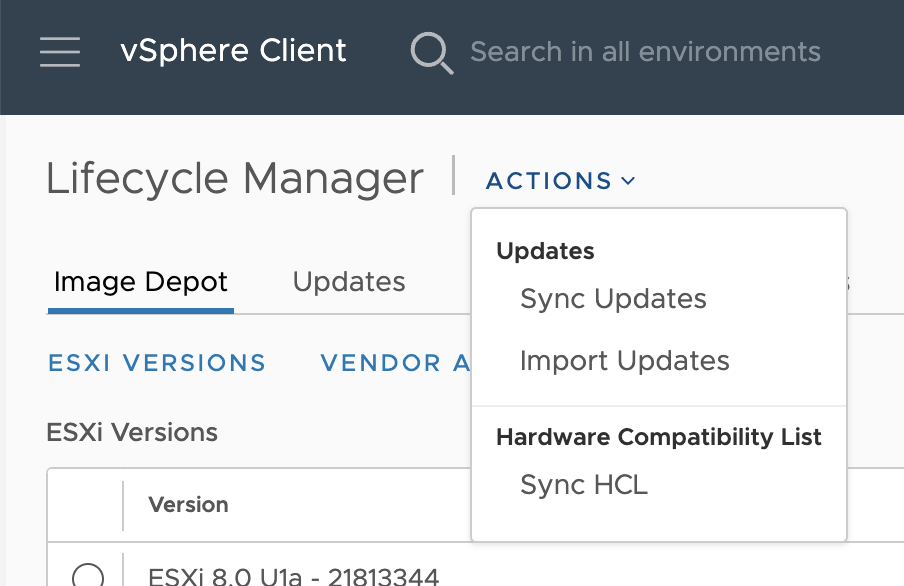
vSphere Lifecycle Manager (vCLM) integrates the NVAIE GPU driver with the vSphere base image to enforce consistency across the ESXi hosts in the cluster. To extend the base image, import the NVAIE GPU driver component by opening up the vSphere client menu (click on the three lines in the top left corner next to vSphere Client) select Lifecycle Manager, select ACTIONS, Import Updates.

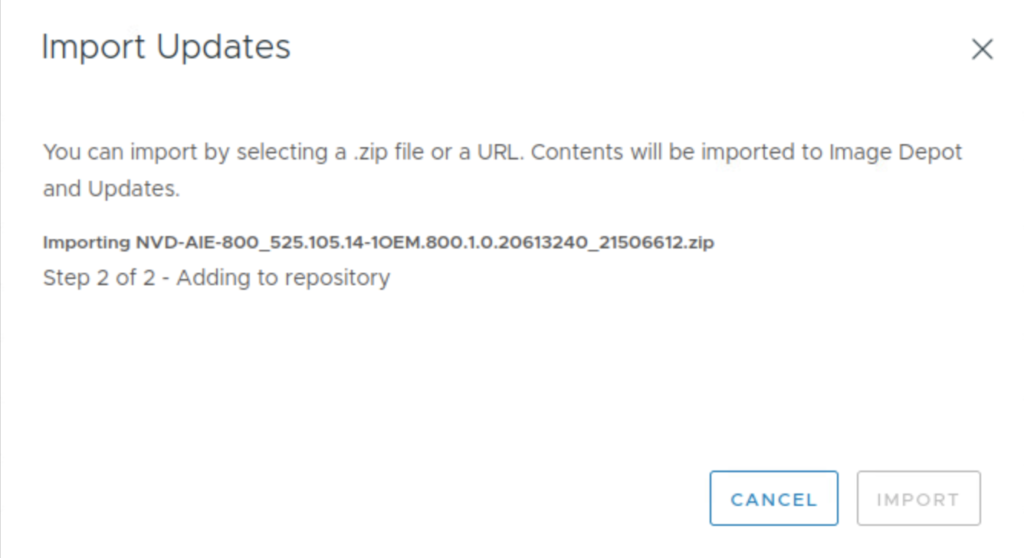
Browse to the download location of the NVAIE vGPU driver and select the Host Driver Zip file to IMPORT.

Verify if the import of the driver component is successful by clicking on Image Depot. Search the Components list.

To extend the base image with the newly added component, go to the vCenter Inventory view, right-click the vSphere cluster, choose Settings, and click the update tab.

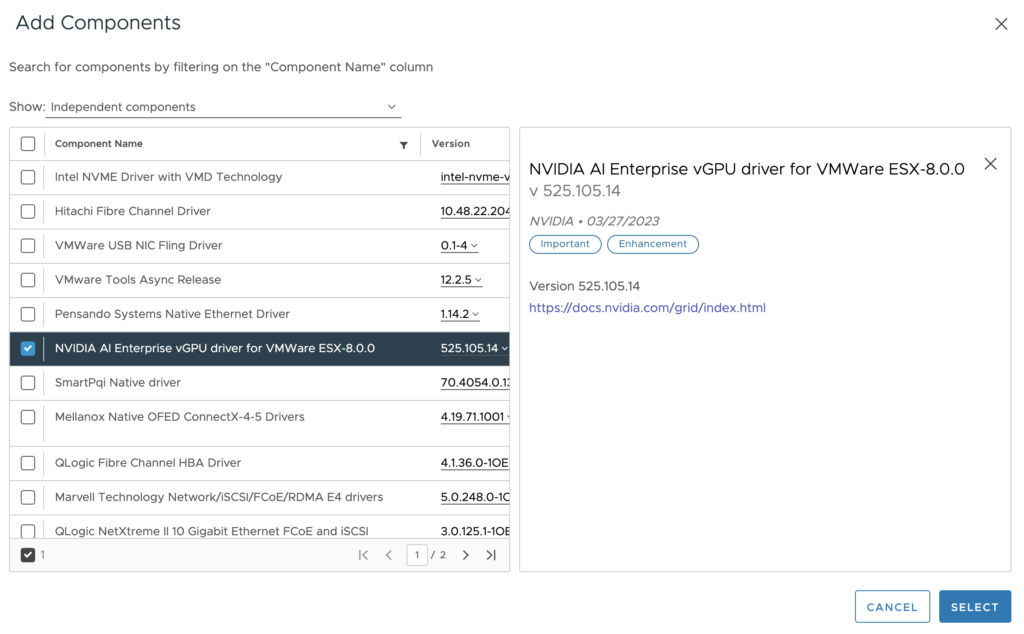
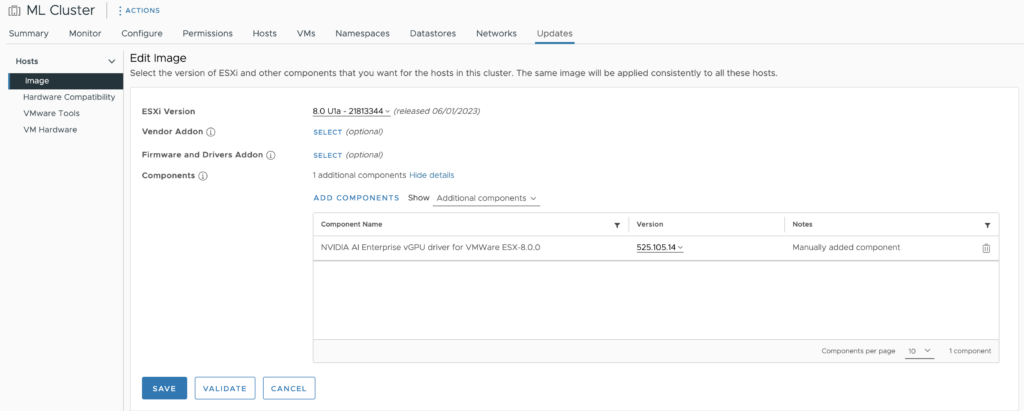
In the Image view, Click on EDIT, review the confirmation, and choose RESUME EDITING. Click on ADD COMPONENTS, add the NVIDIA AI Enterprise vGPU driver for VMware ESX-version number, and choose SELECT.

The driver is added to the base Image. Click on Save.

The ESXi hosts in the cluster should be listed as non-compliant. Select the ESXi hosts to validate and remediate to apply the new base image. Once the base image is installed on all ESXi hosts, the Image Compliance screen indicates that all ESXi hosts in the cluster are compliant.

The cluster is ready to deploy vGPU-enabled virtual machines.

Manual NVAIE vGPU Driver Install

If multiple ESXi hosts in the cluster contain GPUs, it is efficient to store the ESXi host driver on a shared datastore accessible by all ESXi hosts.

Uploading the Driver to a Shared Repository 

In this example, I upload the ESXi host driver to the vSAN datastore. SFTP requires SSH to be active. Enable it via the Host configuration of the Inventory view of vCenter, go to the Configure Menu option of the host, System, Services, click on SSH, and select Start. Remember, this service keeps on running until you boot the ESXi host. A folder is created iso/nvaie. Use the put command to transfer the file to the vSAN datastore

% sftp root@esxi host
(root@esxi host) Password: 
Connected to esxi host
sftp> lpwd
Local working directory: /home/vadmin/Downloads/NVIDIA-AI-Enterprise-vSphere-8.0-525.105.14-525.105.17-528.89/Host_Drivers
sftp> cd /vmfs/volumes/vsanDatastore/iso/nvidia/
sftp> lls
NVD-AIE-800_525.105.14-1OEM.800.1.0.20613240_21506612.zip       nvd-gpu-mgmt-daemon_525.105.14-0.0.0000_21514245.zip
NVD-AIE_ESXi_8.0.0_Driver_525.105.14-1OEM.800.1.0.20613240.vib
sftp> put NVD-AIE-800_525.105.14-1OEM.800.1.0.20613240_21506612.zip 
Uploading NVD-AIE-800_525.105.14-1OEM.800.1.0.20613240_21506612.zip to /vmfs/volumes/vsan:5255fe0bd2a28e17-a7cdc87427ad0c55/869a9363-2ca2-c917-f0f6-bc97e169cdf0/nvidia/NVD-AIE-800_525.105.14-1OEM.800.1.0.20613240_21506612.zip
NVD-AIE-800_525.105.14-1OEM.800.1.0.20613240_21506612.zip                                               100%  108MB  76.6MB/s   00:01    

Install the NVAIE vGPU Driver

Before installing any software components on an ESXi host, always ensure that no workloads are running by putting the ESXi host into maintenance mode. Right-click the ESXi host in the cluster view of vCenter, select the submenu Maintenance mode, and select the option Enter Maintenance mode. 

Install the NVIDIA vGPU hypervisor host driver and the NVIDIA GPU Management daemon using the esxcli command: esxcli software component apply -d /path_to_component/NVD-AIE-%.zip

% esxcli software component apply -d /vmfs/volumes/vsanDatastore/iso/nvidia/NVD-AIE-800_525.105.14-1OEM.800.1.0.20613240_
21506612.zip
Installation Result
   Message: Operation finished successfully.
   Components Installed: NVD-AIE-800_525.105.14-1OEM.800.1.0.20613240
   Components Removed:
   Components Skipped:
   Reboot Required: false
   DPU Results:

Please note that the full path is required, even if you are running the esxcli command from the directory where the file is located. And although the output indicates that no reboot is required, reboot the ESXi host to load the driver.

Verify the NVAIE vGPU Driver

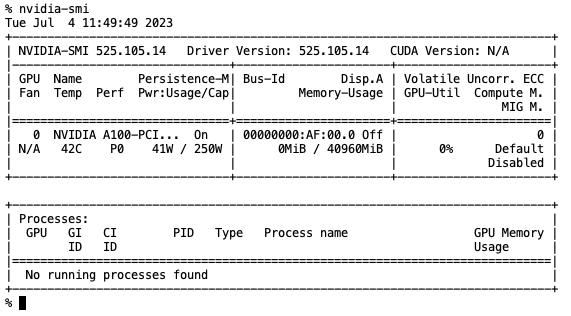
Verify if the driver is operational by executing the command nvidia-smi in an SSH session. 

Unfortunately, NVIDIA SMI doesn’t show whether an NVD-AIE or a regular vGPU driver is installed. If you are using an A30, A100, or H100, NVIDIA-SMI only works if an NVD-AIE driver is installed. You can check the current loaded VIB in vSphere with the following command:

% esxcli software component list | grep NVD
NVD-AIE-800                     NVIDIA AI Enterprise vGPU driver for VMWare ESX-8.0.0                                            525.105.14-1OEM.800.1.0.20613240     525.105.14              NVIDIA        03-27-2023     VMwareAccepted    host

The UI shows that the active type configuration is now Shared Direct.

The cluster is ready to deploy vGPU-enabled virtual machines. The next article focusses on installing the TKGs NVAIE GPU Operator.

Previous articles in the vSphere ML Accelerator Spectrum Deep Dive Series:

  • vSphere ML Accelerator Spectrum Deep Dive Series
  • vSphere ML Accelerator Spectrum Deep Dive – Fractional and Full GPUs
  • vSphere ML Accelerator Spectrum Deep Dive – Multi-GPU for Distributed Training
  • vSphere ML Accelerator Spectrum Deep Dive – GPU Device Differentiators
  • vSphere ML Accelerator Spectrum Deep Dive – NVIDIA AI Enterprise Suite
  • vSphere ML Accelerator Spectrum Deep Dive – ESXi Host BIOS, VM, and vCenter Settings
  • vSphere ML Accelerator Spectrum Deep Dive – Using Dynamic DirectPath IO (Passthrough) with VMs
  • vSphere ML Accelerator Spectrum Deep Dive – NVAIE Cloud License Service Setup

Filed Under: Machine Learning

vSphere ML Accelerator Spectrum Deep Dive – NVAIE Cloud License Service Setup

July 5, 2023 by frankdenneman

Next in this series is installing the NVAIE GPU operator on a TKGs guest cluster. However, we must satisfy a few requirements before we can get to that step.

  • NVIDIA NVAIE Licence activated
  • Access to NVIDIA NGC NVIDIA Enterprise Catalog and Licensing Portal
  • The license Server Instance activated
  • NVIDIA vGPU Manager installed on ESXi Host with NVIDIA GPU Installed
  • VM Class with GPU specification configured
  • Ubuntu image available in the content library for TKGs Worker Node
  • vCenter and Supervisor Access

The following diagram provides an overview of all the components, settings, and commands involved.

Although I do not shy away from publishing long articles, these steps combined are too much for a single article. I’ve split the process up in three separate articles:

  • NVAIE Cloud License Service Setup
  • NVIDIA vGPU Manager Install
  • TKGs GPU operator install

In this article, I follow a greenfield scenario where no NVIDIA license service instance is set up. As I cannot describe your internal licensing processes, I list the requirements of access rights and permissions to set up the NVIDIA license.

NVIDIA NVAIE Licence activated

All commercial-supported software installations require a license key, and the NVAIE suite is no different. In NVIDIA terms, this license key is called the Product Activation Key ID (PAK ID) and it’s necessary to set up a License Service Instance. The component which distributes and tracks client license allocation. Before you start your journey, ensure you have this PAK ID or have access to a fully configured License Service Instance.

Access to NVIDIA NGC NVIDIA Enterprise Catalog and Licensing Portal

The NVIDIA AI Enterprise software is available via the NGC NVIDIA Enterprise Catalog (GPU operator repository) and the NVIDIA License Portal (ESXi VIBs). This software is only available for users linked to an NVAIE-licensed organization. The pre-configured GPU Operator differs from the open-source GPU Operator in the public NGC catalog. The differences are:

  • It is configured to use a prebuilt vGPU driver image (Only available to NVIDIA AI Enterprise customers)
  • It is configured to use containerd as the container runtime
  • It is configured to use the NVIDIA License System (NLS)

In larger organizations, a liaison manages NVIDIA licensing, who can get your NGC account listed as a part of the company’s NGC organization and provide you access to the NVIDIA Enterprise Application Hub licensing portal. These steps are out-of-scope for this article. The starting point for this article is that you have:

  • an NGC account connected to an NGC org that has access to NGC NVIDIA Enterprise Catalog for downloading the drivers and helm charts
  • an NVIDIA Enterprise Application Hub account that has access to the NVIDIA licensing portal for creating a License Service Instance or download a client configuration token
  • An NVIDIA Entitlement Certificate with a valid Product Activation Key (PAK) ID if you plan to install a License Service Instance.

Please note that I’m an employee of VMware, I do not own the licenses, nor did I participate in the process of obtaining the licenses. I requested the licenses via a VMware internal process. I have no knowledge of internal NVIDIA processes which provides access to the NGC NVIDIA Enterprise Catalog or the NVIDIA licensing portal. I cannot share my product activation key ID. Please connect with your NVIDIA contact for these questions.

Selecting a License Service Instance Type

The NVIDIA License system supports two license server instances:

  • Cloud License Service (CLS) instance
  • Delegated License Service (DLS) instance

For AI/ML workloads, most customers prefer the CLS instance hosted by the NVIDIA license portal. Since NVIDIA maintains the CLS instance, the on-prem platform operators do not have to worry about the license service instance’s availability, scalability, and lifecycle management. The only requirement is that workloads can connect to the CLS instance. To establish communication between the workload clients and the CLS instance, the following firewall or proxy server ports must be open:

PortProtocolEg-/IngressServiceSourceDestination
80TLS, TCPEgressLicense releaseClientCLS
443TLS, TCPEgressLicense acquisition
License renewal
ClientCLS

A DLS instance is necessary if you are running an ML cluster in an air-gapped data center. The DLS instance is fully disconnected from the NVIDIA licensing portal. The VI-admin must manually download the licenses from the NVIDIA license portal and upload them to the instance. A highly available DLS setup is recommended to provide licensed clients with continued access to NVAIE licenses if one DLS instance fails. A DLS instance can either run as a virtual appliance or as a containerized software image. The minimum footprint of the DLS virtual appliance is 4 vCPUs, 8GB RAM, and 10GB disk space. A fixed or reserved DHCP address and an FQDN must be registered before installing the DLS virtual appliance. It is recommended to synchronize the DLS virtual appliance with an NTP server. Please review the NVIDIA License System User Guide for a detailed installation guide and an overview of all the required firewall rules. For this example, A CLS instance is created and configured. 

Setting up a Cloud License Service Instance

Log in to the NVIDIA Enterprise Application Hub anc click on NVIDIA Licensing Portal to go to the “NVIDIA licensing portal”.

Creating a License Server

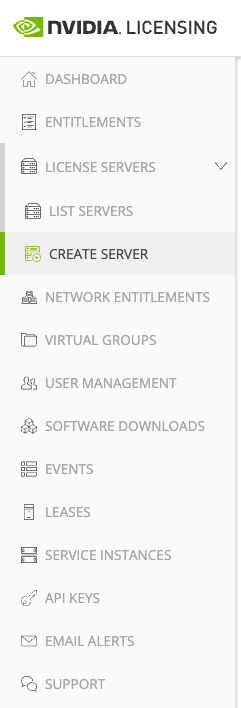
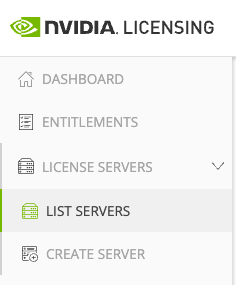
Expand “License Server” in the menu on the left of your screen and select “create server”

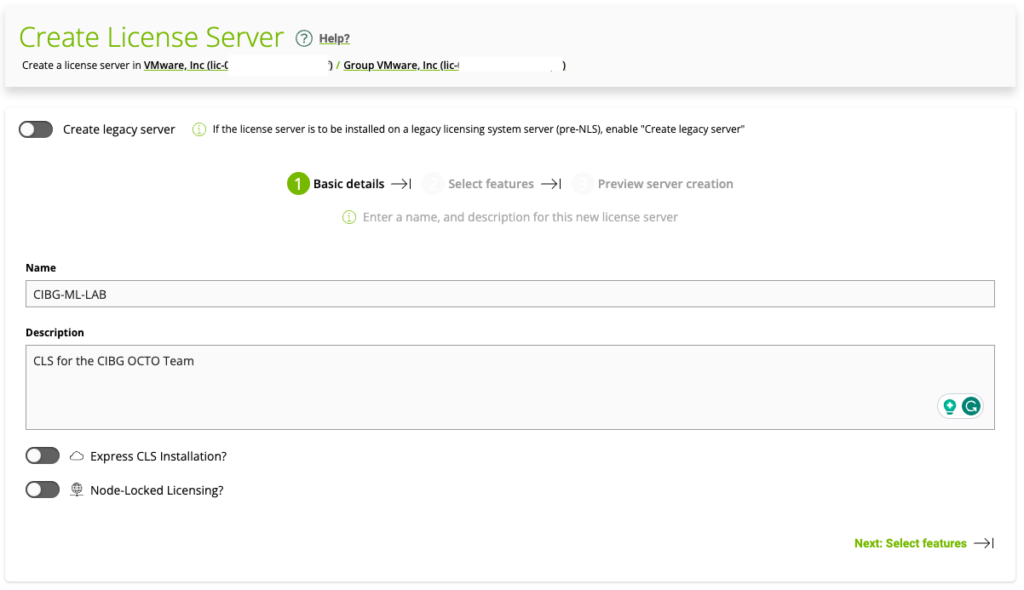
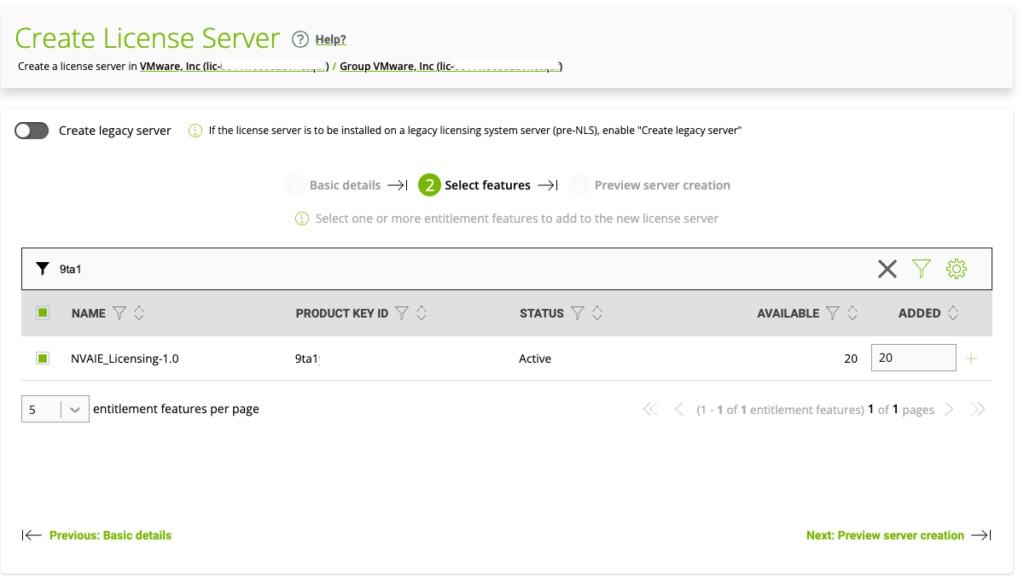
Ensure “Create legacy server” is disabled (slide to the left) and provide a name and description for your CLS. Click on “Select features”. The node-locked functionality allows air-gapped client systems to obtain a node-locked vGPU software license from a file installed locally on the client system. The express CLS installation.

Find your licensed product using the PAK ID that is listed in your NVIDIA Entitlement Certificate. The PAK ID should contain 30 alphanumeric characters).

In the textbox in the ADDED column, enter the number of licenses for the product that you want to add. Click Next: Preview server creation.

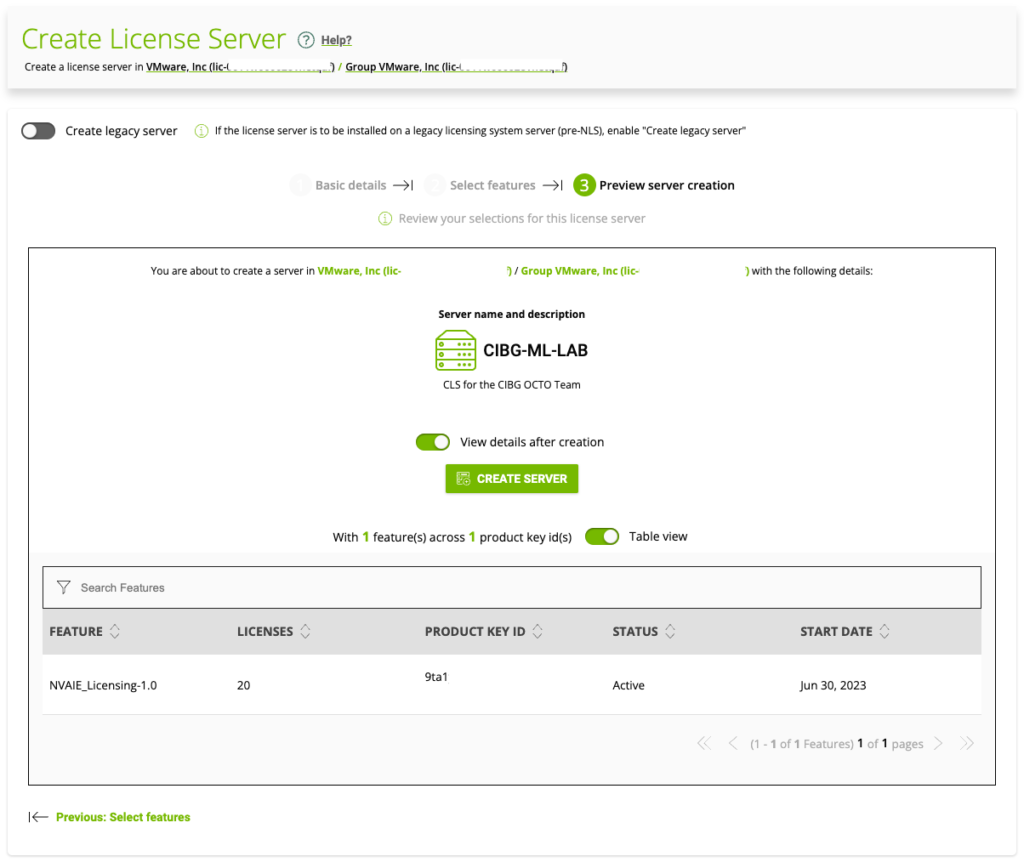
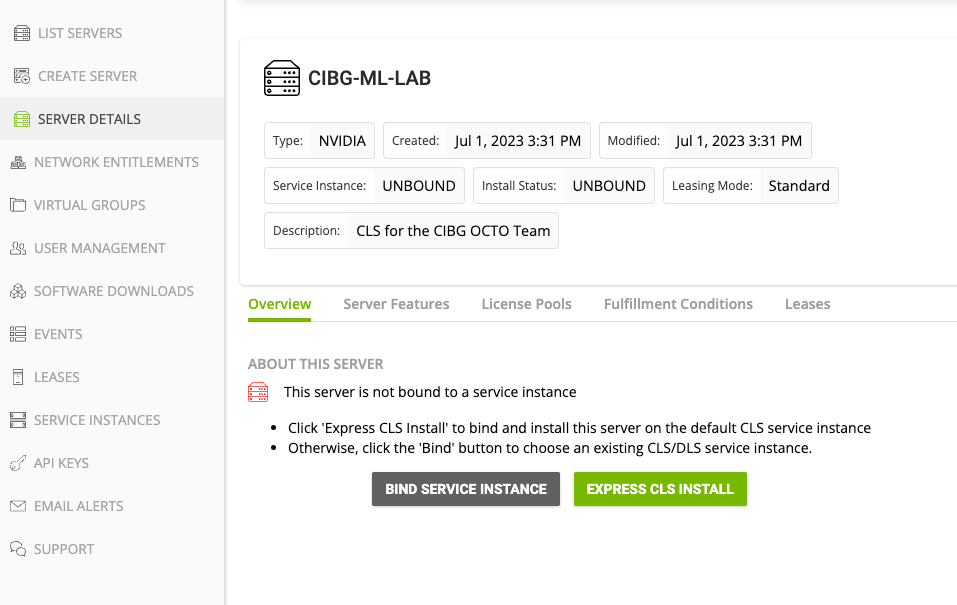
On the Preview server creation page, click CREATE SERVER. Once the server is created, the portal shows the license server is in an “unbound state”.

Creating a CLS Instance 

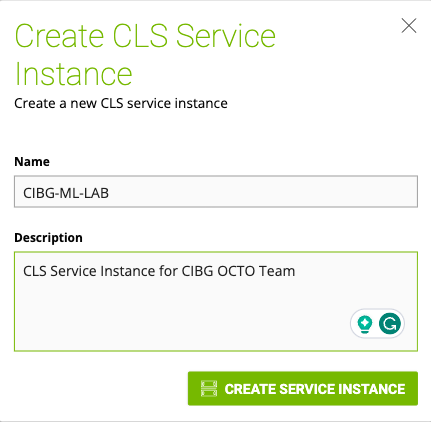
In the left navigation pane of the NVIDIA Licensing Portal dashboard, click SERVICE INSTANCES.

Provide a name and description for the CLS Service Instance.

Binding a License Server to a Service Instance

Binding a license server to a service instance ensures that licenses on the server are available only from that service instance. As a result, the licenses are available only to the licensed clients that are served by the service instance to which the license server is bound.

In the left menu, select License Servers, and click LIST SERVERS.

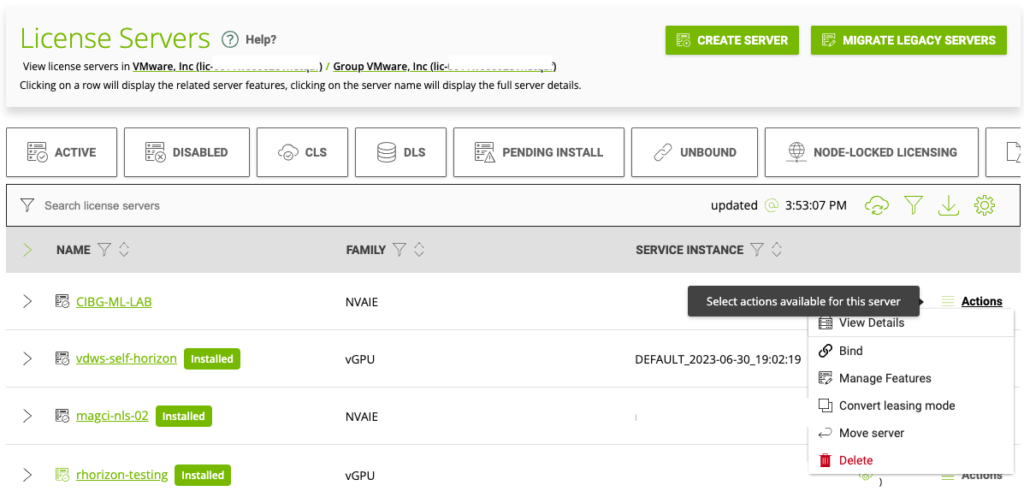
Find your license server using its name, click the Actions button on the right side of your screen, and select Bind.

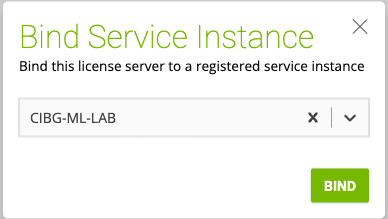
In the Bind Service Instance pop-up window that opens select the CLS service instance to which you want to bind the license server and click BIND. The Bind Service Instance pop-up window confirms that the license server has been bound to the service instance.

The event viewer lists the successful bind action.

Installing a License Server on a CLS Instance

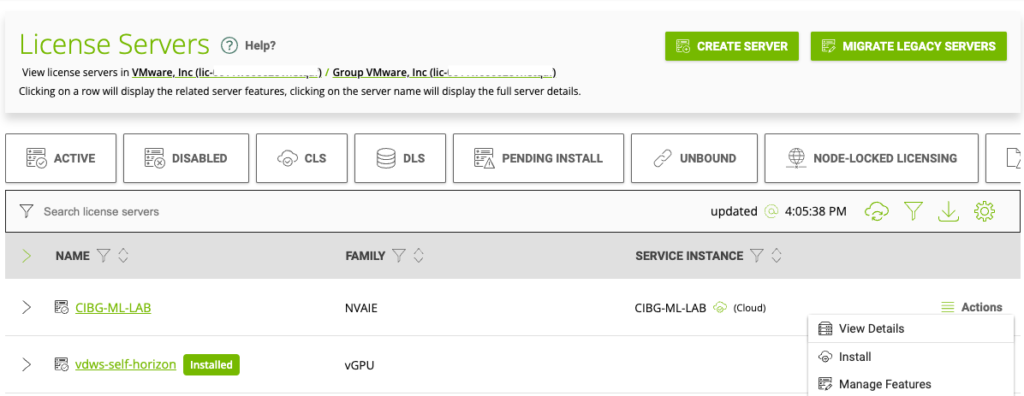
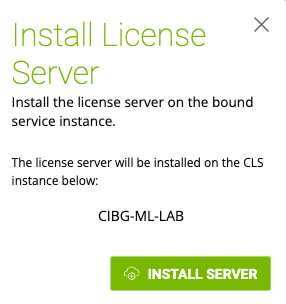
This step is necessary if you are using multiple CLS instances in your organization that is registered at NVIDIA and you are using the new CLS instance, not the default CLS instance for the organization. In the left navigation pane, expand LICENSE SERVER and click LIST SERVERS. Select your License Server, click on Actions, and choose Install.

In the Install License Server pop-up window that opens, click INSTALL SERVER.

The event viewer lists a successful deployment of the license service on the service instance.

The next step is to install the NVIDIA NVAIE vGPU Driver on the ESXi host. This step is covered in the next article.

Previous articles in the vSphere ML Accelerator Spectrum Deep Dive Series:

  • vSphere ML Accelerator Spectrum Deep Dive Series
  • vSphere ML Accelerator Spectrum Deep Dive – Fractional and Full GPUs
  • vSphere ML Accelerator Spectrum Deep Dive – Multi-GPU for Distributed Training
  • vSphere ML Accelerator Spectrum Deep Dive – GPU Device Differentiators
  • vSphere ML Accelerator Spectrum Deep Dive – NVIDIA AI Enterprise Suite
  • vSphere ML Accelerator Spectrum Deep Dive – ESXi Host BIOS, VM, and vCenter Settings
  • vSphere ML Accelerator Spectrum Deep Dive – Using Dynamic DirectPath IO (Passthrough) with VMs
  • vSphere ML Accelerator Spectrum Deep Dive – NVAIE Cloud License Service Setup

Filed Under: Machine Learning

vSphere ML Accelerator Spectrum Deep Dive – Using Dynamic DirectPath IO (Passthrough) with VMs 

June 6, 2023 by frankdenneman

vSphere 7 and 8 offer two passthrough options, DirectPath IO and Dynamic DirectPath IO. Dynamic DirectPath IO is the vSphere brand name of the passthrough functionality of PCI devices to virtual machines. It allows assigning a dedicated GPU to a VM with the lowest overhead possible. DirectPath I/O assigns a PCI Passthrough device by identifying a specific physical device located on a specific ESXi host at a specific bus location on that ESXi host using the Segment/Bus/Device/Function format. This configuration path restricts that VM to that specific ESXi host.

In contrast, Dynamic DirectPath I/O utilizes the assignable hardware framework with vSphere that provides a key-value method using custom or vendor-device-generated labels. It allows vSphere to decouple the static relationship between VM and device and provides a flexible mechanism for assigning PCI devices exclusively to VMs. In other words, it makes passthrough devices work with DRS initial placement and, subsequently vSphere HA. 

The assignable hardware framework allows a device to describe itself with key-value attributes. The framework allows the VM to specify the attributes of the device. It relies on the framework to match these two for design assignment before DRS handles the virtual machine placement decision. It allows operation teams to specify custom labels that help to indicate hardware or site-specific functionality. For example, Labels in a heterogeneous ML cluster can designate which GPUs serve for training and inference workloads. 

DirectPath IODynamic DirectPath IO
VMX device configuration notationpciPassthru%d.id =<SBDF>pciPassthru%d.allowedDevices = <vendorId:deviceId>
pciPassthru%d.customLabel = <string value>
ExamplepciPassthru0.id= 0000:AF:00.0pciPassthru0.allowedDevices = “0x10de:0x20f1”
pciPassthru0.customLabel = “Training”
Example explanationThe VM is configured with a passthrough device at SBDF address of 0000:AF:00.0The VM is configured with a passthrough device that has vendor ID as “0x10de” and device model id as “0x20f1” The custom label indicates this device is designated as a Training device by the organization.
ImpactThe device is assigned statically at VM configuration time.

The VM is not migratable across ESXi hosts because it is bound to that specific device on that specific ESXi host.
The VM is configured with a passthrough device with vendor ID as “0x10de” and device model id as “0x20f1” The custom label indicates this device is designated as a Training device by the organization.

The operations team can describe what kind of device a VM needs. Dynamic Directpath IO, with the help of the assignable hardware framework, assigns a device that satisfies the description. As DRS has a global view of all the GPU devices in the cluster, it is DRS that coordinates the matching of the VM, the ESXi host, and the GPU device. DRS selects and GPU device and moves the VM to the corresponding ESXi host. During power on, the host services follow up on DRS’s decision and assign the GPU device to the VM.

The combination of vSphere clustering services and Dynamic DirectPath IO is a significant differentiator between running ML workloads on a virtualized platform and bare-metal hosting. Dynamic DirectPath IO allows DRS to automate the initial placement of accelerated workloads. With Dynamic DirectPath IO and vSphere HA, workloads can frictionlessly return to operation on other available hardware if the current accelerated ESXi host fails.

Initial Placement of Accelerated Workload

Dynamic DirectPath I/O solves scalability problems within accelerated clusters. If we dive deeper into this process, the system must take many steps to assign a device to a VM. In a cluster, you must find a compatible device and match the physical device to the device listed in the VM(X) configuration. The VMkernel must perform some accounting to determine that the physical device is assigned to the VM. With DirectPath IO, the matching and accounting process uses the host, bus, and other PCIe device locator identifiers. With Dynamic DirectPath IO, the Assignable Hardware framework (AH) is responsible for the finding, matching, and accounting. AH does not expose any API functionality to user-facing systems. It is solely an internal framework that provides a search and accounting service for vCenter and DRS. NVIDIA vGPU utilizes AH as well. The ESXi host implements a performance or consolidation allocation policy using fractional GPUs. AH helps assign weights to a device instance to satisfy the allocation policy while multiple available devices in the vSphere cluster match the description. But more on that in the vGPU article. 

For Dynamic DirectPath IO, DRS uses the internal AH search engine to find a suitable host within the cluster and selects an available GPU device if multiple GPUs exist in the ESXi host. Every ESXi host reports device assignments and the GPU availability to AH. During the host selection and VM initial placement process, DRS provides GPU device selection as a hint to the VMkernel processes running within the ESXi. During the power-on process, the actual device assignment happens. 

If an ESXi host fails, vSphere High Availability restarts the VMs on the remaining ESXi hosts within the cluster. If vCenter runs, HA relies on DRS to find an appropriate ESXi host. With Dynamic DirectPath IO, AH assists DRS in finding a new host based on the device assignment availability. Workloads automatically restart on the remaining available GPUs without any human intervention. With DirectPath IO, the VM is powered down by HA during an isolation event or has crashed due to an ESXi host failure. However, it will remain powered off, as the VM is confined to running on that specific host due to its static SBDF configuration.

Default ESXi GPU Setting

Although DirectPath IO and Dynamic DirectPath IO are the brand names we at VMware like to use in most public-facing collateral, most of the UI uses the term passthrough as the name of the overarching technology. (If we poke around with the esxcli, we also see Passthru.) But the two DirectPath IO types are distinguished at VM creation time as “Access Type”. A freshly installed ESXi OS does not automatically configure the GPU as a passthrough device. If you select the accelerated ESXi host in the inventory view and click on the configure menu, and click on PCIe Devices.

Graphics shows that the GPU device is set to Basics Graphics Type and in a Shared configuration. It is the state the device should be in before configuring either any DirectPath IO type or NVIDIA vGPU functionality. 

You can verify these settings via the CLI: 

esxcli graphics device list
esxcli graphics host get

Enable Passthrough

Once we know the GPU device is in its default state, we can go back to the PCI Devices overview, select GPU Device, and click “Toggle Passthrough.”

The UI reports that the GPU device has enabled Passthrough.

Now, the UI list the active type of the GPU device as Direct.

Keep the Graphics Device Settings set to shared (NVIDIA vGPU devices use Shared Direct).

You can verify these settings via the CLI.

esxcli graphics device list

esxcli graphics host get

Add Hardware Label to PCI Passthrough Device

Select the accelerated ESXi host in the inventory view, click on the configure menu, click on PCIe Devices, select Passthrough-enabled Devices, and select the GPU device.

Click on the “Hardware Label” menu option and provide a custom label for the device. For example, “Training.” Click on OK when finished.

You can verify the label via the CLI with the following command:

esxcli hardware pci list | grep NVIDIA -B 6 -A 32

Create VM with GPU Passthrough using Dynamic DirectPath IO

To create a VM with a GPU assigned using Dynamic DirectPath IO, VM level 17 is required. The following table lists the available vSphere functionality for VMs that have a Directpath IO and Dynamic DirectPath 
IO device associated with them.

FunctionalityDirectPath IODynamic DirectPath IO
Failover HANoYes
Initial Placement DRSNoYes
Load Balance DRSNoNo
vMotionNoYes
Host Maintenance ModeShutdown VM and ReconfigureCold Migration
SnapshotNoNo
Suspend and ResumeNoNo
Fractional GPUsNoNo
TKGs VMClass SupportNoYes

To associate a GPU device using Dynamic DirectPath IO, open the VM configuration, click “Add New Device,” and select “PCI Device.”

Select the appropriate GPU Device and click on Select.

The UI shows the new PCI device using Dynamic DirectPath IO in the VM Settings.

RequirementNotes
Supported 64-bits Operating System
Reserve all guest memory(automatically set in vSphere 8)
EFI firmware Boot option
Advanced SettingspciPassthru.set.usebitMMIO = true
pciPassthru.64bitMMIOSizeGB = (size in GB)

The Summary page of the VM lists the ESXi host and the PCIe Device. However, the UI shows no associated VMs connected to the GPU at the Host view. Two commands are available in the CLI. You can verify if a VM is associated with the GPU device with the following command:

esxcli graphics device list

The following command list the associated VM:

esxcli graphics vm list

The following articles will cover NVAIE vGPU driver installation on ESXi and TKGs

Other articles in this series:

  • vSphere ML Accelerator Spectrum Deep Dive Series
  • vSphere ML Accelerator Spectrum Deep Dive – Fractional and Full GPUs
  • vSphere ML Accelerator Spectrum Deep Dive – Multi-GPU for Distributed Training
  • vSphere ML Accelerator Spectrum Deep Dive – GPU Device Differentiators
  • vSphere ML Accelerator Spectrum Deep Dive – NVIDIA AI Enterprise Suite
  • vSphere ML Accelerator Spectrum Deep Dive – ESXi Host BIOS, VM, and vCenter Settings
  • vSphere ML Accelerator Spectrum Deep Dive – Using Dynamic DirectPath IO (Passthrough) with VMs
  • vSphere ML Accelerator Spectrum Deep Dive – NVAIE Cloud License Service Setup

Filed Under: Machine Learning

vSphere ML Accelerator Spectrum Deep Dive – ESXi Host BIOS, VM, and vCenter Settings

May 30, 2023 by frankdenneman

To deploy a virtual machine with a vGPU, whether a TKG worker node or a regular VM, you must enable some ESXi host-level and VM-level settings. All these settings are related to the isolation of GPU resources and memory-mapped I/O (MMIO) and the ability of the (v)CPU to engage with the GPU using native CPU instructions. MMIO provides the most consistent high performance possible. By default, vSphere assigns a MMIO region (an address range, not actual memory pages) of 32GB to each VM. However, modern GPUs are ever more demanding and introduce new technologies requiring the ESXi Host, VM, and GPU settings to be in sync. This article shows why you need to configure these settings, but let’s start with an overview of the required settings.

ComponentRequirementsvSphere FunctionalityNotes
Physical ESXi hostMust have Intel VT-d or AMD I/O VT enabled in the BIOSPassthrough & vGPU
Must have SR-IOV enabled in the BIOSvGPU MIGEnable on Ampere & Hopper GPUs
Must have Memory Mapping Above 4G enabled in the BIOSPassthrough & vGPUNot applicable for NVIDIA T4
Must use a supported 64-bits OS
Passthrough & vGPU
Must be configured with EFI firmware Boot optionPassthrough & vGPU
Must reserve all guest memoryPassthrough & vGPU
pciPassthru.set.usebitMMIO = true
pciPassthru.64bitMMIOSizeGB = xxx *
Passthrough & vGPUNot applicable for  NVIDIA T4
Set automatically for TKG worker nodes
Must be configured with Advanced Setting vgpu.hotmigrate.enabledvGPU

* Calculation follows in the article

Memory Management Basics

Before diving into each requirement’s details, we should revisit some of the memory management basics. In an ESXi host, there are three layers of memory.

  • The guest virtual memory (the memory available at the application level of a VM)
  • The guest physical memory (the memory available to operating systems running on VMs)
  • The host physical memory (the memory available to the ESXi hypervisor from the physical hosts)

The CPU uses the memory management unit (MMU) to translate virtual addresses to physical addresses. A GPU exposes device addresses to control and use the resources on the device. The IOMMU is used to translate IO virtual addresses to physical addresses. From the view of the application running inside the virtual machine, the ESXi hypervisor adds an extra level of address translation that maps the guest physical address to the host physical address. With direct assigning a device to a VM, the native driver running in the guest OS controls the GPU and only “sees” the guest’s physical memory. If an application would directly perform a direct memory access (DMA) to the memory address of a GPU device, it would fail as the VMkernel remaps the virtual machine memory addresses. The Input-Output Memory Management Unit (IOMMU) handles this remapping, allowing native GPU device drivers to be used in a virtual machine by the guest operating system. Let’s review the requirements in more detail.

Physical Host Settings

Intel VT-D and AMD I/O

It is required to enable VT-D in the ESXi host BIOS for both passthrough-enabled GPUs as well as NVIDIA GPUs. In 2006 Intel introduced Intel Virtualization Technology for Directed I/O (Intel VT-d) architecture, an I/O memory management unit (IOMMU). One of the key features of the IOMMU is providing DMA isolation, allowing the VMkernel to assign devices to specific virtual machines directly. Complete isolation of hardware resources while providing a direct path and reducing overhead typically associated with software emulation. 

The left part of the diagram is outdated technology, which succeeded in vSphere by VT-D. In AMD systems, this feature is called AMD-IO Virtualization Technology (previously called AMD IOMMU).  Please note that VT-D is a sub-feature of the Intel Virtualization Technology (Intel VT) and AMD Virtualization (AMD-V). Enabling Virtualization Technology in the BIOS should enable all Intel VT sub-features, such as VT-D.

You can verify if Intel VT-d or AMD-V is enabled in the BIOS by running the following command in the shell of ESXi (requires root access to an SSH session)

esxcfg-info|grep "\----\HV Support"

If the command returns the value 3, it indicates that VT or AMD-V is enabled in the BIOS and can be used. If it returns the value of 2, it indicates that the CPU is VT/D or AMD-V is supported by the CPU but is currently not enabled in the BIOS. If it returns 0 or 1, it’s time to ask someone to acquire some budget for new server hardware. 🙂 For more info about status 0 or 1, visit VMware KB article 1011712.

Single Root I/O Virtualization

It is required to enable Single Root I/O Virtualization (SR-IOV) in the ESXi host BIOS for only NVIDIA Multi-Instance GPUs (vGPU MIG). Single Root I/O Virtualization (SR-IOV) is sometimes called Global SR-IOV in the BIOS. SR-IOV permits a physical GPU to partition and isolates its resources, allowing it to appear as multiple separate physical devices to the ESXi host. 

SR-IOV uses physical functions (PFs) and virtual functions (VFs) to manage global functions for the SR-IOV devices. The PF handles the functions that control the physical card. The PF is not tied to any virtual machine. Global functions are responsible for initializing and configuring the physical GPU, moving data in and out of the device, and managing resources such as memory allocation and Quality of Service (QoS) policies. VFs are associated with the virtual machine. They have their own PCI configuration space and complete IOMMU protection for the VM, I/O queues, interrupts, and memory resources. 

The number of virtual functions provided to the VMkernel depends on the device. The VMkernel manages the allocation and configuration of the vGPU device, while the PF handles the initialization and management of the underlying hardware resources.

Unlike NICs, GPUs cannot directly be exposed to VMs using SR-IOV alone. NVIDIA vGPU MIG technology uses SR-IOV as an underlying technology to partition its physical GPU devices and present them as individual smaller vGPU devices. Additionally, ESXi requires VT-d to be enabled to properly configure and manage virtual functions associated with a physical NIC. Without VT-d enabled, SR-IOV could not provide the necessary isolation and security between virtual functions and could potentially cause conflicts or other issues with the physical GPU.

NVIDIA requires enablement of SR-IOV in the BIOS to have the NVIDIA T4 to work properly. T4 GPUs offer only time-sliced GPU functionality.

Memory Mapped I/O in Detail

CPU cores execute instructions. Two main instruction categories are reading and writing to system memory (RAM) and reading and writing to I/O devices such as network cards or GPUs. Modern systems apply a memory-mapped I/O (MMIO) method; in this system, the processor does not know the difference between its system memory and memory from I/O devices. If the processor needs to read into a particular location in RAM, it can just figure out its address from the memory map and read and write from it. But what about the memory from an I/O device? 

If the CPU core executes an instruction that requires reading memory from the GPU, then the CPU will send a transaction to its system agent. The system agent identifies the I/O transaction and routes it to an address range designated for I/O instructions in the memory system range called the MMIO space. The MMIO contains memory mappings of the GPU registers. The CPU uses these mappings to access the memory of the GPU directly. The processor does not know whether it reads its internal memory or generates an I/O instruction to a PCIe device. The processor only accesses a single memory map. So this is why it’s called memory-mapped I/O.

Let’s dig deeper into this statement to understand the fundamental role of the MMIO space. It’s important to know that the MMIO region is not used to store data but for accessing, configuring, and controlling GPU operations.

To interact with the GPU, the CPU can read from and write to the GPU’s registers, mapped into the system’s memory address space through MMIO. The MMIO space points towards the MMIO hardware registers on the GPU device. These memory-mapped I/O hardware registers on the GPU are also known as BARs, Base Address Registers. Mapping the GPU BARs into the system’s physical address space provides two significant benefits. One, the CPU can access them through the same kind of instructions used for memory, not having to deal with a different method of interaction; two, the CPU can directly interact with the GPU without going through any virtual memory management layers. Both provide tremendous performance benefits. The CPU can control the GPU via the BARs, such as setting up input and output buffers, launching computation kernels on the GPU, initiating data transfers, monitoring the device status, regulating power management, and performing error handling. The GPU maintains page tables to translate a GPU virtual address to a GPU physical address and a host physical memory address.

Let’s use a Host-to-Device memory transfer operation as an example, the NVIDIA technical term for loading a data set into the GPU. The system relies on direct memory access (DMA) to move large amounts of data between the system and GPU memory. The native driver in the guest OS controls the GPU and issues a DMA request. 

DMA is very useful, as the CPU cannot keep up with the data transfer rate of modern GPUs. Without DMA, a CPU uses programmed I/O, occupying the CPU core for the entire duration of the read or write operation, and is thus unavailable to perform other work. With DMA, the CPU first initiates the transfer. It does other operations while the transfer is in progress, and it finally receives an interrupt from the DMA controller when the operation is done.

The MMIO space for a VM is outside its VM memory configuration (guest physical memory mapped into host physical memory) as it is “device memory”. It is exclusively used for communication between the CPU and GPU and only for that configuration – VM and passthrough device. 

When the application in the user space is issuing a data transfer, the communication library, or the native GPU driver, determines the virtual memory address and size of the data set and issues a data request to the GPU. The GPU initiates a DMA request, and the CPU uses the MMIO space to set up the transfer by writing the necessary configuration data to the GPU MMIO registers to specify the source and destination addresses of the data transfer. The GPU has page tables which contain page tables of the host system memory and the frame buffer capacity. “Frame buffer” is a GPU terminology for onboard GPU DRAM, a remnant of the times when GPUs were actually used to generate graphical images on a screen 😉 As we use reserved memory on the host side, these page addresses do not change, allowing the GPU to cache the host’s physical memory addresses. When the GPU is all set up and configured to receive the data, the GPU kicks off a DMA transfer and copies the data between the host’s physical memory and GPU memory without involving the CPU in the transfer.

Please note that MMIO space is a separate entity in the host physical memory. Assigning an MMIO space does not consume any memory resources from the VM memory pool. Let’s look at how the MMIO space is configured in an X86 system.

Memory Mapping Above 4G

It is required to enable the setting “Memory mapping above 4G”, often called “above 4G decoding”, “PCI Express 64-Bit BAR Support,” or “64-Bit IOMMU Mapping.” This requirement is because storing the MMIO space above 4 GB can be accessed by 64-bit operating systems without conflicts. And to understand the 4GB threshold, we have to look at the default behavior of x86 systems. 

At boot time, the BIOS assigns an MMIO space for PCIe devices. It discovers the GPU memory size and its matching MMIO space request and assigns a memory address range from the MMIO space. By default, the system carves out a part for the I/O address space in the first 32 bits of the address space. Because it’s in the first 4 gigabytes of the system memory address range, it is why this region is called MMIO-low or “MMIO below 4G”. 

The BAR size of the GPU impacts the MMIO space at the CPU side, and the size of a BAR determines the amount of allocated memory available for communication purposes. Suppose the GPU requires more than 256 MB to function. In that case, it has to incorporate multiple bars during its operations, which typically increases complexity, resulting in additional overhead and impacting performance negatively. Sometimes a GPU requires contiguous memory space, and a BAR size limit of 256 MB can prevent the device from being used. X86 64-bit architectures can address much larger address spaces. However, by default, most server hardware is still configured to work correctly with X86 32-bit systems. By enabling the system BIOS setting “Memory mapping above 4G”, the system can create an MMIO space beyond the 4G threshold and has the following benefits:

  • It allows the system to generate a larger MMIO space to map, for example, the entire BAR1 in the MMIO space. BAR1 maps the GPU device memory so the CPU can access it directly.
  • Enabling “Above 4G Mapping” can help reduce memory fragmentation by providing a larger contiguous address space, which can help improve system stability and performance.

Virtual Machine Settings

64-Bit Guest Operating System

To enjoy your GPU’s memory capacity, you require a guest operating system with a physical address limit that can contain that memory capacity. A 32-bit OS can maximally address 4 GB of memory, and 64-bit has a theoretical limit of 16 million terabytes (16,777,216TB). In summary, a 64-bit operating system is necessary for modern GPUs because it allows for more significant amounts of memory to be addressed, which is critical for their performance. This is why the NVIDIA Driver installed in the guest OS only supports Windows X86_64 operating systems and Linux 64-bit distributions.

Unified Extensible Firmware Interface 

Unified Extensible Firmware Interface (UEFI), or as it’s called in the vSphere UI, the “EFI Firmware Boot option,” is the replacement for the older BIOS firmware used to boot a computer operating system. Besides many advantages, like faster boot times, improved security (secure boot), and better compatibility with modern hardware, it supports MMIO. The VMware recommendation is to enable EFI for GPUs with 16GB and more. The reason is because of their BAR size. NVIDIA GPUs present three BARs to the system. BAR0, BAR1, and BAR3. Let’s compare an NVIDIA T4 with 16GB to an NVIDIA A100 with 40GB.

BAR address (Physical Function)T4A100 (40GB)
BAR016 MB16 MB
BAR1256 MB64 GB
BAR232 MB32 MB

BAR0 is the card’s main control space, allowing control of all the engines and spaces of the GPU. NVIDIA uses a standard size for BAR0 throughout its GPU lineup. The T4, A2, V100, A30, A100 40GB, A100 80GB, and the new H100 all have a BAR0 size of 16 MB. The BAR uses 32-bit addressing for compatibility reasons, as it contains the GPU id information and the master interrupt control.

Now this is where it becomes interesting. BAR1 maps the frame buffer. Whether to use a BIOS or an EFI firmware depends on the size of BAR1, not on the total amount of frame buffer the GPU has. In short, if the GPU has a BAR1 size exceeding 256 MB, you must configure the VM with an EFI firmware. That means that if you use an NVIDIA T4, you could use the classic BIOS, but if you just got that shiny new A2, you must use an EFI firmware for the VM, even though both GPU devices have a total memory capacity of 16 GB.

DeviceT4A2
Memory capacity16 GB16 GB
BAR1 size256 MB16 GB

As the memory-mapped I/O part mentions, every system has an MMIO below the 4 GB region. The system maps BARs with a size of 256 MB in this region, and the BIOS firmware supports this. Anything larger than 256 MB and you want to switch over to EFI. Please remember that EFI is the better choice of the two regardless of BAR sizes and that you cannot change the firmware once the guest OS is installed. Changing it from BIOS to EFI requires a reinstallation of the guest OS. I recommend saving yourself a lot of time by configuring your templates with the EFI firmware.

Please note that the BAR (1) sizes are independent of the actual frame buffer size of the GPU. The best method to determine this is by reading out the BAR size and comparing it to the device’s memory capacity. By default, most modern GPUs use a 64-bit decoder for addressing. You can request the size of the BAR1 in vSphere via VSI Shell (not supported, so don’t generate any support tickets based on your findings). In that case, you will notice that the A100 BAR1 has an address range of 64 GB, while the physically available memory capacity is 40 GB. 

However, ultimately it’s a combination of the device and driver that determines what the guest OS detects. Many drivers use a 256 MB BAR1 aperture for backward compatibility reasons. This aperture acts as a window into the much larger device memory. This removes the requirement of contiguous access to the device memory. However, if SR-IOV is used, a VF has contiguous access to its own isolated VF memory space (typically smaller than device memory). If I load the datacenter driver in the VMkernel and run the nvidia-smi -q command, it shows a BAR1 aperture size of 4 GB.

BAR3 is another control space primarily used by kernel processes

Reserve all guest memory (All locked)

To use a passthrough GPU or vGPU, vSphere requires a VM memory to be protected by a reservation. Memory reservations protect virtual machine memory pages from being swapped out or ballooned. The reservation is needed to fix all the virtual machine memory at power on, and the ESXi memory scheduler cannot move or reclaim it during memory pressure moments. As mentioned in the “Memory Mapped I/O in detail,” data is copied using DMA and is performed by the GPU device. It uses the host’s physical addresses to access these pages to get the data from the system memory into the GPU device. If, during the data transfer, the ESXi host is pushed into an overcommitted state, it might select those data set pages to swap out or balloon. That situation would cause a page fault at the ESXi host level, but due to IOMMU requirements, we cannot service those requests in flight. In other words, we cannot restart an IO operation from a passthrough device and must ensure the host’s physical page is at the position the GPU expects. A memory reservation “pins” that page to that physical memory address to ensure no page faults happen during DMA operations. As the VM MMIO space is considered device memory, it falls in the virtual machine overhead memory category and is automatically protected by a memory reservation.

As mentioned, VT-D records that host physical memory regions are mapped to which GPUs, allowing it to control access to those memory locations based on which I/O device requests access. VT-d creates DMA isolation by restricting access to these MMIO regions or, as they are called in DMA terminology, protection domains. This mechanism works both ways, it isolates the device and restricts other VMs from accessing the assigned GPU, but due to its address-translation tables, it keeps it from accessing other VMs’ memory as well.  In vSphere 8, a GPU VM is automatically configured with the option “Reserve all guest memory (All locked)”.

Advanced Configuration Parameters

If the default 32GB MMIO space is not sufficient, set the following two advanced configuration parameters: 

  • pciPassthru.set.usebitMMIO = true
  • pciPassthru.64bitMMIOSizeGB = xxx

The setting pciPassthru.set.usebitMMIO = true enables 64-bit MMIO. The setting “pciPassthru.64bitMMIOSizeGB =” specifies the size of the MMIO region for the entire VM. That means if you assign multiple GPUs to a single VM, you must calculate to total required MMIO space for that virtual machine to operate correctly.

A popular method is to use the frame buffer size (GPU memory capacity), round it up to a power of two, use the next power of two values, and use that value as the MMIO size. Let’s use an A100 40 GB as an example. The frame buffer capacity is 40 GB. Rounding it up would result in 64 GB, then using the next power of two values would result in a 128 GB MMIO space. Until the 15.0 GRID documentation, NVIDIA used to list the recommended MMIO Size. It aligns with this calculation method. If you assign two A100 40 GBs to one VM, you should assign a value of 256 GB as the MMIO Size. But why is this necessary? If you have a 40 GB card, why do you need more than 40 GB of MMIO? If you need more, why isn’t 64GB enough? Why is 128 GB required? Let’s look deeper into the PCIe BAR structure in the configuration space of the GPU.

A GPU config space contains six BARs with a 32-bit addressable space. Each base register is 32-bits wide and can be mapped anywhere in the 32-bit memory space. Two BARs are combined to provide a 64-bit memory space. Modern GPUs expose multiple 64-bit BARs. The BIOS determines the size. How this works exceeds the depth of this deep dive, Sarayhy Jayakumar explains it very well in the video “System Architecture 10 – PCIe MMIO Resource Assignment.” What is essential to know is that the MMIO space for a BAR has to be naturally aligned. The concept of a “naturally aligned MMIO space” refers to the idea that these memory addresses should be allocated in a way that is efficient for the device’s data access patterns. That means for a 32-bit BAR, the data is stored in four consecutive bytes, and the first byte lies on a 4-byte boundary, while a 64-bit BAR uses an 8-byte boundary, and the first byte lies on an 8-byte boundary. If we take a closer look at an a100 40 GB, it exposes three memory-mapped BARs to the system. 

BAR0 acts as the config space for the GPU is a 32-bit addressable BAR, and is 16 MB.

BAR1 is mapped to the frame buffer. It is a 64-bit addressable BAR and consumes two base address registers in the PCIe configuration space of the GPU. That is why the next detectable BAR is listed as BAR3, as BAR1 consumes BAR1 and BAR2. The combined BAR1 typically requires the largest address space. In the case of the A100 40 GB, it is 64 GB.

The role of BAR3 is device-specific. It is a 64-bit addressable BAR and is 32 MB in the case of the A100 40 GB. Most of the time, it’s debug or IO space.

As a result, we need to combine these 32-bit and 64-bit BARs into the MMIO space available for a virtual machine and naturally align them. If we add up the address space requirement, it’s 16MB + 64 GB + 32 MB = 64 GB and a little more. To ensure the system can align them perfectly, you round it up to the next power of two, 128 GB. But I think most admins and architects will wonder, how much overhead does the MMIO space generate? Luckily, the MMIO space of an A100 40 GB is not consuming 128 GB after setting the “pciPassthru.64bitMMIOSizeGB =128” advanced parameter. As it lives outside the VM memory capacity, you can quickly check its overhead by monitoring the VM overhead reservation. Let’s use an A100 40 GB in this MMIO size overhead experiment. If we check the NVIDIA recommendation chart, it shows an MMIO size of 128 GB. 

ModelMemory SizeBAR1 Size (PF)MMIO Size – Single GPUMMIO Size – Two GPUs
V10016 GB / 32 GB16 GB / 32 GB64 GB, all variants128 GB
A3024 GB32 GB64 GB128 GB
A10040 GB64 GB128 GB256 GB
A10080 GB128 GB256 GB512 GB
H10080 GB128 GB256 GB512 GB

The VM is configured with 128 GB of memory. This memory configuration should be enough to keep a data set in system memory that can fill up the entire frame buffer of the GPU. Before setting the MMIO space and assigning the GPU as a passthrough device, the overhead memory consumption of the virtual machine is 773.91 MB. You can check that by selecting the VM in vCenter, going to the Monitor tab, and selecting utilization or monitoring the memory consumption using ESXTOP.

The VM is configured with an MMIO space of 128 GB.

If you only assign the MMIO space but don’t assign a GPU, the VM overhead does not change as there is no communication happening via the MMIO space. It will only become active once a GPU is assigned to the VM. The GPU device is assigned, and if you monitor the VM memory consumption, you notice that the memory overhead of the VM is increased to 856.82 MB. The 128GB MMIO space consumes 82.91 MB.

Let’s go crazy and increase the MMIO space to 512GB.

Going from an MMIO space of 128GB to 512GB increases the VM overhead to 870.94MB, which results in an increment of  ~14MB. 

An adequate-sized MMIO space is vital to performance. Looking at the minimal overhead an MMIO space introduces, I recommend not to size the MMIO space too conservatively.  

TKGS Worker Nodes

We have to do two things because we cannot predict how many GPUs and which GPU types are attached to TKGS GPU-enabled worker nodes. Enable the MMIO space automatically to continue a seamless developer experience and set an adequate MMIO space for a worker node. By default, an 512 GB MMIO space is automatically configured, or to state it differently, it provides enough space for four A100 40 GB GPUs per TKGS worker node.

If this is not enough space for your configuration, we have a way to change that, but this is not a developer-facing option. Let me know in the comments below if you foresee any challenges by not exposing this option.

Enable vGPU Hot Migration at vCenter Level

One of the primary benefits of vGPU over (Dynamic) Direct Path I/O is its capability of live migration of vGPU-enabled workload. Before you can vMotion a VM with a vGPU attached to it, you need to tick the checkbox of the vgpu.hotmigrate.enabled setting in the Advanced vCenter Server Settings section of your vCenter. In vSphere 7 and 8, the setting is already present and only needs to be ticked to get enabled.

Other articles in this series:

  • vSphere ML Accelerator Spectrum Deep Dive Series
  • vSphere ML Accelerator Spectrum Deep Dive – Fractional and Full GPUs
  • vSphere ML Accelerator Spectrum Deep Dive – Multi-GPU for Distributed Training
  • vSphere ML Accelerator Spectrum Deep Dive – GPU Device Differentiators
  • vSphere ML Accelerator Spectrum Deep Dive – NVIDIA AI Enterprise Suite
  • vSphere ML Accelerator Spectrum Deep Dive – ESXi Host BIOS, VM, and vCenter Settings
  • vSphere ML Accelerator Spectrum Deep Dive – Using Dynamic DirectPath IO (Passthrough) with VMs
  • vSphere ML Accelerator Spectrum Deep Dive – NVAIE Cloud License Service Setup

Filed Under: Machine Learning

#47 – How VMware accelerates customers achieving their net zero carbon emissions goal

May 30, 2023 by frankdenneman

In episode 047, we spoke with Varghese Philipose about VMware’s sustainability efforts and how they help our customers meet their sustainability goals. Features like the green score help many of our customers understand how they can lower their carbon emissions and hopefully reach net zero.

Topics discussed:

  • Creating sustainability dashboards – https://blogs.vmware.com/management/2019/06/sustainability-dashboards-in-vrealize-operations-find-how-much-did-you-contribute-to-a-greener-planet.html
  • Sustainability dashboards in VROps 8.6 – https://blogs.vmware.com/management/2021/10/sustainability-dashboards-in-vrealize-operations-8-6.html
  • VMware Green Score – https://blogs.vmware.com/management/2022/11/vmware-green-score-in-aria-operations-formerly-vrealize-operations.html
  • Intrinsically green – https://news.vmware.com/esg/intrinsically-evergreen-vmware-earth-day-2023
  • Customer success story – https://blogs.vmware.com/customer-experience-and-success/2023/04/tam-partnerships-make-customers-the-hero.html

Follow the podcast on Twitter for updates and news about upcoming episodes: https://twitter.com/UnexploredPod.

Filed Under: Podcast

  • « Go to Previous Page
  • Page 1
  • Page 2
  • Page 3
  • Page 4
  • Interim pages omitted …
  • Page 89
  • Go to Next Page »

Copyright © 2025 · SquareOne Theme on Genesis Framework · WordPress · Log in