• Skip to primary navigation
  • Skip to main content

frankdenneman.nl

  • AI/ML
  • NUMA
  • About Me
  • Privacy Policy

Basic Terminologies Large Language Models

August 18, 2023 by frankdenneman

Many organizations are in the process of deploying large language models to apply to their use cases. Publically available Large Language Models (LLMs), such as ChatGPT, are trained on publicly available data through September 2021. However, they are unaware of proprietary private data. Such information is critical to the majority of enterprise processes. To help an LLM to become a useful tool in the enterprise space, an LLM is further trained of finetuned on proprietary data to adapt to organization-specific concepts.

This process introduces terminology that is used more often outside the data science community. Having a better understanding of the following concepts should enhance your ability to navigate the data science team’s requirements when building an LLM deployment architecture.

Neural Network: A Large Language Model (LLM) is a sophisticated neural network architecture designed for natural language processing tasks. LLMs use multiple layers of interconnected nodes to learn language patterns from vast amounts of text data. Parameters, specifically weights, and biases, are crucial components that define how the model processes information.

Weights govern the strength of connections between nodes, influencing the LLM’s ability to capture linguistic nuances. Biases adjust the activation levels of nodes, allowing the model to adapt its responses. During forward propagation, the input text is transformed into tokens and flows through the network, undergoing contextual analysis and predicting subsequent words or phrases.

Backward propagation, an integral part of training, calculates gradients to adjust weights and biases. This process refines the model’s parameters, aligning its language generation with human-written text. Through continuous learning, LLMs become adept at tasks like completing text, translating, and generating new content.

Large Language Model: A Large Language Model is a specific Natural Language Processing (NLP) model that predicts the next word or token. Compared to other NLP models (which are based on language models LM), they are characterized by their size (parameter count of >1B) and are typically trained on vast amounts of text data from the internet. This enables them to learn a broad range of language features and general knowledge. LLMs can handle a number of tasks, from summarization to content generation to question and answer. NLP models are typically focused on sentiment analysis and text classification. LLMs can be further fine-tuned for various tasks with minimal additional training, while NLP is less versatile and requires extensive task-specific training. 

Foundation model: A foundation model is an LLM, sometimes referred to as a Pretrained Language Model (PLM), that is robust enough to act as a “foundation” that can be used as is or fine-tuned/adapted for newer domains. In general, it is trained on diverse data, capable of being customized and fine-tuned for various applications and tasks. For example, the open-source LLaMA 2 models are trained on 2 trillion tokens primarily sourced from publicly available online data sources. Meta required 368640 GPU (A100-80 GBs) hours to train the 13B LLaMa-2 model.  

Token: A token is a fundamental unit of text that an LLM uses to process and understand language. In English, a token can be as short as a single character or as long as a word. For example, in the sentence “I love vSphere,” there are three tokens: “I,” “love,” and “vSphere.” However, the word “vSphere” might be broken down into two tokens depending on the model’s tokenizer. Token length is important because it can impact the overall size of the input data, computational resources required for processing, and the model’s ability to perform linguistically. Tokens help break down the text into manageable pieces for analysis and are essential for language generation. They serve as the building blocks that allow LLMs to comprehend human language. 

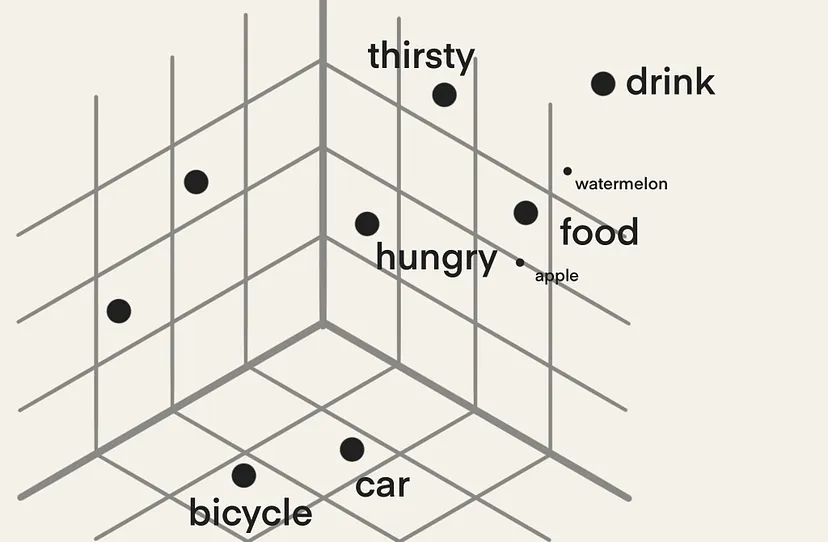
Embeddings: are numerical representations of tokens. Each token is transformed into a vector of numbers. These vectors encode the semantic meaning of the text and facilitate computer-based processing and analysis of human language. This language-to-number translation equips machine-learning processes to interact with language data efficiently.

Vector: Vectors are commonly used to represent data points in a multi-dimensional space. Each element of a vector corresponds to a specific dimension, and the combination of these elements defines the position of the vector in that space. Vectors are essential for measuring similarities and transforming data. The article “Explaining Vector Databases in 3 Levels of Difficulty” provides a great primer on vectors, embeddings, and Vector databases.

Image by Leonie Monigatti

Parameters: Parameters are the learned values that a model acquires through training to facilitate predictions or classifications on new data. In neural networks, these parameters are commonly denoted as weights and biases, dictating how input data undergoes transformation into output predictions.    

An LLM model size is typically expressed in parameter count in billions, such as the LLaMA-2 13B. This model contains roughly 13 Billion parameters. The memory consumption depends on the floating-point format (precision). Typically for LLM, a BF16 or FP16 is used. A parameter using BF16 consumes 2 bytes. 1 Billion bytes equal a gigabyte. Thus, we can easily calculate the “static” model memory consumption. LLaMA-2 13B consumes 26 GB of GPU memory when loaded into the GPU. Streaming data into the LLM or fine-tuning the model increases memory consumption. 

Transformer Architecture: The transformer architecture is a foundational framework for training and utilizing large neural networks in natural language processing (NLP). It revolutionized the field by introducing the attention mechanism, which allows the model to weigh the importance of different words in a sentence. It introduced a self-attention mechanism to process input data in parallel, allowing it to truly understand the context of words depending on other words that are placed further away within the sentence (long-range dependencies). The transformer architecture has an encoder and decoder functionality. The encoder creates a “contextualized representation” of a prompt, capturing the meaning and significance of the words in the prompt by considering how they relate to each other within the given context. The decoder receives and processes the contextualized representation, using its understanding of the context to guide output generation. Typically, it generates one word of the output at a time. The first word generated is based on the input context, and the next word is generated based on the input context and the previously generated word. This is called autoregressive context.

(Downstream) Task: An LLM is typically refined further to achieve a specific goal or perform a particular downstream task. Many foundation models today can perform a wide range of NLP tasks without refinement for a particular downstream task. A “task” refers to a specific job or activity that the model is designed to perform using its language understanding and generation capabilities. Tasks can include a wide range of natural language processing objectives. The most common ones are text generation (predicting the next word/token), summarization (given an input, return a short output), question answering (predicting the next word/token based on search results in the prompt), sentiment analysis, translation, and instruction. When a new downstream task is needed, we still need to fine-tune the foundation LLM to respond to domain-specific prompts (eg; ensure it favors a particular term, “Tanzu,” over others).  

Prompt: A prompt is a specific input given to the model to guide its behavior and generate desired text output. The prompt serves as an instruction or query that helps the LLM understand the task or context it needs to respond to. It can be a sentence, a paragraph, or even just a few keywords, depending on the task at hand. For example, if technical marketing wants an LLM to generate a technical specification overview, they can use the prompt “Write a detailed description of our latest update release, highlighting its unique features and capabilities.”

Prompt engineering: The quality and specificity of the prompt can greatly influence the LLM’s output. A well-crafted prompt provides clear guidance to the model, leading to more relevant and accurate generated text. Prompt engineering involves designing prompts effectively to achieve the desired results for various tasks such as translation, summarization, question answering, and more. Prompt engineering can also be used to induce LLMs to say undesirable things, for example, with a prompt that tells an LLM to forget its existing rules before responding. 

Zero-shot: refers to the model’s ability to perform tasks or generate text about new topics without additional training or examples in the prompt. It relies on its existing knowledge to tackle new challenges without requiring specific learning for each one. 

P-tuning: This technique involves fine-tuning a small trainable model prior to engaging the LLM. The small model encodes the text prompt and crafts task-specific virtual tokens, which are then added to the prompt and fed into the LLM. Once the fine-tuning is done, these virtual tokens are stored in a lookup table and used during inference, replacing the smaller model. P-tuning is far more resource efficient compared to other forms of fine-tuning of an LLM. The time required to tune a smaller model can often be measured in minutes instead of days with fine-tuning the LLM.   This is a great talk about P-tuning and what exactly virtual tokens are.

Parameter Efficient Fine-Tuning: PEFT aims to make the fine-tuning process more efficient by focusing on updating only a subset of the model’s parameters (e.g., 100M parameters for a 15B model), rather than retraining the entire model from the ground up. The idea behind PEFT is to balance retaining the knowledge captured by the pre-trained model and tailoring it to perform well on a specific task. By carefully selecting and adjusting certain parameters, you can achieve good performance on the task while reducing the computational cost and time required for fine-tuning. PEFT also overcomes the issues of catastrophic forgetting, a behavior observed during the full fine-tuning of LLMs. There are multiple PEFT methods: : 

Adapter-based PEFT: Adapters are new modules added to the pre-trained network, and only the new parameters are trained, while the original LLM-trained parameters are left untouched. As a result, a small proportion of parameters of the original LLM is trained. This means that the model keeps remembering the previous tasks and uses a small number of new parameters to learn the new task. However, the downside of adding these new layers is the inference latency increase. This issue appears unavoidable because the adapter layers are added sequentially to an LLM. They must be processed sequentially, and there is no way to parallel process them.   

LoRA: Low-Rank Adaptation of Large Language Models: LoRA also freezes the pre-trained parameters, but instead of adding additional layers to the neural network, it adds values to the parameters. As a result, the model can be executed fully in parallel, avoiding additional inferencing latency. In addition, LoRA applies a very intelligent method to reduce the number of trainable parameters, reducing fine-tuning time and memory consumption. A further reduction of memory consumption can be achieved by quantizing the majority (non-outliers) trainable parameters, which results in using an integer data type (INT8) instead of a floating point. A parameter stored in INT8 consumes 8 bits, reducing the memory footprint in half compared to BF16. This is the most popular method of PEFT.  

Quantized Low-Ranking Adaptation (QLoRA):  QLoRA takes it one step further and compresses the weights and activations to 4-bit precision. QLoRA uses a specific data type for storing the base model weights and data type to perform computations. During the computations, QLoRA “dequantizes” the weights from a 4-bit precision (4-bit NormalFloat) into a 16-bit bfloat. The weights are only decompressed when needed; therefore, QLoRA allows large models to run on GPUs with smaller memory capacities.   

IA3 (Infused Adapter by Inhibiting and Amplifying Inner Activations): IA3 is a newer PEFT technique intended to improve over LoRA. It offers the same benefits as the LoRA. However, it’s only tested on really “small” LLM models (3B) currently, and most backends do not support this yet. The last update on the GitHub IA3 repo was done in September 2022, which might hint at a lack of popularity of this PEFT method in the data science community. 

Fine Tuning: Fine-tuning is the mechanism to improve LLM models for a specific task (e.g., summarizing legal documents) or domain (e.g., more knowledge about virtualization). During the training of an LLM, the neural network is exposed to unlabeled data and learns through a form of self-supervision (e.g., predicting the next word or sentence entailment). That means that the algorithm explores the patterns, structures, and relationships within the dataset on its own without being provided with specific labeled output for every task, but the robustness of its dataset may mean that it will already be good at some tasks (eg; generating coherent sounding sentences). Fine-tuning always involves supervised learning, where human labelers validate and curate data for a specific task (e.g., to fine-tune the model’s question-answering capabilities, we would have question and answer pairs as the input).  

Reinforcement Learning with Human Feedback (RLHF): When validating the accuracy of a model designed for an image recognition task, we can quickly determine its accuracy. It either classifies the cat correctly or not. With LLMs, it’s a bit more challenging, as it is more difficult to define what makes a “good” text as it is subjective and context-dependent.    

The RHLF method uses feedback generated by humans for generated text to measure the model performance. The method involves deploying multiple models during the training process. A pretrained language model and typically a smaller reward model. The PLM generates multiple responses based on a prompt and a reward model numerical scores each response on how well humans perceive this text. It ranks the response according to human preference and then applies reinforcement learning to train the PLM further to prioritize the response with the higher numerical scores.  

RHLF systems are complex and challenging as gathering human preference data is expensive. RLHF performance is only as good as the quality of the human annotations. People tend to disagree. Therefore, ground truth is often lacking due to variance in opinions by the annotating team.  There are multiple methods of human feedback besides the preference order, such as: 

  • Corrections: Upvoting or downvoting the model output (also known as prompt completion) 
  • Demonstrations: Humans write the preferred answer to a prompt 
  • Natural Language Input: Humans are asked to provide feedback on the model output in natural language 

Supervised fine-tuning (SFT): involves adapting a PLM to a specific downstream task using validated training examples. Validated training examples are pairs of input data and output labels that have been carefully checked and confirmed to be accurate and reliable. SFT tunes the model to a specific task, such as responding to customer support questions. The model can be trained to adapt to specific knowledge-based or demonstrate a particular persona or empathy by using validated training examples.  

Is PEFT considered supervised learning?:  PEFT is not strictly categorized as supervised learning; rather, it is a technique that can be applied within the context of supervised learning. Supervised learning involves training a model on labeled data pairs, where the labels serve as the ground truth for training. PEFT, on the other hand, is a method that aims to fine-tune a pre-trained model using a limited amount of new data specific to a task to adapt the model’s parameters while leveraging its existing knowledge. PEFT is characterized by its emphasis on efficiency and parameter reuse. It does not require extensive retraining on the entire dataset, as it focuses on updating only a subset of the model’s parameters to adapt it to a new task.

In-Context Learning 

Retrieval Augmented Generation (RAG): Once an LLM is trained, it is ignorant of new data. When an organization launches a new product or service, the customer service-focused LLM needs to be retrained to incorporate these new data points. RAG allows the LLM to act as a conversational interface, while RAG “grounds” the LLM with information that aligns with its use case while reducing hallucinations. RAG allows LLMs to access knowledge sources outside the trained model and augment the completion of the prompt with relevant information found in external sources. These sources can be the organizations’ proprietary data sources, like knowledge bases, Bugzilla, Confluence, internal documents, etc. RAG typically works together with a Vector Database or a search engine. 

When the user provides the prompt to the LLM, the RAG framework performs a “contextual search” on the Vector database and generates the context. The RAG framework augments the original prompt by injecting the context into the prompt. The LLM receives the enriched prompt and can generate a better response as it has access to factual data. The LLM sends the generated response back to the user.  

RAG frameworks and Vector DBs can be critical differentiators for organizations with rapidly changing knowledge bases or any other source of information. These organizations cannot change the LLM and redeploy at the same velocity as the demand for up-to-date information. Keeping the models’ answers in lock-step with the velocity of their service offering is challenging. A good example is a FAQ for a chatbot function at a call center for a new product or service. The data science team can add up-to-date data to the Vector DB answer and question domains and ensure that the RAG framework prioritizes the Vector DB over the LLM model for information retrieval. 

Grounding: refers to the process of connecting the model’s prompt completion (responses) to real-world knowledge. Grounding is about ensuring that the model’s outputs are coherent, accurate, and relevant to the information available in the world. Pretraining, prompt-engineering, fine-tuning, and in-context learning all help to ground the LLM.  

Hallucination: a hallucination is a confident response by the LLM that appears coherent and contextually relevant but is not based on accurate information from the input data or is not logically grounded in reality. An example is URLs that are generated by an LLM that does not exist.  

Guardrails: Guardrails restrict LLMs to respond in a particular (safe) manner. These guardrails guide the LLM to stay on topic, avoid hallucinations or toxic responses, or execute malicious code. Chatbots can become an attack surface, and a security guardrail can protect LLM platforms. Guardrails are programmable constraints and are placed between the chatbot and the LLM. The NVIDIA NeMo framework offers a guardrail workflow to apply constraints to the LLM easily. 

Filed Under: AI & ML

My Sessions at VMware Explore 2023 Las Vegas

August 17, 2023 by frankdenneman

Next week we are back in Las Vegas. Busy times ahead with meeting customers, old friends, making new friends, and presenting a few sessions. Next week I will present at Customer Technical Exchange (CTEX), {code}, and host two meet-the-expert sessions. I will also participate as a part-time judge at the {code} hackathon.

Breakout Sessions

45 Minutes of NUMA (A CPU is not a CPU Anymore [CODEB2761LV]

Tuesday, Aug 22, 2:45 PM – 3:30 PM PDT Level 4, Delfino 4003

Yu Wang and I will dive deep into the new Multi-Chip CPU architecture, On-board Accelerators, and Sub-NUMA clustering and highlight cool new vSphere 8 features that will make your life as a Vi-admin easier.

Building an LLM Deployment Architecture – 5 lessons learned [CTEX]

Tuesday, Aug 22, 4:00 PM – 5:00 PM PDT,  Zeno 4708 

Shawn Kelly and I will go over the details on how to create a deployment architecture for fine-tuning and deploying Large Language Models on your vSphere environment. Shawn and I have been deploying and developing a chatbot application with a data science team within VMware, and we want to share our lessons learned.

What’s new with VMware+NVIDIA AI-Ready Enterprise Platform [CEIB3051LV]

Thursday, Aug 24, 10:00 AM – 10:45 AM PDT Level 2, Titian 2305

Watch Raghu’s keynote, and then come to this session later next week. Due to NDA rules, we cannot disclose any content in the description of the current Explore Content Catalog. If you are planning to run Machine Learning workloads in your organization, join this session to hear about our latest offering that NVIDIA and VMware have created together.

Meet The Expert Sessions

Machine Learning Accelerator Deep Dive [CEIM1849LV]

Monday, Aug 211:00 PM – 1:30 PM PDTMeet the Experts, Level 2, Ballroom G, Table 7

Wednesday, Aug 2311:00 AM – 11:30 AM PDTMeet the Experts, Level 2, Ballroom G, Table 7

Have questions about your ML workload or are not sure whether vSphere is the platform for ML workload? Sign up for the MtE session, and let’s discuss your challenges.

If you see me walk by, say hi!

Filed Under: AI & ML

vSphere ML Accelerator Spectrum Deep Dive – Installing the NVAIE vGPU Driver

July 6, 2023 by frankdenneman

After setting up the Cloud License Service Instance, the NVIDIA AI Enterprise vGPU driver must be installed on the ESXi host. A single version driver amongst all the ESXi hosts in the cluster containing NVIDIA GPU devices is recommended. The most common error during the GPU install process is using the wrong driver. And it’s an easy mistake to make. In vGPU version 13 (the current NVAIE version is 15.2), NVIDIA split its ESXi host vGPU driver into two kinds. A standard vGPU driver component supports graphics, and an AI Enterprise (AIE) vGPU component supports compute. The Ampere generation devices, such as the A30 and A100 device, support compute only, so it requires an AIE vGPU component. There are AIE components available for all NVIDIA drivers since vGPU 13.

This article series focuses on building a vSphere infrastructure for ML platforms, and thus this article lists the steps to install the NVD-AIE driver. To download the NVD-AIE driver, ensure you have a user id that has access to the NVIDIA License Portal. The next step is to ensure the platform meets the requirements before installing the driver component. The installation process can be done using vSphere Lifecycle Manager or manually installing the driver component on each ESXi host in the cluster. Both methods are covered in this article.

Requirements

Make sure to configure the ESXi Host settings as follows before installing the NVIDIA vGPU Driver:

ComponentRequirementsNotes
Physical ESXi hostMust have Intel VT-d or AMD I/O VT enabled in the BIOS
Must have SR-IOV enabled in the BIOSEnable on Ampere & Hopper GPUs
Must have Memory Mapping Above 4G enabled in the BIOSNot applicable for NVIDIA T4 (32-bit BAR1)
vCenterMust be configured with Advanced Setting vgpu.hotmigrate.enabledIf you want to live-migrate VMs
vSphere GPU Device SettingsGraphics Type: Basic
Graphics Device Settings: Shared Direct

The article vSphere ML Accelerator Spectrum Deep Dive – ESXi Host BIOS, VM, and vCenter Settings provides detailed information about every setting listed.

Preparing the GPU Device for the vGPU Driver

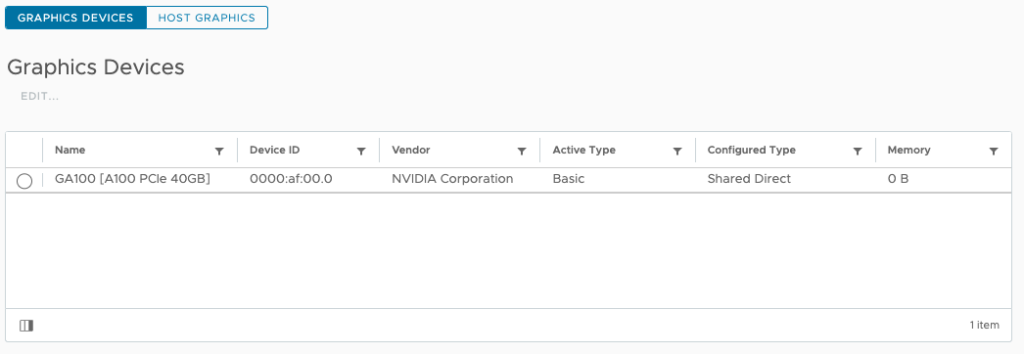
The GPU device must be in “Basic Graphics Type” mode to successfully install the vGPU driver. It is the default setting for the device. That means that the GPU should not be configured as a Passthrough device. In vCenter, go to the Inventory view, select the ESXi host containing the GPU device, go to the Configure menu option, Hardware, PCI Devices. The GUI should present the following settings:

Go to the Graphics menu options

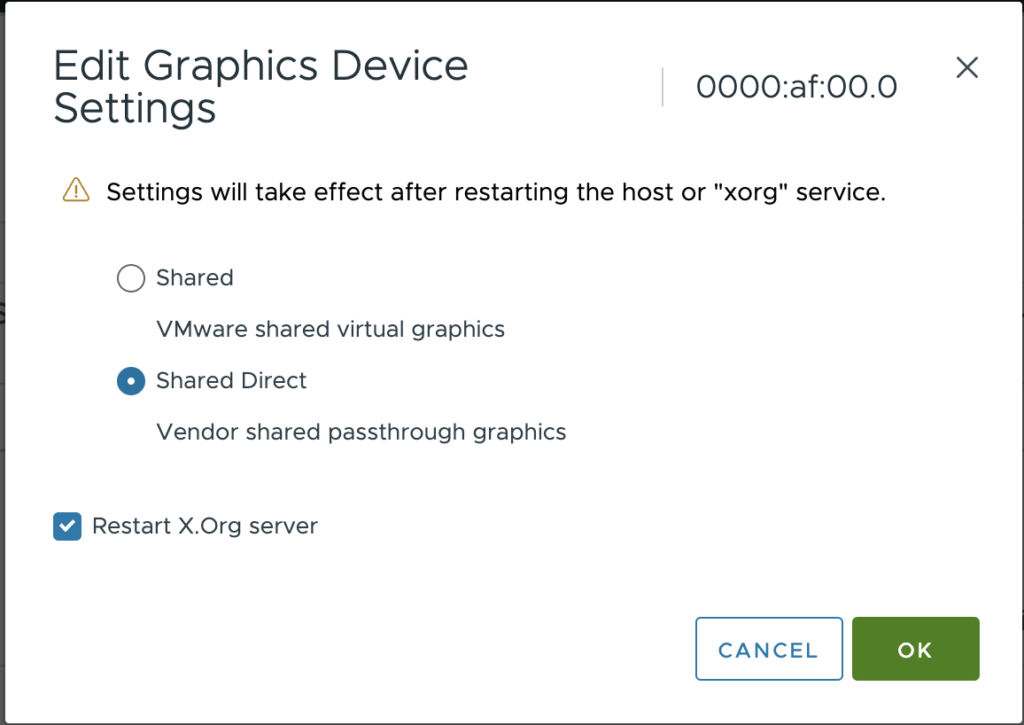
Select the GPU and choose EDIT... The default graphics type is Shared, which provides vSGA functionality. To enable vGPU support for VMs, you must change the default graphics type to Shared Direct.

You can verify these settings via the CLI using the following command:

% esxcli graphics device list
0000:af:00.0
   Vendor Name: NVIDIA Corporation
   Device Name: GA100 [A100 PCIe 40GB]
   Module Name: None
   Graphics Type: Basic
   Memory Size in KB: 0
   Number of VMs: 0

Verify if the default graphics settings is set to Shared Direct using the command:

% esxcli graphics host get
   Default Graphics Type: SharedPassthru
   Shared Passthru Assignment Policy: Performance

If the UI is having an off-day and won’t want to listen to your soothing mouse clicks, use the following commands to place GPU in the correct mode, and restart the X.Org server.

% esxcli graphics host set --default-type SharedPassthru
% /etc/init.d/xorg restart
Getting Exclusive access, please wait…
Exclusive access granted.
% esxcli graphics host get
   Default Graphics Type: SharedPassthru
 Shared Passthru Assignment Policy: Performance

NVAIE Driver Download

Selecting the correct vGPU version

The vGPU driver is available at the NVIDIA Licensing Portal, part of the NVIDIA APPLICATION HUB. Go to the SOFTWARE DOWNLOADS option in the left menu, or go directly to https://ui.licensing.nvidia.com/software if logged in.

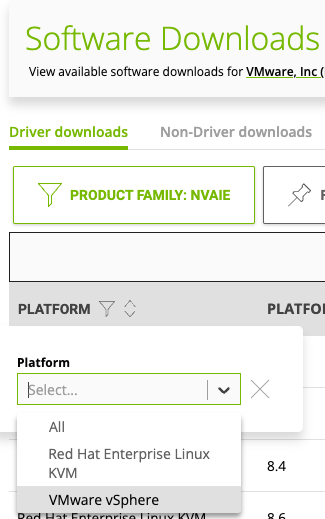
Two options look applicable: the vGPU product family and the NVAIE product family. For ML workloads, choose the NVAIE product family. The NVAIE product family provides vGPU capability for compute (ML/AI) workload. The vGPU family is for vGPU functionality for the VDI workload. You can recognize the correct vGPU Driver components with the NVD-AIE (NVIDIA AI Enterprise) prefix. To reduce the results shown on the screen, click PLATFORM and select VMware vSphere.

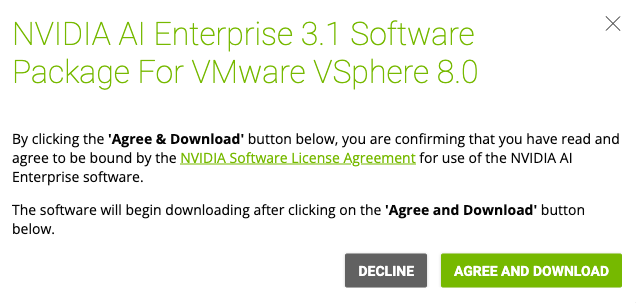
Select the latest release. At the time of writing this article, the latest NVAIE version was 3.1 for both vSphere 7 and vSphere 8. 

Since I’m running vSphere 8.0 update 1, I’m selecting NVAIE 3.1 for vSphere 8.

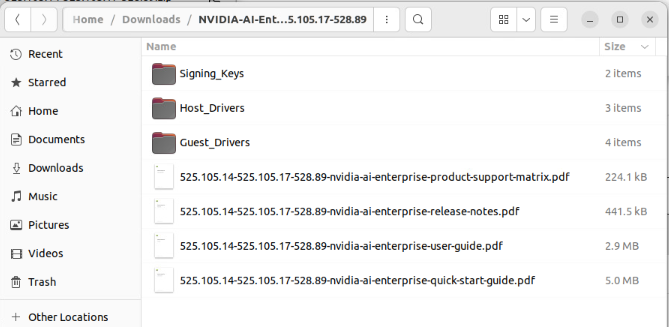
The file is downloaded in a zip-file format. Extract the file to review the contents.

As described in the articles “vSphere ML Accelerator Deep Dive – Fractional and Full GPUs” and “vSphere ML Accelerator Spectrum Deep Dive – ESXi Host BIOS, VM, and vCenter Settings“, two components drive the GPU. The guest OS driver controls the MMIO space and the communication of the device, and the GPU manager (the NVIDIA name for the ESXi Driver) controls the time-sharing mechanism to multiplex control across multiple workloads.

The zip file contains the ESXi Host Drivers and the Guest Drivers. It does not contain the GPU operator for TKGs, which installs and manages the LCM of the TKGs worker node driver. The GPU operator is installed via a helm chart. Before being able to install the GPU operator, the ESXi host driver must be installed to allow the VM Class to present a vGPU device to the TKGs worker node.

Installing the Driver

vSphere offers two possibilities to install the NVAIE vGPU driver onto all the cluster hosts, and which method is best for you depends on the cluster configuration. If every ESXi host in the cluster is equipped with at least one GPU device. Installing and managing the NVAIE vGPU driver across all hosts in the cluster using a vSphere Lifecycle Manager (vLCM) desired state image is recommended. The desired state functionality of Lifecycle Manager ensures the standardization of drivers across every ESXi host in the cluster. Visual confirmation in vCenter allows VI-admins to verify driver consistency across ESXi hosts. If an ESXi host configuration is not compliant with the base image vCenter lifecycle manager reports this violation. If a few ESXi hosts in the cluster contain a GPU card, installing the driver using the manual process might be better. You can always opt for using a desired state image in a heterogeneous cluster, but some ESXi hosts will have a driver installed without use. In general, using the desired state image throughout the cluster, even in heterogeneous clusters, is recommended to manage a consistent version of the NVAIE vGPU Driver at scale.

vSphere Lifecycle Manager

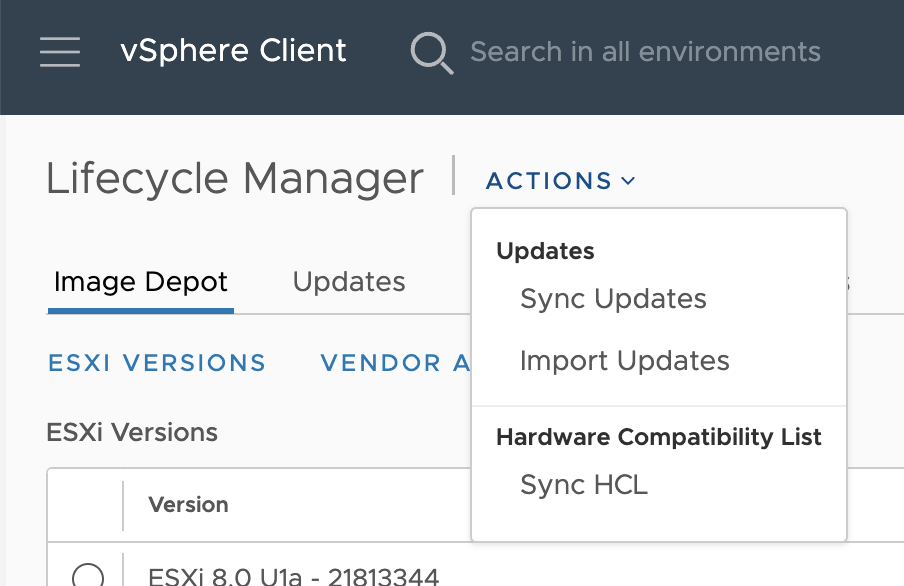
vSphere Lifecycle Manager (vCLM) integrates the NVAIE GPU driver with the vSphere base image to enforce consistency across the ESXi hosts in the cluster. To extend the base image, import the NVAIE GPU driver component by opening up the vSphere client menu (click on the three lines in the top left corner next to vSphere Client) select Lifecycle Manager, select ACTIONS, Import Updates.

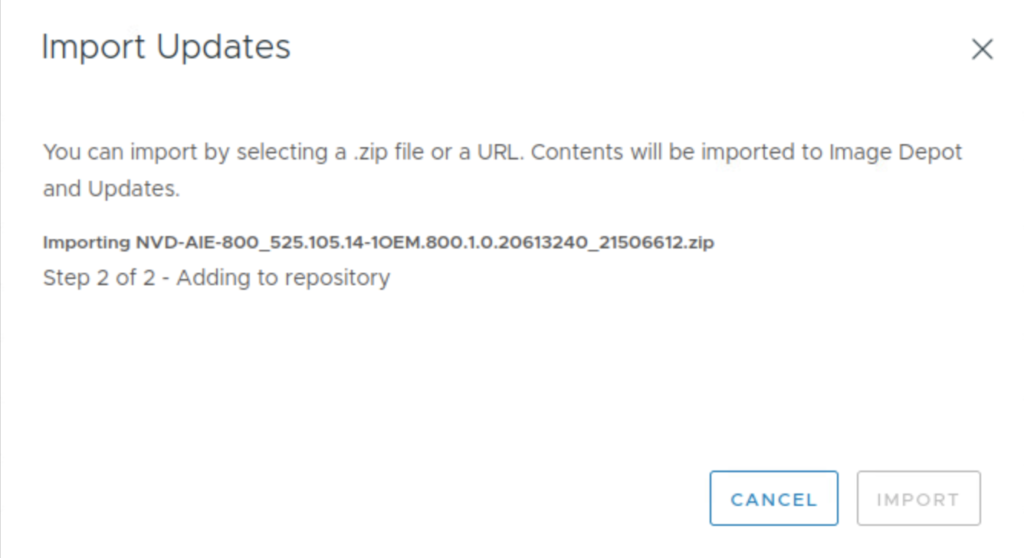
Browse to the download location of the NVAIE vGPU driver and select the Host Driver Zip file to IMPORT.

Verify if the import of the driver component is successful by clicking on Image Depot. Search the Components list.

To extend the base image with the newly added component, go to the vCenter Inventory view, right-click the vSphere cluster, choose Settings, and click the update tab.

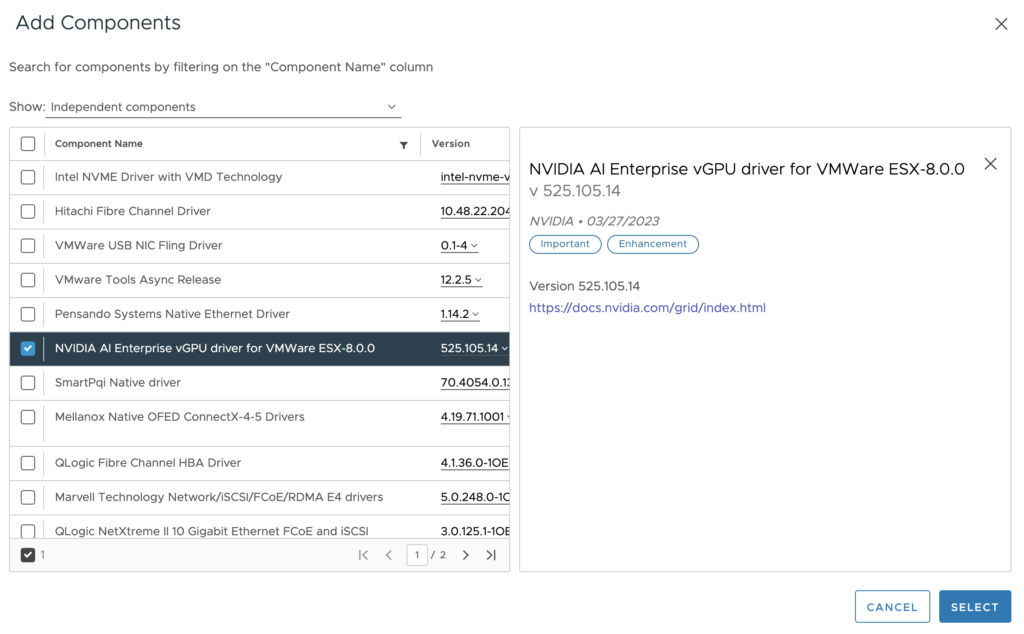
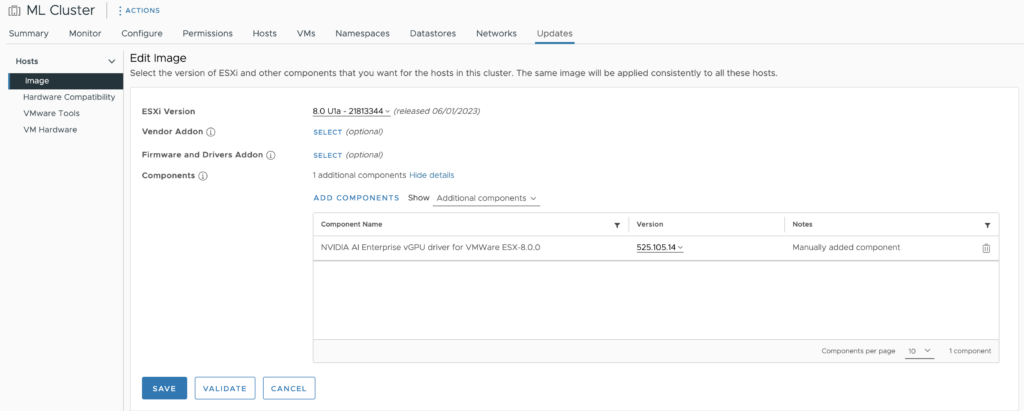
In the Image view, Click on EDIT, review the confirmation, and choose RESUME EDITING. Click on ADD COMPONENTS, add the NVIDIA AI Enterprise vGPU driver for VMware ESX-version number, and choose SELECT.

The driver is added to the base Image. Click on Save.

The ESXi hosts in the cluster should be listed as non-compliant. Select the ESXi hosts to validate and remediate to apply the new base image. Once the base image is installed on all ESXi hosts, the Image Compliance screen indicates that all ESXi hosts in the cluster are compliant.

The cluster is ready to deploy vGPU-enabled virtual machines.

Manual NVAIE vGPU Driver Install

If multiple ESXi hosts in the cluster contain GPUs, it is efficient to store the ESXi host driver on a shared datastore accessible by all ESXi hosts.

Uploading the Driver to a Shared Repository 

In this example, I upload the ESXi host driver to the vSAN datastore. SFTP requires SSH to be active. Enable it via the Host configuration of the Inventory view of vCenter, go to the Configure Menu option of the host, System, Services, click on SSH, and select Start. Remember, this service keeps on running until you boot the ESXi host. A folder is created iso/nvaie. Use the put command to transfer the file to the vSAN datastore

% sftp root@esxi host
(root@esxi host) Password: 
Connected to esxi host
sftp> lpwd
Local working directory: /home/vadmin/Downloads/NVIDIA-AI-Enterprise-vSphere-8.0-525.105.14-525.105.17-528.89/Host_Drivers
sftp> cd /vmfs/volumes/vsanDatastore/iso/nvidia/
sftp> lls
NVD-AIE-800_525.105.14-1OEM.800.1.0.20613240_21506612.zip       nvd-gpu-mgmt-daemon_525.105.14-0.0.0000_21514245.zip
NVD-AIE_ESXi_8.0.0_Driver_525.105.14-1OEM.800.1.0.20613240.vib
sftp> put NVD-AIE-800_525.105.14-1OEM.800.1.0.20613240_21506612.zip 
Uploading NVD-AIE-800_525.105.14-1OEM.800.1.0.20613240_21506612.zip to /vmfs/volumes/vsan:5255fe0bd2a28e17-a7cdc87427ad0c55/869a9363-2ca2-c917-f0f6-bc97e169cdf0/nvidia/NVD-AIE-800_525.105.14-1OEM.800.1.0.20613240_21506612.zip
NVD-AIE-800_525.105.14-1OEM.800.1.0.20613240_21506612.zip                                               100%  108MB  76.6MB/s   00:01    

Install the NVAIE vGPU Driver

Before installing any software components on an ESXi host, always ensure that no workloads are running by putting the ESXi host into maintenance mode. Right-click the ESXi host in the cluster view of vCenter, select the submenu Maintenance mode, and select the option Enter Maintenance mode. 

Install the NVIDIA vGPU hypervisor host driver and the NVIDIA GPU Management daemon using the esxcli command: esxcli software component apply -d /path_to_component/NVD-AIE-%.zip

% esxcli software component apply -d /vmfs/volumes/vsanDatastore/iso/nvidia/NVD-AIE-800_525.105.14-1OEM.800.1.0.20613240_
21506612.zip
Installation Result
   Message: Operation finished successfully.
   Components Installed: NVD-AIE-800_525.105.14-1OEM.800.1.0.20613240
   Components Removed:
   Components Skipped:
   Reboot Required: false
   DPU Results:

Please note that the full path is required, even if you are running the esxcli command from the directory where the file is located. And although the output indicates that no reboot is required, reboot the ESXi host to load the driver.

Verify the NVAIE vGPU Driver

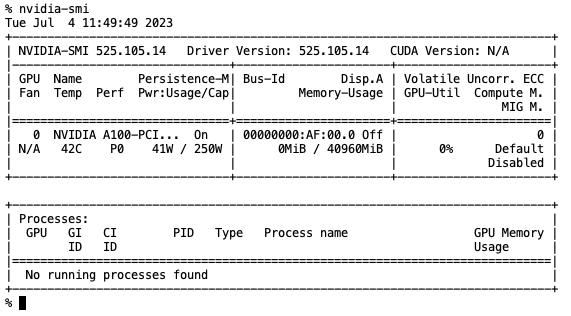
Verify if the driver is operational by executing the command nvidia-smi in an SSH session. 

Unfortunately, NVIDIA SMI doesn’t show whether an NVD-AIE or a regular vGPU driver is installed. If you are using an A30, A100, or H100, NVIDIA-SMI only works if an NVD-AIE driver is installed. You can check the current loaded VIB in vSphere with the following command:

% esxcli software component list | grep NVD
NVD-AIE-800                     NVIDIA AI Enterprise vGPU driver for VMWare ESX-8.0.0                                            525.105.14-1OEM.800.1.0.20613240     525.105.14              NVIDIA        03-27-2023     VMwareAccepted    host

The UI shows that the active type configuration is now Shared Direct.

The cluster is ready to deploy vGPU-enabled virtual machines. The next article focusses on installing the TKGs NVAIE GPU Operator.

Previous articles in the vSphere ML Accelerator Spectrum Deep Dive Series:

  • vSphere ML Accelerator Spectrum Deep Dive Series
  • vSphere ML Accelerator Spectrum Deep Dive – Fractional and Full GPUs
  • vSphere ML Accelerator Spectrum Deep Dive – Multi-GPU for Distributed Training
  • vSphere ML Accelerator Spectrum Deep Dive – GPU Device Differentiators
  • vSphere ML Accelerator Spectrum Deep Dive – NVIDIA AI Enterprise Suite
  • vSphere ML Accelerator Spectrum Deep Dive – ESXi Host BIOS, VM, and vCenter Settings
  • vSphere ML Accelerator Spectrum Deep Dive – Using Dynamic DirectPath IO (Passthrough) with VMs
  • vSphere ML Accelerator Spectrum Deep Dive – NVAIE Cloud License Service Setup

Filed Under: AI & ML

vSphere ML Accelerator Spectrum Deep Dive – NVAIE Cloud License Service Setup

July 5, 2023 by frankdenneman

Next in this series is installing the NVAIE GPU operator on a TKGs guest cluster. However, we must satisfy a few requirements before we can get to that step.

  • NVIDIA NVAIE Licence activated
  • Access to NVIDIA NGC NVIDIA Enterprise Catalog and Licensing Portal
  • The license Server Instance activated
  • NVIDIA vGPU Manager installed on ESXi Host with NVIDIA GPU Installed
  • VM Class with GPU specification configured
  • Ubuntu image available in the content library for TKGs Worker Node
  • vCenter and Supervisor Access

The following diagram provides an overview of all the components, settings, and commands involved.

Although I do not shy away from publishing long articles, these steps combined are too much for a single article. I’ve split the process up in three separate articles:

  • NVAIE Cloud License Service Setup
  • NVIDIA vGPU Manager Install
  • TKGs GPU operator install

In this article, I follow a greenfield scenario where no NVIDIA license service instance is set up. As I cannot describe your internal licensing processes, I list the requirements of access rights and permissions to set up the NVIDIA license.

NVIDIA NVAIE Licence activated

All commercial-supported software installations require a license key, and the NVAIE suite is no different. In NVIDIA terms, this license key is called the Product Activation Key ID (PAK ID) and it’s necessary to set up a License Service Instance. The component which distributes and tracks client license allocation. Before you start your journey, ensure you have this PAK ID or have access to a fully configured License Service Instance.

Access to NVIDIA NGC NVIDIA Enterprise Catalog and Licensing Portal

The NVIDIA AI Enterprise software is available via the NGC NVIDIA Enterprise Catalog (GPU operator repository) and the NVIDIA License Portal (ESXi VIBs). This software is only available for users linked to an NVAIE-licensed organization. The pre-configured GPU Operator differs from the open-source GPU Operator in the public NGC catalog. The differences are:

  • It is configured to use a prebuilt vGPU driver image (Only available to NVIDIA AI Enterprise customers)
  • It is configured to use containerd as the container runtime
  • It is configured to use the NVIDIA License System (NLS)

In larger organizations, a liaison manages NVIDIA licensing, who can get your NGC account listed as a part of the company’s NGC organization and provide you access to the NVIDIA Enterprise Application Hub licensing portal. These steps are out-of-scope for this article. The starting point for this article is that you have:

  • an NGC account connected to an NGC org that has access to NGC NVIDIA Enterprise Catalog for downloading the drivers and helm charts
  • an NVIDIA Enterprise Application Hub account that has access to the NVIDIA licensing portal for creating a License Service Instance or download a client configuration token
  • An NVIDIA Entitlement Certificate with a valid Product Activation Key (PAK) ID if you plan to install a License Service Instance.

Please note that I’m an employee of VMware, I do not own the licenses, nor did I participate in the process of obtaining the licenses. I requested the licenses via a VMware internal process. I have no knowledge of internal NVIDIA processes which provides access to the NGC NVIDIA Enterprise Catalog or the NVIDIA licensing portal. I cannot share my product activation key ID. Please connect with your NVIDIA contact for these questions.

Selecting a License Service Instance Type

The NVIDIA License system supports two license server instances:

  • Cloud License Service (CLS) instance
  • Delegated License Service (DLS) instance

For AI/ML workloads, most customers prefer the CLS instance hosted by the NVIDIA license portal. Since NVIDIA maintains the CLS instance, the on-prem platform operators do not have to worry about the license service instance’s availability, scalability, and lifecycle management. The only requirement is that workloads can connect to the CLS instance. To establish communication between the workload clients and the CLS instance, the following firewall or proxy server ports must be open:

PortProtocolEg-/IngressServiceSourceDestination
80TLS, TCPEgressLicense releaseClientCLS
443TLS, TCPEgressLicense acquisition
License renewal
ClientCLS

A DLS instance is necessary if you are running an ML cluster in an air-gapped data center. The DLS instance is fully disconnected from the NVIDIA licensing portal. The VI-admin must manually download the licenses from the NVIDIA license portal and upload them to the instance. A highly available DLS setup is recommended to provide licensed clients with continued access to NVAIE licenses if one DLS instance fails. A DLS instance can either run as a virtual appliance or as a containerized software image. The minimum footprint of the DLS virtual appliance is 4 vCPUs, 8GB RAM, and 10GB disk space. A fixed or reserved DHCP address and an FQDN must be registered before installing the DLS virtual appliance. It is recommended to synchronize the DLS virtual appliance with an NTP server. Please review the NVIDIA License System User Guide for a detailed installation guide and an overview of all the required firewall rules. For this example, A CLS instance is created and configured. 

Setting up a Cloud License Service Instance

Log in to the NVIDIA Enterprise Application Hub anc click on NVIDIA Licensing Portal to go to the “NVIDIA licensing portal”.

Creating a License Server

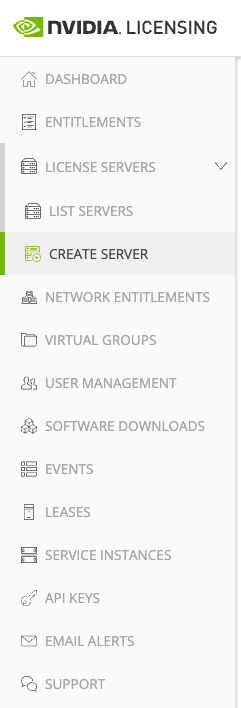
Expand “License Server” in the menu on the left of your screen and select “create server”

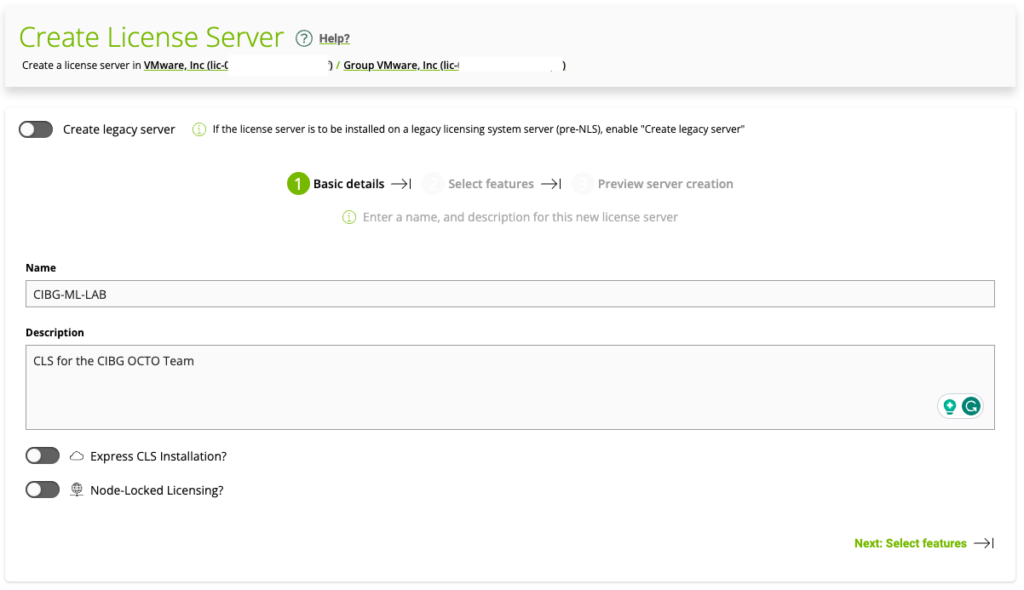
Ensure “Create legacy server” is disabled (slide to the left) and provide a name and description for your CLS. Click on “Select features”. The node-locked functionality allows air-gapped client systems to obtain a node-locked vGPU software license from a file installed locally on the client system. The express CLS installation.

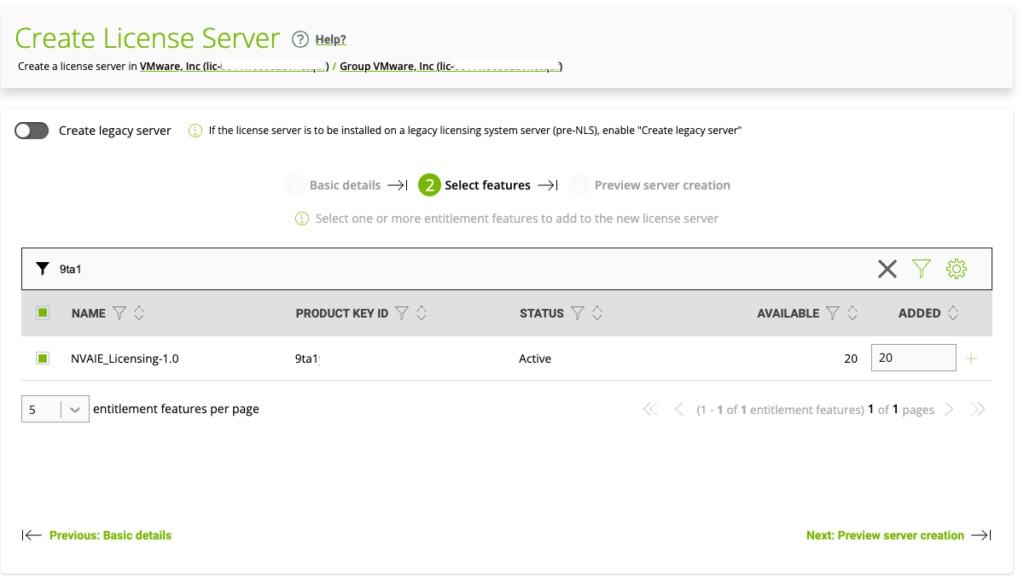
Find your licensed product using the PAK ID that is listed in your NVIDIA Entitlement Certificate. The PAK ID should contain 30 alphanumeric characters).

In the textbox in the ADDED column, enter the number of licenses for the product that you want to add. Click Next: Preview server creation.

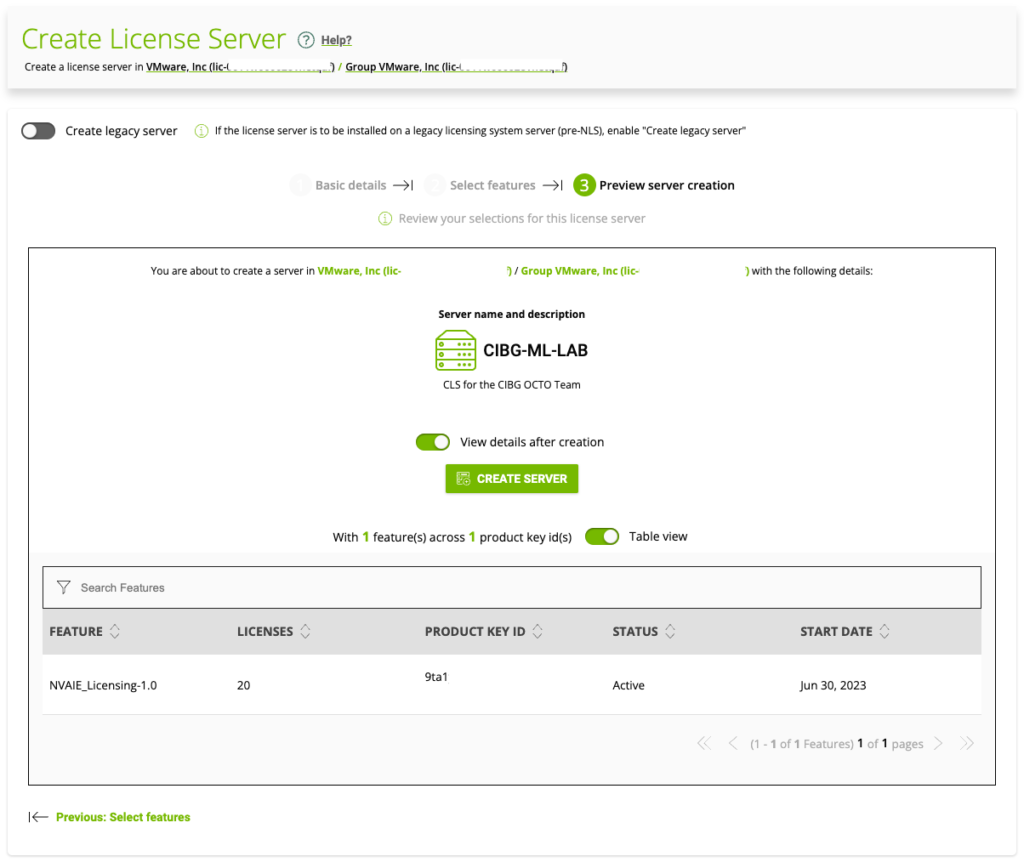
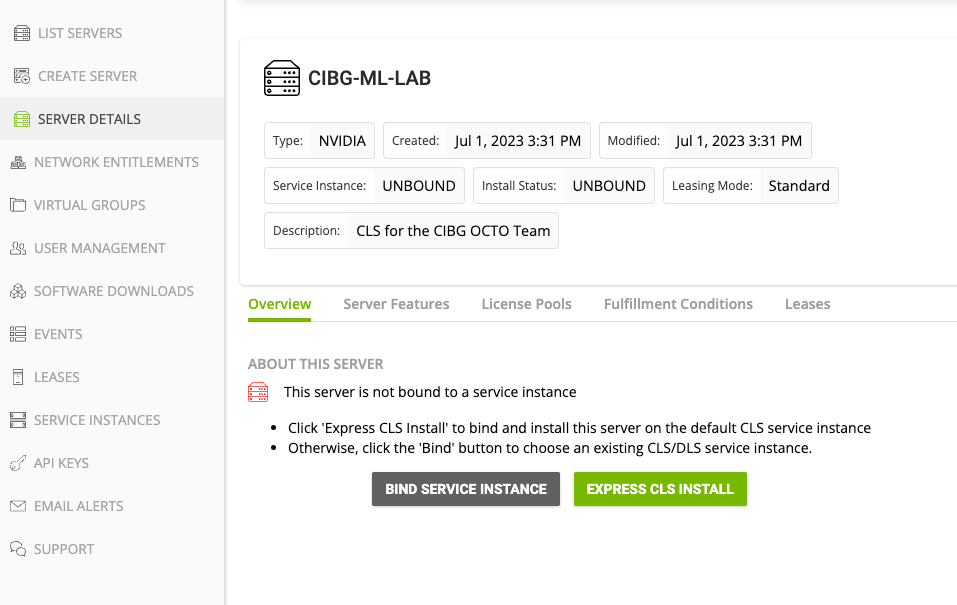
On the Preview server creation page, click CREATE SERVER. Once the server is created, the portal shows the license server is in an “unbound state”.

Creating a CLS Instance 

In the left navigation pane of the NVIDIA Licensing Portal dashboard, click SERVICE INSTANCES.

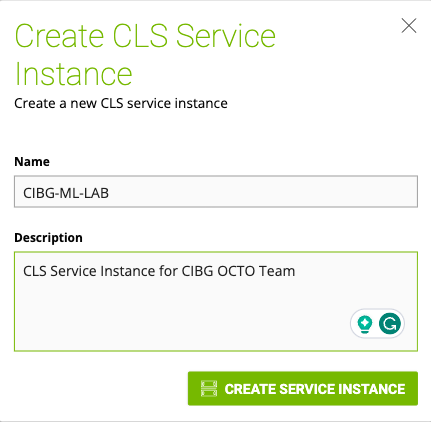
Provide a name and description for the CLS Service Instance.

Binding a License Server to a Service Instance

Binding a license server to a service instance ensures that licenses on the server are available only from that service instance. As a result, the licenses are available only to the licensed clients that are served by the service instance to which the license server is bound.

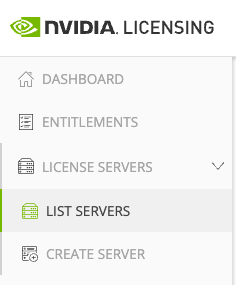
In the left menu, select License Servers, and click LIST SERVERS.

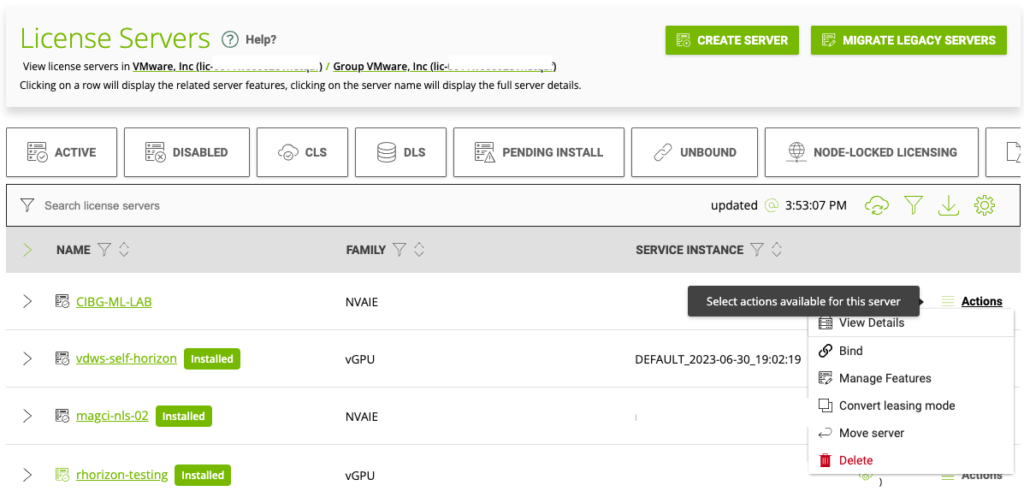
Find your license server using its name, click the Actions button on the right side of your screen, and select Bind.

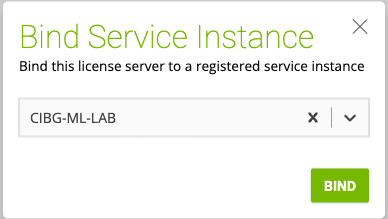
In the Bind Service Instance pop-up window that opens select the CLS service instance to which you want to bind the license server and click BIND. The Bind Service Instance pop-up window confirms that the license server has been bound to the service instance.

The event viewer lists the successful bind action.

Installing a License Server on a CLS Instance

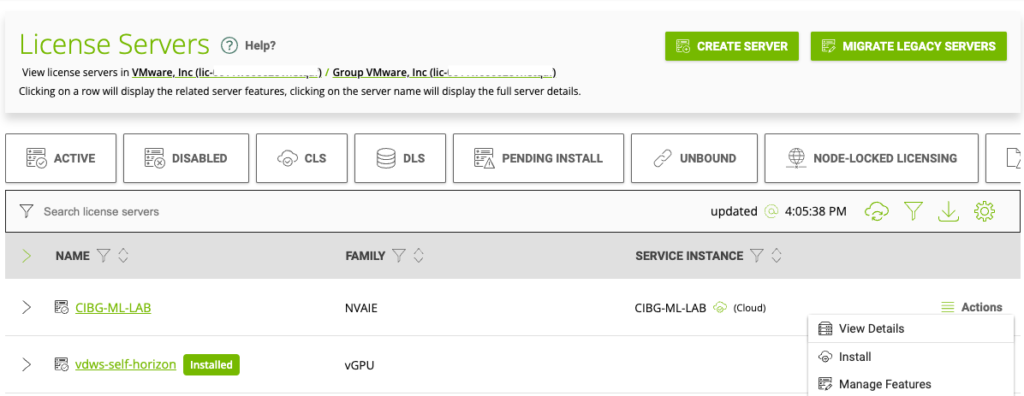
This step is necessary if you are using multiple CLS instances in your organization that is registered at NVIDIA and you are using the new CLS instance, not the default CLS instance for the organization. In the left navigation pane, expand LICENSE SERVER and click LIST SERVERS. Select your License Server, click on Actions, and choose Install.

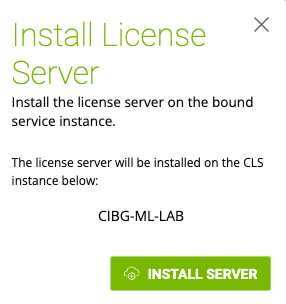
In the Install License Server pop-up window that opens, click INSTALL SERVER.

The event viewer lists a successful deployment of the license service on the service instance.

The next step is to install the NVIDIA NVAIE vGPU Driver on the ESXi host. This step is covered in the next article.

Previous articles in the vSphere ML Accelerator Spectrum Deep Dive Series:

  • vSphere ML Accelerator Spectrum Deep Dive Series
  • vSphere ML Accelerator Spectrum Deep Dive – Fractional and Full GPUs
  • vSphere ML Accelerator Spectrum Deep Dive – Multi-GPU for Distributed Training
  • vSphere ML Accelerator Spectrum Deep Dive – GPU Device Differentiators
  • vSphere ML Accelerator Spectrum Deep Dive – NVIDIA AI Enterprise Suite
  • vSphere ML Accelerator Spectrum Deep Dive – ESXi Host BIOS, VM, and vCenter Settings
  • vSphere ML Accelerator Spectrum Deep Dive – Using Dynamic DirectPath IO (Passthrough) with VMs
  • vSphere ML Accelerator Spectrum Deep Dive – NVAIE Cloud License Service Setup

Filed Under: AI & ML

vSphere ML Accelerator Spectrum Deep Dive – Using Dynamic DirectPath IO (Passthrough) with VMs 

June 6, 2023 by frankdenneman

vSphere 7 and 8 offer two passthrough options, DirectPath IO and Dynamic DirectPath IO. Dynamic DirectPath IO is the vSphere brand name of the passthrough functionality of PCI devices to virtual machines. It allows assigning a dedicated GPU to a VM with the lowest overhead possible. DirectPath I/O assigns a PCI Passthrough device by identifying a specific physical device located on a specific ESXi host at a specific bus location on that ESXi host using the Segment/Bus/Device/Function format. This configuration path restricts that VM to that specific ESXi host.

In contrast, Dynamic DirectPath I/O utilizes the assignable hardware framework with vSphere that provides a key-value method using custom or vendor-device-generated labels. It allows vSphere to decouple the static relationship between VM and device and provides a flexible mechanism for assigning PCI devices exclusively to VMs. In other words, it makes passthrough devices work with DRS initial placement and, subsequently vSphere HA. 

The assignable hardware framework allows a device to describe itself with key-value attributes. The framework allows the VM to specify the attributes of the device. It relies on the framework to match these two for design assignment before DRS handles the virtual machine placement decision. It allows operation teams to specify custom labels that help to indicate hardware or site-specific functionality. For example, Labels in a heterogeneous ML cluster can designate which GPUs serve for training and inference workloads. 

DirectPath IODynamic DirectPath IO
VMX device configuration notationpciPassthru%d.id =<SBDF>pciPassthru%d.allowedDevices = <vendorId:deviceId>
pciPassthru%d.customLabel = <string value>
ExamplepciPassthru0.id= 0000:AF:00.0pciPassthru0.allowedDevices = “0x10de:0x20f1”
pciPassthru0.customLabel = “Training”
Example explanationThe VM is configured with a passthrough device at SBDF address of 0000:AF:00.0The VM is configured with a passthrough device that has vendor ID as “0x10de” and device model id as “0x20f1” The custom label indicates this device is designated as a Training device by the organization.
ImpactThe device is assigned statically at VM configuration time.

The VM is not migratable across ESXi hosts because it is bound to that specific device on that specific ESXi host.
The VM is configured with a passthrough device with vendor ID as “0x10de” and device model id as “0x20f1” The custom label indicates this device is designated as a Training device by the organization.

The operations team can describe what kind of device a VM needs. Dynamic Directpath IO, with the help of the assignable hardware framework, assigns a device that satisfies the description. As DRS has a global view of all the GPU devices in the cluster, it is DRS that coordinates the matching of the VM, the ESXi host, and the GPU device. DRS selects and GPU device and moves the VM to the corresponding ESXi host. During power on, the host services follow up on DRS’s decision and assign the GPU device to the VM.

The combination of vSphere clustering services and Dynamic DirectPath IO is a significant differentiator between running ML workloads on a virtualized platform and bare-metal hosting. Dynamic DirectPath IO allows DRS to automate the initial placement of accelerated workloads. With Dynamic DirectPath IO and vSphere HA, workloads can frictionlessly return to operation on other available hardware if the current accelerated ESXi host fails.

Initial Placement of Accelerated Workload

Dynamic DirectPath I/O solves scalability problems within accelerated clusters. If we dive deeper into this process, the system must take many steps to assign a device to a VM. In a cluster, you must find a compatible device and match the physical device to the device listed in the VM(X) configuration. The VMkernel must perform some accounting to determine that the physical device is assigned to the VM. With DirectPath IO, the matching and accounting process uses the host, bus, and other PCIe device locator identifiers. With Dynamic DirectPath IO, the Assignable Hardware framework (AH) is responsible for the finding, matching, and accounting. AH does not expose any API functionality to user-facing systems. It is solely an internal framework that provides a search and accounting service for vCenter and DRS. NVIDIA vGPU utilizes AH as well. The ESXi host implements a performance or consolidation allocation policy using fractional GPUs. AH helps assign weights to a device instance to satisfy the allocation policy while multiple available devices in the vSphere cluster match the description. But more on that in the vGPU article. 

For Dynamic DirectPath IO, DRS uses the internal AH search engine to find a suitable host within the cluster and selects an available GPU device if multiple GPUs exist in the ESXi host. Every ESXi host reports device assignments and the GPU availability to AH. During the host selection and VM initial placement process, DRS provides GPU device selection as a hint to the VMkernel processes running within the ESXi. During the power-on process, the actual device assignment happens. 

If an ESXi host fails, vSphere High Availability restarts the VMs on the remaining ESXi hosts within the cluster. If vCenter runs, HA relies on DRS to find an appropriate ESXi host. With Dynamic DirectPath IO, AH assists DRS in finding a new host based on the device assignment availability. Workloads automatically restart on the remaining available GPUs without any human intervention. With DirectPath IO, the VM is powered down by HA during an isolation event or has crashed due to an ESXi host failure. However, it will remain powered off, as the VM is confined to running on that specific host due to its static SBDF configuration.

Default ESXi GPU Setting

Although DirectPath IO and Dynamic DirectPath IO are the brand names we at VMware like to use in most public-facing collateral, most of the UI uses the term passthrough as the name of the overarching technology. (If we poke around with the esxcli, we also see Passthru.) But the two DirectPath IO types are distinguished at VM creation time as “Access Type”. A freshly installed ESXi OS does not automatically configure the GPU as a passthrough device. If you select the accelerated ESXi host in the inventory view and click on the configure menu, and click on PCIe Devices.

Graphics shows that the GPU device is set to Basics Graphics Type and in a Shared configuration. It is the state the device should be in before configuring either any DirectPath IO type or NVIDIA vGPU functionality. 

You can verify these settings via the CLI: 

esxcli graphics device list
esxcli graphics host get

Enable Passthrough

Once we know the GPU device is in its default state, we can go back to the PCI Devices overview, select GPU Device, and click “Toggle Passthrough.”

The UI reports that the GPU device has enabled Passthrough.

Now, the UI list the active type of the GPU device as Direct.

Keep the Graphics Device Settings set to shared (NVIDIA vGPU devices use Shared Direct).

You can verify these settings via the CLI.

esxcli graphics device list

esxcli graphics host get

Add Hardware Label to PCI Passthrough Device

Select the accelerated ESXi host in the inventory view, click on the configure menu, click on PCIe Devices, select Passthrough-enabled Devices, and select the GPU device.

Click on the “Hardware Label” menu option and provide a custom label for the device. For example, “Training.” Click on OK when finished.

You can verify the label via the CLI with the following command:

esxcli hardware pci list | grep NVIDIA -B 6 -A 32

Create VM with GPU Passthrough using Dynamic DirectPath IO

To create a VM with a GPU assigned using Dynamic DirectPath IO, VM level 17 is required. The following table lists the available vSphere functionality for VMs that have a Directpath IO and Dynamic DirectPath 
IO device associated with them.

FunctionalityDirectPath IODynamic DirectPath IO
Failover HANoYes
Initial Placement DRSNoYes
Load Balance DRSNoNo
vMotionNoYes
Host Maintenance ModeShutdown VM and ReconfigureCold Migration
SnapshotNoNo
Suspend and ResumeNoNo
Fractional GPUsNoNo
TKGs VMClass SupportNoYes

To associate a GPU device using Dynamic DirectPath IO, open the VM configuration, click “Add New Device,” and select “PCI Device.”

Select the appropriate GPU Device and click on Select.

The UI shows the new PCI device using Dynamic DirectPath IO in the VM Settings.

RequirementNotes
Supported 64-bits Operating System
Reserve all guest memory(automatically set in vSphere 8)
EFI firmware Boot option
Advanced SettingspciPassthru.set.usebitMMIO = true
pciPassthru.64bitMMIOSizeGB = (size in GB)

The Summary page of the VM lists the ESXi host and the PCIe Device. However, the UI shows no associated VMs connected to the GPU at the Host view. Two commands are available in the CLI. You can verify if a VM is associated with the GPU device with the following command:

esxcli graphics device list

The following command list the associated VM:

esxcli graphics vm list

The following articles will cover NVAIE vGPU driver installation on ESXi and TKGs

Other articles in this series:

  • vSphere ML Accelerator Spectrum Deep Dive Series
  • vSphere ML Accelerator Spectrum Deep Dive – Fractional and Full GPUs
  • vSphere ML Accelerator Spectrum Deep Dive – Multi-GPU for Distributed Training
  • vSphere ML Accelerator Spectrum Deep Dive – GPU Device Differentiators
  • vSphere ML Accelerator Spectrum Deep Dive – NVIDIA AI Enterprise Suite
  • vSphere ML Accelerator Spectrum Deep Dive – ESXi Host BIOS, VM, and vCenter Settings
  • vSphere ML Accelerator Spectrum Deep Dive – Using Dynamic DirectPath IO (Passthrough) with VMs
  • vSphere ML Accelerator Spectrum Deep Dive – NVAIE Cloud License Service Setup

Filed Under: AI & ML

  • « Go to Previous Page
  • Page 1
  • Page 2
  • Page 3
  • Page 4
  • Interim pages omitted …
  • Page 89
  • Go to Next Page »

Copyright © 2025 · SquareOne Theme on Genesis Framework · WordPress · Log in